Azure IoT and Arduino – Part2
In Part1 of the Azure IoT and Arduino blog series, I showed how to hook up an Arduino Feather HUZZAH to Windows 10 and get it to run a simple blinky test. This post will build on that and show how to connect a DHT22 temperature and humidity sensor. All of this information is found online but in different locations so this blog will gather it all together into a single post. Part 3 of this series of posts will show how to send the temperature data to Microsoft Azure.
To get started, a few additional libraries need to be added to the Arduino IDE in order to work with the DHT sensor. Those two items are:
- DHT sensor library
- Adafruit Unified Sensor library
The DHT sensor library are drivers and classes for working with DHT sensors, and the Adafruit unified sensor library combines sensor data into a single 'type' while abstracting details for all the different sensors. What this provides is the ability to take any supported sensor and plug it in and it should work. Pretty sweet.
DHT Sensor Library
We'll begin by installing the DHT library first. In the Arduino IDE, click on the Sketch menu, then select Include Library -> Manage Libraries, as shown in Figure 1.
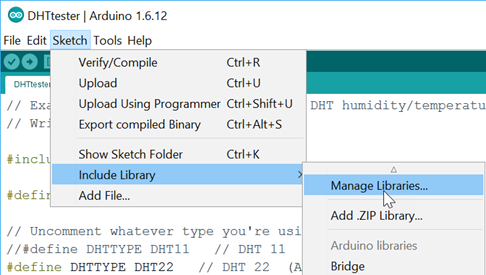
Figure 1
In the Library Manager dialog, type in DHT Sensor Library in the search box, as shown in Figure 2. Click the DHT sensor library, select the version, then click Install. When I built this solution, version 1.2.3 was the latest, but in checking at the time of this writing, version 1.3.0 is the latest. Either should work.

Figure 2
Once the DHT sensor library is installed, click Close on the Library Manager dialog.
Unified Sensor Driver
Now do the same thing for the Adafruit DHT Unified library but the install for this is a little different. Open your favorite browser and navigate to the following URL:
https://github.com/adafruit/Adafruit_Sensor
On the Adafruit sensor page, click green Clone or download link, and select Download ZIP, as shown in Figure 3, and save it to a location on your PC. The file will be called Adafruit-sensor-master.zip.
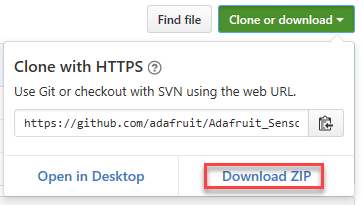
Figure 3
Back in the Arduino IDE, click on the Sketch menu, the select Include Library -> Add .ZIP Library, as shown in Figure 4.
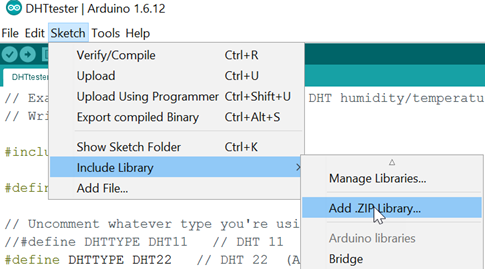
Figure 4
Browse to the location where you saved the zip file and select it, then click Open. The Arduino will install the necessary library into the IDE. The install is very short, and you can verify that both the DHT sensor and the Adafruit Unified Sensor libraries have both been successfully installed by selecting Include Library from the Sketch menu, and you will see both listed in the Recommended libraries section of the menu, as shown in Figure 5.
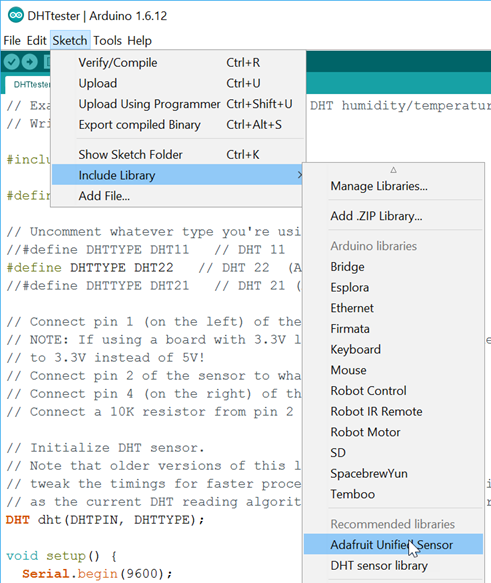
Figure 5
At this point, it's time to hook up the sensor and write the code to read the sensor data.
Hooking up the Sensor
Figure 6 shows how I hooked up the sensor to the Arduino board. The DHT22 sensor needs to be wired up as follows:
- Pin 1 of the DHT22 sensor connects to the VCC (3 to 5V power) on the Arduino (red wire)
- Pin 2 of the DHT22 is the data pin and connects to pin 2 on the Arduino (white wire)
- Ignore pin 3
- Pin 4 of the DHT22 is the ground pin and connects to ground on the Arduino (black wire)
Next, place a 10K resistor between the VCC (power) and data pin. This will act as a medium-strength pull on the data line.
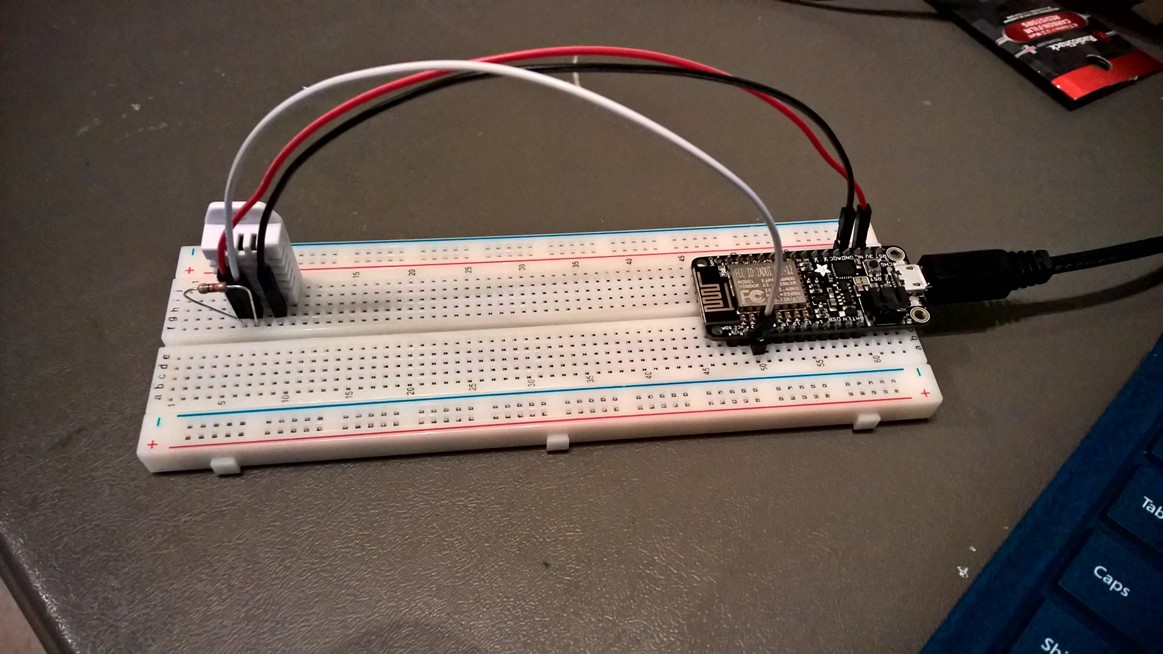
Figure 6
Once you have the sensor hooked up, it's time to write some code.
The Code
If you don't want to write any code, that's good because it's already been written for you. Simply go to https://learn.adafruit.com/dht/downloads and click on the Arduino library and example code for DHT sensors link. This will download a .ZIP file called DHT-sensor-library-master, and in that zip file is a library and example scripts for testing the DHT sensors. Extract the zip file into a directory and navigate to the \examples\DHTtester folder. Open the file in that directory called DHTtester in the Arduino IDE. Notice that it has support for the DHT11 and DHT22 sensors. Simply uncomment the sensor type you are using (in this case the DHT22). Also notice that in this file, all sensor data is sent to the output logs via Serial.print.
You're ready to go! Plug in the Arduino board (as shown in Figure 6) and give it a minute to boot. While it's booting, click the Verify button to compile the sketch. Once it has compiled, click the Upload button to deploy the code to the Arduino board. While it is uploading, select Serial Monitor from the Tools menu which will allow you to see the logs and data read (which is where the Serial.print statements are sending the data). Once the code is uploaded, the Arduino will start reading the DHT sensor data and outputting the results to the serial monitor, as shown in figure 7.
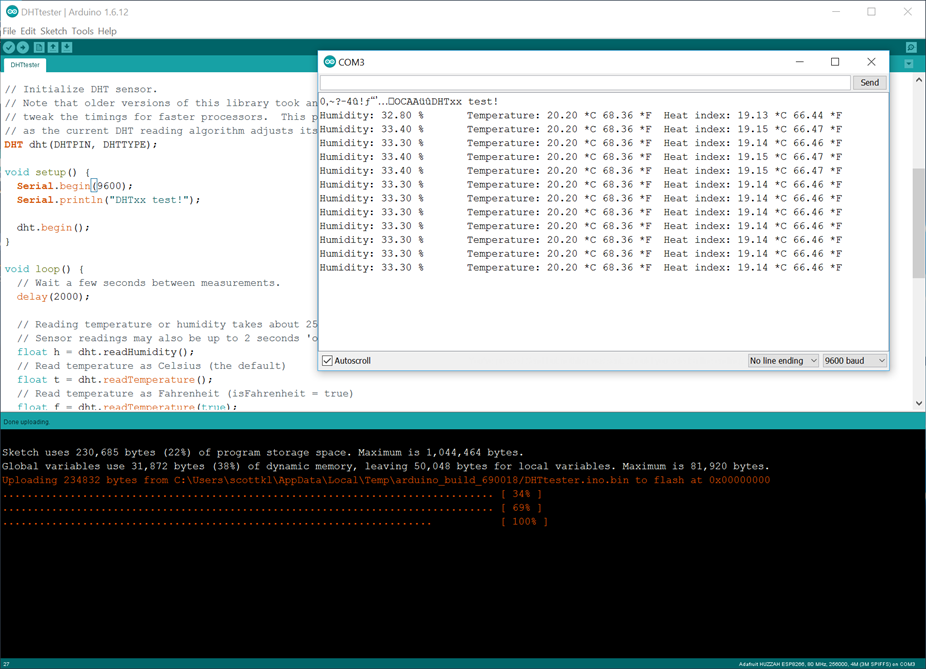
Figure 7
There you go, you are up and running! The next blog post in this series will modify the code to send the sensor data to Azure.