Getting Started with PHP 5.6 and Microsoft SQL Server and Azure SQL Database
This blog will show you how to create a sample PHP server and connect it to Azure SQL Database. You will learn how to create a Microsoft Azure account, provision a logical server in the Azure management portal, create a database populated with sample data, set a firewall rule for the database, use PHP to connect to SQL using Microsoft’s PHP driver and create a working PHP project.
Step 1: Create a Microsoft Account
To create a Microsoft Azure account, click Free Trial and then return to Step 2 when complete. If you already have a Microsoft Azure account, proceed to Step 2 now.
Step 2: Use the Azure Management Portal to create a logical server and a database
- Sign in to the Azure Management portal and then:
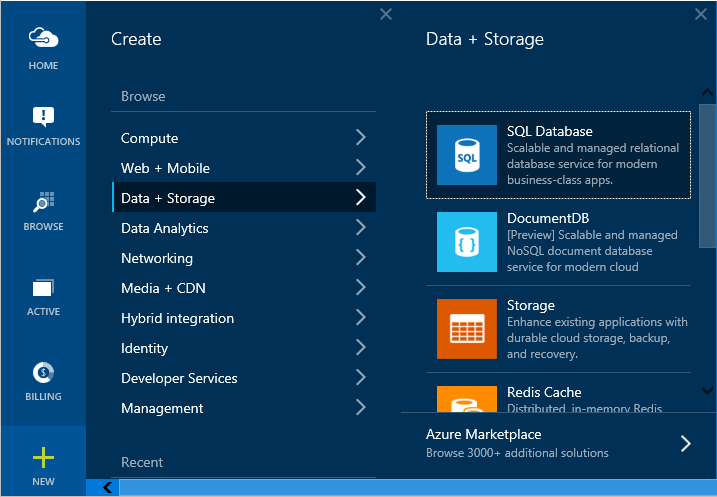
- Click New at the bottom of the page
- From the list of available options, click Data + Storage
- Then click SQL Database
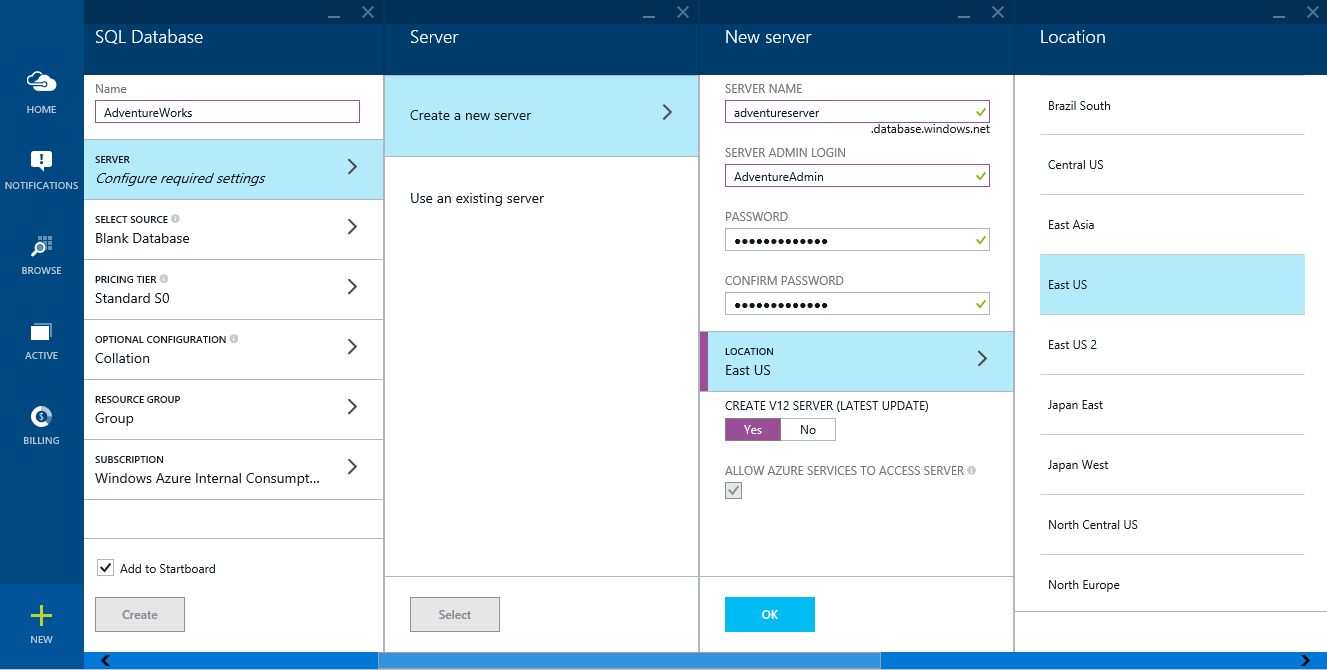
- In the SQL Database blade:
- Choose a Name for your Database, in this example“AdventureWorks”.
- To create the logical server, click Server, then Create a new server.
- Enter a Server Name. Make sure this server name is unique otherwise creation will fail.
- Enter the Server Admin Login, Password, and Confirm Password
- Select the preferred geographical location, typically close to you or your application.
- When completed, click OK
-
- Specify the source of the database by clicking Select Source(optional if you would like to create an empty database)
- Select Sample This will create a database prepopulated with the Adventure Works light schema. It is very important you select this schema for the rest of the example to work
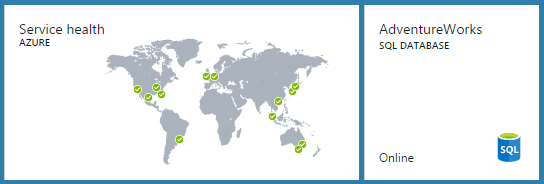
- Lastly, click Create at the bottom of the blade. This will create an Azure SQL Database and pin it the Startboard as shown below.
- Specify the source of the database by clicking Select Source(optional if you would like to create an empty database)
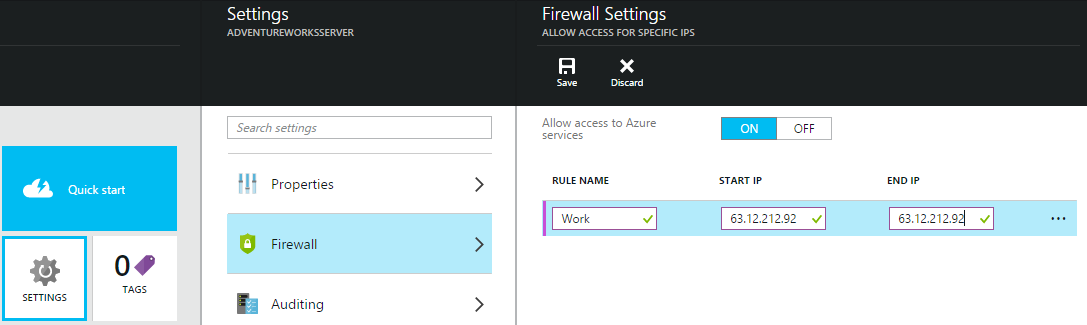
Step 3: Configure the firewall
The following steps will demonstrate how to add a specific IP address as a firewall rule so the database can be accessed from a local client.
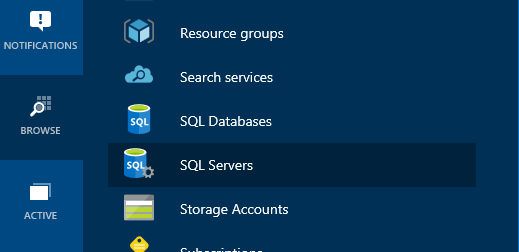
- In the ribbon on the left-hand side of the screen, click Browse and then SQL Servers. Note: Make sure you click on SQL Servers. SQL Databases will have no option for firewall rules.
- From the available options, click the SQL server that you created in Step 2.
- Click Settings, then Firewall.
- Click this link to get you current IP address from Bing: https://www.bing.com/search?q=my%20ip%20address
- In the Firewall Settings, enter a Rule Name, and paste your public IP address from the previous step in Start IP and End IP fields. When complete, click Save at the top of the page. For simplicity if you want your SQL Database to be accessible on every IP, just enter 0.0.0.0 for start ip and 255.255.255.255 for end ip.
Step 4: Setup IIS
- Hit start and enter run.exe
- Enter OptionalFeatures. exe in the text box and hit Ok.
- Check Internet Information Services and expand the drop down.
- Check Web Management Tools and select IIS Management Console inside it.
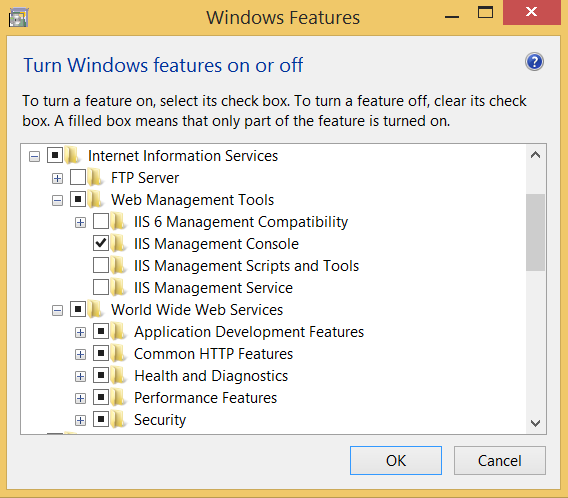
- Check World Wide Web Services and expand the menu.
- Under Application Development Features select CGI and leave the rest unchecked.
- Under Common HTTP Features check Default Document, Directory Browsing, HTTP Errors, and Static Content and leave the rest unchecked.
- Under Health and Diagnostics check Custom logging and HTTP logging. Leave the rest unchecked.
- Under Performance features select Static Content Compression. Leave the rest unchecked.
- Under Security select Request Filtering. Leave the rest unchecked.
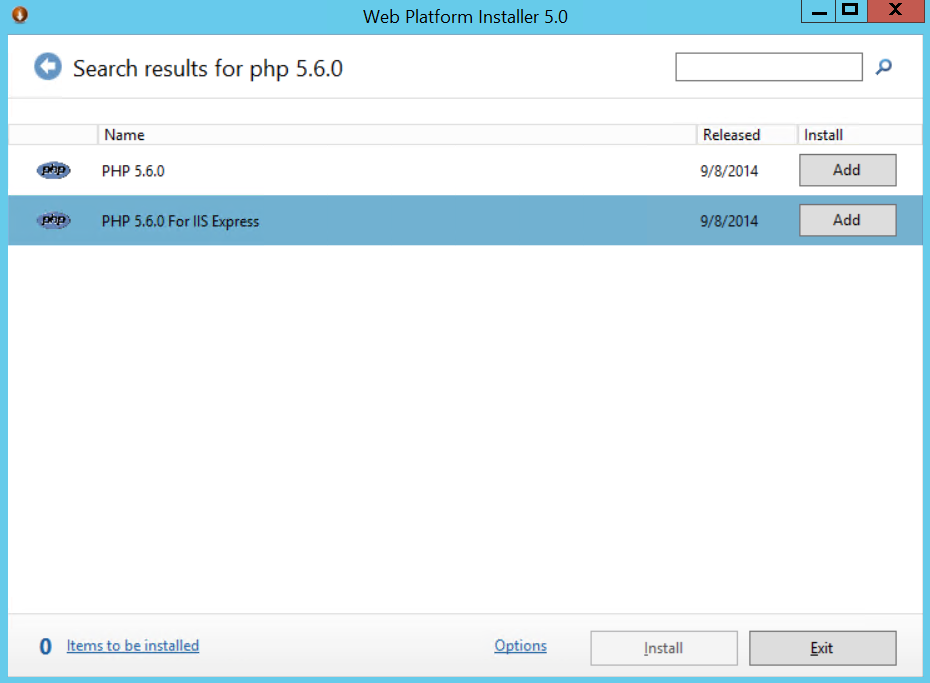
Step 5: Download PHP 5.6.0 for IISExpress, Microsoft ODBC Driver 11 and Microsoft SQL Server Driver
- Download Microsoft Web Platform Installer. Use Internet Explorer as your browser.
- Search for PHP 5.6.0. Choose PHP 5.6.0 for IIS Express and install it.
- Download Microsoft ODBC Driver 11 for SQL Server. Use Internet Explorer as your browser. If you are on 64 bit machine download the 1033\x64\msodbcsql.msi file and if you are on a 32 bit machine download the 1033\x64\msodbcsql.msi file
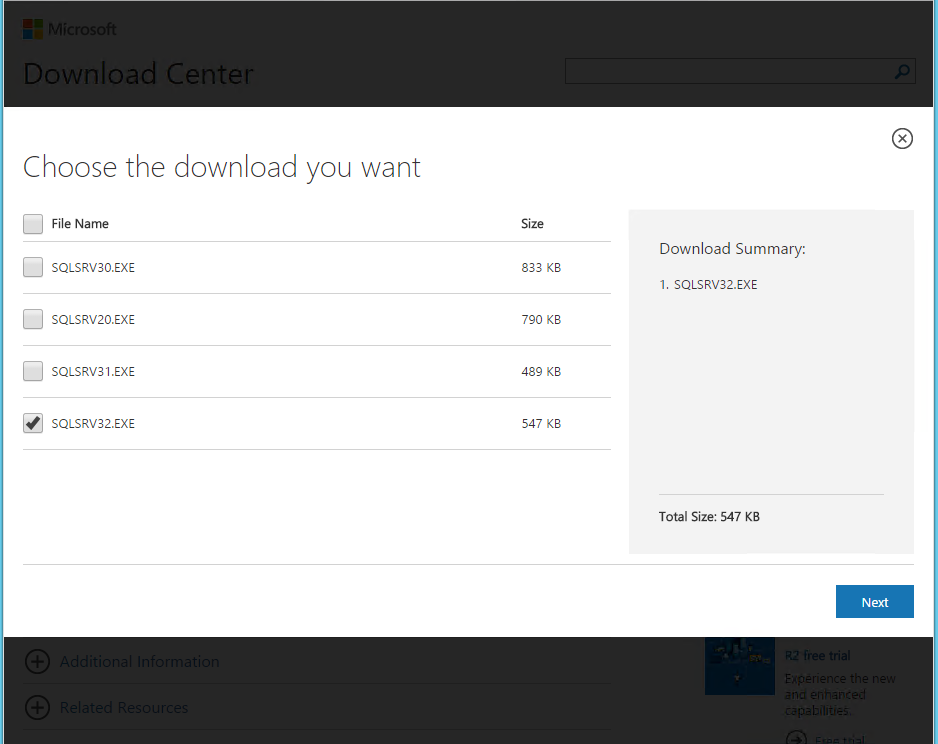
- Download the Microsoft SQL Server Driver. (SQLSRV32.EXE contains the latest bits). Use Internet Explorer as your browser. Once you run the exe, make note of the directory where you store the drivers
Step 6: Get the appropriate driver
- Navigate the directory where you installed Microsoft Drivers for PHP for Microsoft SQL Server.
- Copy the php_sqlsrv_56_nts.dll(56 for php 5.6) and paste it inside C:\Program Files (x86)\PHP\v5.6\ext.
- We are using the nts – non thread safe version for IIS. If you wish to use Apache, us the ts – thread safe version. For our purposes only the nts version will work.
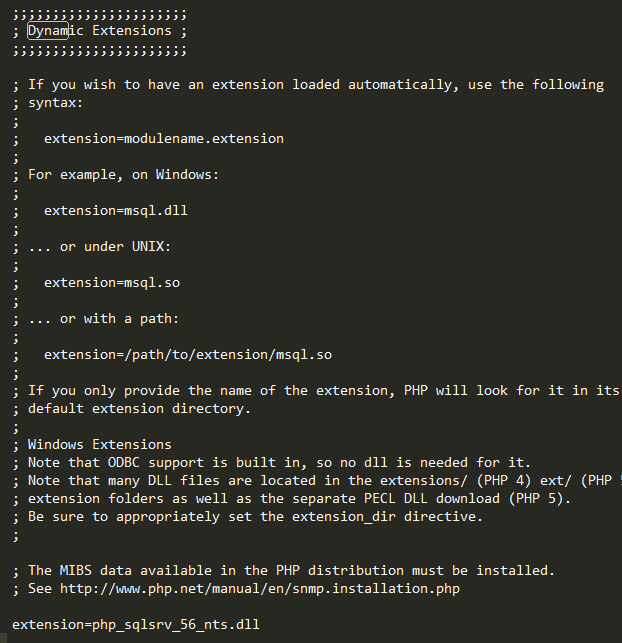
Step 7: Edit the php.ini file
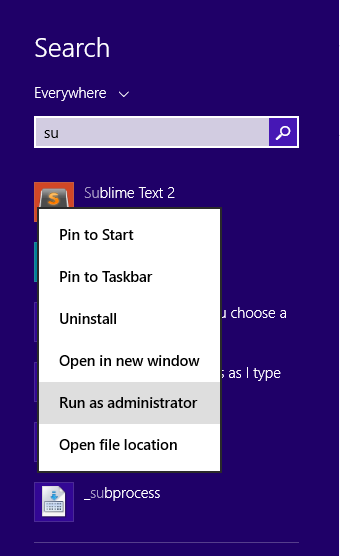
- Open your favorite text editor in administrator mode. In this case we will use Sublime Text.
- Open the C:\Program Files (x86)\PHP\v5.6\php.ini inside Sublime Text.
- Add the following under the Dynamic extensions - extension=php_sqlsrv_56_nts.dll. Save the file
Step 8: Setup your php local server
- Create a new file in Sublime Text and name it index.php. Make sure Sublime Text is running in administrator mode
- Copy and paste the following code inside it and save it inside C:\inetpub\wwwroot
  <?php

 $serverName = "tcp:yourserver.database.windows.net,1433";
 $connectionOptions = array("Database"=>"yourdatabase",
 "Uid"=>"yourusername", "PWD"=>"yourpassword");
 //Establishes the connection
 $conn = sqlsrv_connect($serverName, $connectionOptions);
 //Select Query
 $tsql = "SELECT [CompanyName] FROM SalesLT.Customer";
 //Executes the query
 $getProducts = sqlsrv_query($conn, $tsql);
 //Error handling
 if ($getProducts == FALSE)
 die(FormatErrors(sqlsrv_errors()));
 $productCount = 0;
 $ctr = 0;
 ?>
 <h1> First 10 results are : </h1>
 <?php
 while($row = sqlsrv_fetch_array($getProducts, SQLSRV_FETCH_ASSOC))
 {
 if($ctr>9)
 break;
 $ctr++;
 echo($row['CompanyName']);
 echo("<br/>");
 $productCount++;
 }
 sqlsrv_free_stmt($getProducts);

 $tsql = "INSERT SalesLT.Product (Name, ProductNumber, StandardCost, ListPrice, SellStartDate) OUTPUT INSERTED.ProductID VALUES ('SQL New 1', 'SQL New 2', 0, 0, getdate())";
 //Insert query
 $insertReview = sqlsrv_query($conn, $tsql);
 if($insertReview == FALSE)
 die(FormatErrors( sqlsrv_errors()));
 ?>
 <h1> Product Key inserted is :</h1>
 <?php
 while($row = sqlsrv_fetch_array($insertReview, SQLSRV_FETCH_ASSOC))
 {
 echo($row['ProductID']);
 }
 sqlsrv_free_stmt($insertReview);
 //Delete Query
 //We are deleting the same record
 $tsql = "DELETE FROM [SalesLT].[Product] WHERE Name=?";
 $params = array("SQL New 1");

 $deleteReview = sqlsrv_prepare($conn, $tsql, $params);
 if($deleteReview == FALSE)
 die(FormatErrors(sqlsrv_errors()));

 if(sqlsrv_execute($deleteReview) == FALSE)
 die(FormatErrors(sqlsrv_errors()));

 ?>
Step 9: Test your PHP server
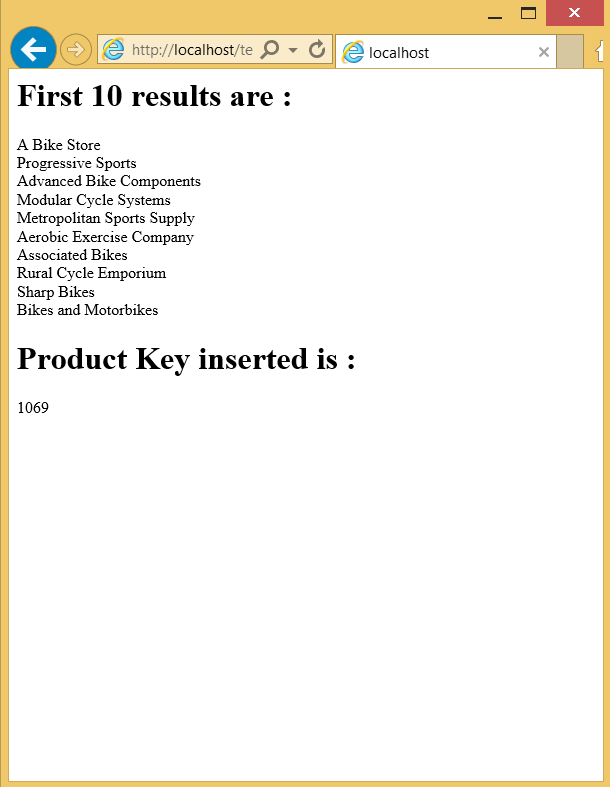
- Go to Internet Explorer and type in https://localhost/index.php
- You should see the following
Congratulations! You have just built your first PHP server with Azure SQL Databases. The source code for the complete reference application can be downloaded here.
If you have any questions, do not hesitate to reach me at mebha at microsoft dot com
Meet Bhagdev
Program Manager
Microsoft Corporation