Walkthrough: Assign Dataset Dynamically Created in Code to your local report with ReportViewer
The Walkthrough: Creating a ReportViewer Report shows how to create a simple table report in a Visual Studio Windows Forms application project based on a predefined dataset and data table in the project. However, sometimes the dataset need to be displayed is not the one you predefined, so the dataset structure cannot be retrieved when you design the report. This article will walk you through the processes of designing a local report and binding it to a dynamically created dataset in code.
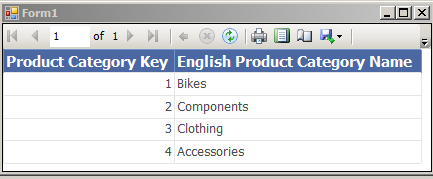
The sample in this article uses the sample AdventureWorksDW2008R2 database. The report displays the Product Category list containing both the category key and category name columns.
Create a new Windows Forms application project
1. Open Visual Studio. On the File menu, point to New, and then select Project.
2. In the Installed Templates pane, select Visual C# .
3. Choose Windows Forms Application.
4. In the Name box, type SimpleReport.
5. In the Location box, enter the directory in which you want to save your project, or click Browse to navigate to it.
6. Click OK.
Define a dataset for report designing
1. In the Project menu, select Add New Item.
2. In the Add New Item dialog, click DataSet. Type a name for the dataset and click Add. The default name is DataSet1.xsd.
This adds a new XSD file to the project and opens the Dataset Designer.
3. From the Toolbox in the Dataset Designer, drag a DataTable control onto the design surface.
We need to set the schema of this table matching the one will be created in code
4. Right click the DataTable and select Add -> Column.
5. Type in ProductCategoryKey as the Data Column name.
6. Add another column set the name to EnglishProductCategoryName
7. Save the DataSet1 file.
Add a new report definition file using the Report Wizard
1. From the Project menu, select AddNew Item.
2. In the Add New Item dialog box, choose Report Wizard.
3. In Name, type Product Category.rdlc and then click Add.
A graphical design surface opens behind the dialog box.
4. In the Dataset Properties page, in the Data source drop-down list, select DataSet1 you created.
The Available datasets box is automatically updated with DataTable1 you created.
5. Click Next.
6. In the Arrange Fields page, drag both Category and Sales from Available fields to the Values box.
7. Click Next twice, then click Finish.
This creates the .rdlc file and opens it in Report Designer. The tablix you designed is now displayed in the design surface like this:
| Product Category Key | English Product Category Name |
| [ProductCategoryKey] | [EnglishProductCategoryName] |
Add the ReportViewer control to your form
1. Click Form1.cs in Solution Explorer.
2. From the View menu, choose Designer.
3. From the Reporting section of the Toolbox, drag the ReportViewer control to the form.
4. Open the smart tags panel of the ReportViewer1 control by clicking the smart-tag glyph on the top right corner. Click the Choose Report drop-down list and select SimpleReport.Sales Orders.rdlc.
Notice that a BindingSource is automatically created corresponding to which point to DataSet1 as DataSource.
5. From the smart tags panel, click Dock in parent container.
Specify the dataset in code to the ReportViewer
1. Click Form1.cs in Solution Explorer and select View Code.
2. Add the following code to the Form_Load event. Since we need access SQL Server Database, please also add using System.Data.SqlClient in the namespace.
private void Form1_Load(object sender, EventArgs e) { SqlConnection con = new SqlConnection("Data Source=.; Initial Catalog=AdventureWorksDW2008R2; Integrated Security=True"); SqlDataAdapter da = new SqlDataAdapter("SELECT ProductCategoryKey, EnglishProductCategoryName FROM DimProductCategory", con); DataSet ds = new DataSet(); da.Fill(ds); ds.Tables[0].TableName = "DataTable1";
this.DataTable1BindingSource.DataSource = ds; this.reportViewer1.RefreshReport(); }
|
In the code, we change the BindingSource to point the dataset created in the code.
3. Build the project and run it. Then we can get the result like this:
Besides dataset, you can also bind the datasource with a Linq result set but just remember to keep the same data scheme as that defined in your report.
Reference