Walkthrough: Working ReportViewer with a complex Business Object with a nested generic list type property as data source for local reports
The MSDN document https://msdn.microsoft.com/en-us/library/ms251784(v=VS.100).aspx shows a good demo on how to use a business object with a ReportViewer control for local processing. This is a simple scenario, however sometimes the situation becomes complex when there is a nested generic List type property defined in the Product class. This article will dig further on handling this complex business object scenario.
Perform the following steps to create a complex business object, design a local report, and display it a ReportViewer control in your .NET Windows Form or Web Form application.
Create a business object as a data source
- 1. Create a Windows Form project in Visual Studio and then create a new class with the file name BusinessObject.cs.
- 2. Replace the default code with the code:
public class Product { private string m_name; private int m_price; private List<int> m_styles;
public Product(string name, int price, List<int> styles) { m_name = name; m_price = price; m_styles = styles; }
public string Name { get { return m_name; } }
public int Price { get { return m_price; } } public List<int> Styles { get { return m_styles; } } }
public class Merchant { private List<Product> products;
public Merchant() { products = new List<Product>(); }
public List<Product> ProductList { get { return products; } }
public void AddProduct(Product product) { products.Add(product); }
}
|
- 3. Build your project. This creates an assembly for the object, which you will later use as a data source for the report.
Add a report to the project
- 1. From the Project menu, select Add New Item.
- 2. In the Add New Item dialog, select Report. Type a name for the report and click Add. This launches the Report Wizard with the Data Source Configuration Wizard.
- 3. In the Choose a Data Source Type page, select Object and click Next.
- 4. In the Select the Data Objects page, expand the class hierarchy under BusinessObject until you see Product in the list. Select Product and click Finish. You now return to the Report Wizard. Notice that the new data source object is added to your project in Solution Explorer.
- 5. Click Next, and then click Finish to quickly finish the report composing.
- 6. Now you can see your local report generated like this.

Add a ReportViewer control to your Windows Form
- 1. Drag a ReportViewer control to your Windows form or Web form.
- 2. Select the ReportViewer control, and open the smart tags panel by clicking the triangle on the top right corner. Click the Choose Report drop-down list and select the report you just designed. For example:

Notice that a BindingSource is automatically created corresponding to each object data source used in the report.
Add code to display your report with ReportViewer control
- 1. Add the following code to the Form_Load event:
Merchant merchant = new Merchant(); merchant.AddProduct(new Product("Bike", 20, new List<int>() { 1, 2, 3 })); merchant.AddProduct(new Product("Towel", 10, new List<int>() { 90, 60, 75 })); this.BindingSource.DataSource = merchant.ProductList; this.reportViewer1.RefreshReport(); |
- 2. Build your project and run it.
- 3. After you run your application, you will find that the Styles field could not be correctly displayed:
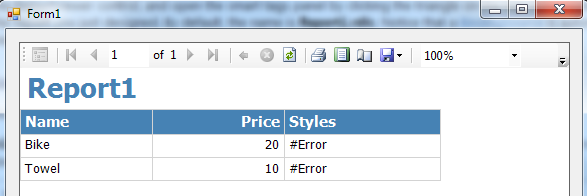
WHAT IS WRONG?
If you look at the output information in Visual Studio, you can find the following warning: Warning: The Value expression used in textbox 'Styles'returned a data type that is not valid. (rsInvalidExpressionDataType) The error is caused by the fact that the Fields!Styles.Value is actually a List<int> type object which cannot be directly displayed in the report.
|
Modify your report for correct display
The following steps will correct the problem and display the styles into a string with the format like "1, 2, 3":
- 1. Double click your report to open it in designer view in Visual Studio.
- 2. Click the top Report menu
- 3. Click Report Properties
- 4. Switch to the Code tab and input the following code:
Public Function GetListItems(intList As System.Collections.Generic.List(Of Integer)) As String() Dim intArrayStr As String() = Array.ConvertAll(Of Integer, String)(intList.ToArray(), New Converter(Of Integer, String)(AddressOf Convert.ToString)) Return intArrayStr End Function |
- 5. Click OK to return to the report
- 6. Replace the Styles field value =Fields!Styles.Value by the expression =Join(Code.GetListItems(Fields!Styles.Value),",") .
- 7. Build and run your project again. Then you can get the result like this:

Reference