Ask Learn
Preview
Ask Learn is an AI assistant that can answer questions, clarify concepts, and define terms using trusted Microsoft documentation.
Please sign in to use Ask Learn.
Sign inThis browser is no longer supported.
Upgrade to Microsoft Edge to take advantage of the latest features, security updates, and technical support.
Note
Access to this page requires authorization. You can try signing in or changing directories.
Access to this page requires authorization. You can try changing directories.
Authors: Rangarajan Srirangam, Mandar Inamdar
Contributors and Reviewers: John Hoang, Sanjay Mishra, Alexei Khalyako, Sourabh Agarwal, Osamu Hirayama, Shiyang Qiu
Azure SQL Data Warehouse is an enterprise-class, distributed database, capable of processing massive volumes of relational and non-relational data. It can deploy, grow, shrink, and pause in seconds. As an Azure service, Azure SQL Data Warehouse automatically takes care of software patching, maintenance, and backups. Azure SQL Data Warehouse uses the Microsoft massive parallel processing (MPP) architecture. MPP was originally designed to run large on-premises enterprise data warehouses. For more information on Azure SQL Data Warehouse, see What is Azure SQL Data Warehouse?
This article focuses on migrating data to Azure SQL Data Warehouse with tips and techniques to help you achieve an efficient migration. Once you understand the steps involved in migration, you can practice them by following a running example of migrating a sample database to Azure SQL Data Warehouse.
Migrating your data to Azure SQL Data Warehouse involves a series of steps. These steps are executed in three logical stages: Preparation, Metadata migration and Data migration. 
Figure 1: The three logical stages of data migration
In each stage, tasks to be executed involve the on-premises database system, the on-premises local storage, the network connecting the local system to Azure (either internet or a dedicated circuit) and Azure SQL Data Warehouse. This results in a physical data movement from the source database to Azure as shown below. (These steps are also similar in moving data from any other source system on cloud instead of on-premises to Azure SQL Data Warehouse) 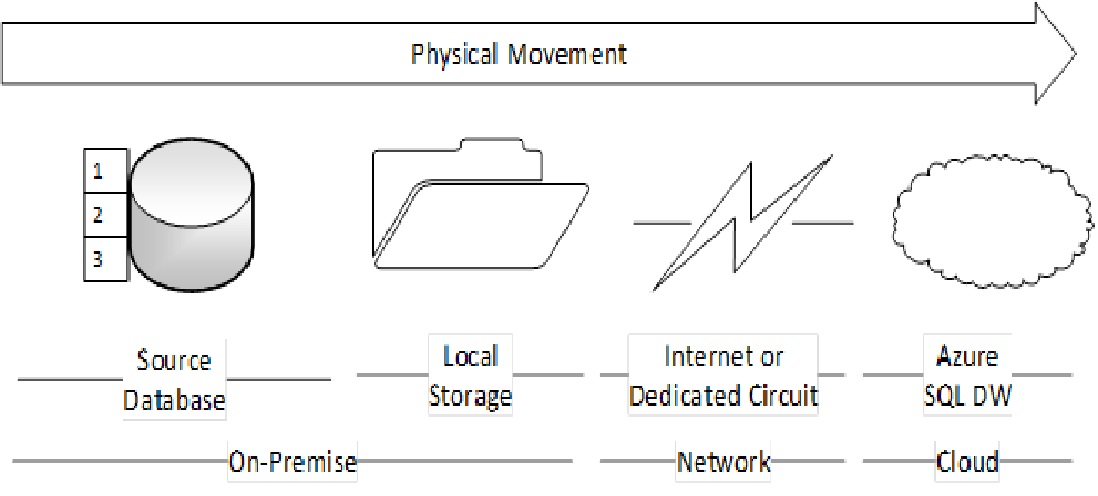
Figure 2: Physical data movement from the source database to Azure
Steps in the preparation stage start at the source database, where you choose the entities and attributes to migrate. You allocate local storage for further steps to come, establish a network to Azure, create a storage account and create an instance of Azure SQL Data Warehouse on Azure.
Metadata migration involves compatibility assessment and corrections, exporting the metadata, copying the metadata from the source system to Azure, and importing the metadata onto Azure SQL Data Warehouse.
Data Migration involves making the data-level compatibility changes if any, filtering and extracting the data to migrate, performing format conversions on the extracted data as necessary, compressing the data, copying the data to Azure, loading the transferred data, and doing post-load transformations and optimizations.
These steps are illustrated in the diagram below. The steps result in a logical flow from top to bottom and a physical flow from left to right.
(Arrows indicate a dependency: the latter step depends on the successful completion of former steps) 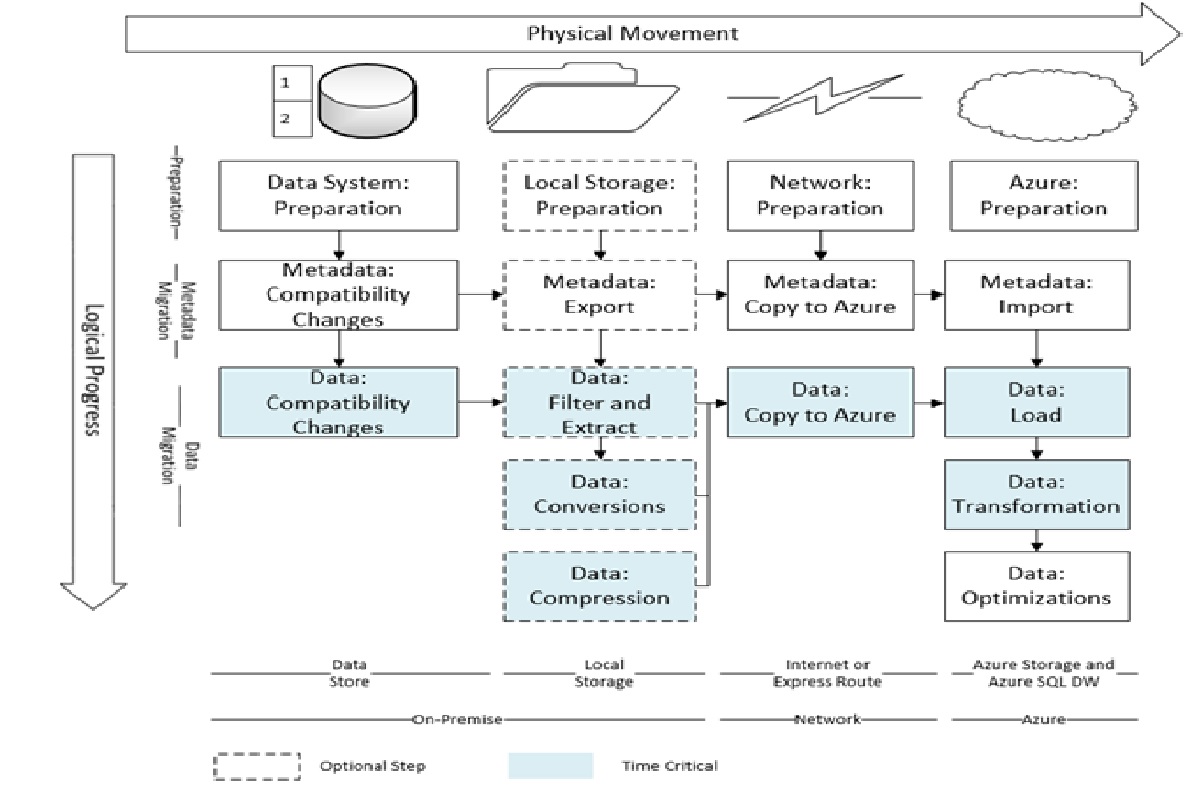
Figure 3: Data migration process that results in a logical flow from top to bottom and a physical flow from left to right
If the volume of the data to migrate is large, some steps can be time consuming. These steps are rate-determining because they influence the overall migration time. Such steps are shaded in color.
Some migration steps may be optional depending on the size of the data, the nature of the network, and the tools and services used for migration. Optional steps are shown with dotted lines.
To practice and understand the steps, you can follow a running example that migrates a sample database to Azure SQL Data Warehouse. To try out the sample, you’ll need:
The data migration steps usually affect the performance, maintainability and reliability of the migration. Approaches for migrating data to Azure SQL Data Warehouse can be classified based on where the data migration is orchestrated from, and based on whether the migration operations are individualized or combined.
It’s possible to use a hybrid approach, where operations are partly controlled from source and partly from Azure. With Data Factory and the Data Management Gateway, you can also build data pipelines that do one or more operations in the differentiated approach such as for example, moving data from SQL Server to File system/Blob and moving blobs from blob storage to Azure SQL Data Warehouse.
Often the speed of migration is an overriding concern compared to ease of setup and maintainability, particularly when there’s a large amount of data to move. Optimizing purely for speed, a source controlled differentiated approach relying on bcp to export data to files, efficiently moving the files to Azure Blob storage, and using the Polybase engine to import from blob storage works best.
In our running example, we choose the Source controlled and Differentiated approach, as it favors speed and customizability.
Note: You can also migrate the AdventureWorksDW sample Database to Azure SQL Data Warehouse by the other strategies, using SSIS or Azure Data Factory.
On the source, establish connectivity to the source data system, and choose which data entities and which attributes to migrate to Azure SQL Data Warehouse. It’s best to leave out entities and objects that aren’t going to be processed on Azure SQL Data Warehouse. Examples of these are log or archival tables and temporarily created tables.
Tip: Don’t migrate more objects than you need. Moving unnecessary data to cloud and having to purge data and objects on Azure SQL Data Warehouse can be wasteful. Depending on the sizes of unused objects, the cost and time of the data export, local transformations, and transfer increase.
In our example, we migrate all the tables in the AdventureWorks DW database, since it’s a relatively small database.
If the exported data will be stored locally prior to transfer (the differentiated approach), on the local storage system, ensure, at a minimum, that there is sufficient space to hold all of the exported data and metadata, the locally transformed data, and the compressed files. For better performance, use a storage system with sufficient independent disk resources allowing read/write options with little contention.
If the data transfer will be directly from the source data system to Azure SQL Data Warehouse (the Integrated approach), skip this step.
In our example, you need about 500 MB of free space on the SQL Server Machine to hold the exported, format converted, and compressed data files for the AdventureWorksDW sample database tables.
You can establish a connection to Azure via the public internet or using dedicated connectivity. A dedicated connection can provide better bandwidth, reliability, latency, and security compared to the public internet. On Azure, dedicated networking is offered through the ExpressRoute service. Depending on the migration approach, the connectivity establishedbe used to move data to Azure SQL Data Warehouse directly, or move intermediate files to Azure storage.
Tip: If the size of the data to transfer is large, or you want to reduce the time it takes to transfer data or improve the reliability in data transfer, try ExpressRoute.
In our example, we transfer the data over the public internet to an Azure Storage location in the same region as the Azure SQL Data Warehouse because the data to transfer is relatively small. This requires no special network establishment step, but make sure that you’re connected to the internet during the following steps:
Prepare to receive the data on Azure:
Tip: For speedy data movement, choose the Azure region closest to your data source that also has Azure SQL Data Warehouse, and create a storage account in the same region.
Sample TSQL commands for the same are as follows:
 IF NOT EXISTS (SELECT * FROM sys.symmetric_keys)
CREATE MASTER KEY
 IF NOT EXISTS (SELECT * FROM  sys.database_credentials WHERE name='AzSqlDW_AzureStorageCredentialPolybase' )
CREATE DATABASE SCOPED CREDENTIAL AzSqlDW_AzureStorageCredentialPolybase
WITH IDENTITY = 'AzSqlDW_Identity' , SECRET = '<YourStorageAccountKey>'
 IF NOT EXISTS (SELECT * FROM sys.external_data_sources WHERE name = 'AzSqlDW_AzureBlobStorage')
CREATE EXTERNAL DATA SOURCE AzSqlDW_AzureBlobStorage WITH (TYPE = HADOOP ,
LOCATION=
'wasbs://<YourStorageContainerName>@r<YourStorageAccountName>.blob.core.windows.net',
CREDENTIAL = AzSqlDW_AzureStorageCredentialPolybase);
 IF NOT EXISTS(SELECT * FROM sys.external_file_formats WHERE name = 'AzSqlDW_TextFileGz')
CREATE EXTERNAL FILE FORMAT AzSqlDW_TextFileGz WITH(FORMAT_TYPE = DelimitedText,
FORMAT_OPTIONS (FIELD_TERMINATOR = '|'),
DATA_COMPRESSION = 'org.apache.hadoop.io.compress.GzipCodec' );
In the above TSQL code replace YourStorageAccountName, YourStorageAccountKey and YourStorageContainerName with your corresponding values.
Tip: To prepare for a parallelized data import with Polybase, create one folder in the storage container for each source table—the folder name could be the same as the table name. This allows you split the data from large tables into several files and do a parallel data load into the target table from the multiple blobs in the container. You can also create a subfolder hierarchy based on how the source table data is grouped. This allows a control on the granularity of your load. For example, your subfolder hierarchy could be Data/Year/Quarter/Month/Day/Hour. This is also handy for incremental loads. For example, when you want to load a month of new data.
The source objects to migrate need to be compatible with Azure SQL Data Warehouse. Resolve any compatibility issues at the source before starting migration.
Tip: Do compatibility assessment and corrections as the first step in migration.
Tip: Use the Data Warehouse Migration Utility (Preview) to check compatibility issues—even do a quick migration for small amounts of data.
Note: The Data Warehouse Migration Utility can also help automate the migration itself. Note that the tool does not compress files, move data to Azure storage or use Polybase for import. Certain other steps, such as the “Azure Preparation” steps and the UTF 8 conversion are not supported. The tool generates bcp scripts that will move your data first to flat files on your server, and then directly into your Azure SQL Data Warehouse. The tool may be simple to use for small amounts of data.
A list of SQL Server functionality that is not present in Azure SQL Data Warehouse can be found in the migration documentation. In each table, make sure:
In addition, when using Polybase for data loading following limitations need to be checked
Note: Azure SQL Data Warehouse currently supports rows larger than 32K and data types over 8K. Large row support adds support for varchar(max), nvarchar(max) and varbinary(max). In this first iteration of large row support, there are a few limits in place which will be lifted in future updates. In this update, loads for large rows is currently only supported through Azure Data Factory (with BCP), Azure Stream Analytics, SSIS, BCP or the .NET SQLBulkCopy class. PolyBase support for large rows will be added in a future release. This article demonstrates data load using Polybase.
Check the tables in the same database (except for the total column size) for compatibility using the following query:
 SELECT t.[name],c.[name],c.[system_type_id],c.[user_type_id],y.[is_user_defined],y.[name]
FROM sys.tables  t
JOIN sys.columns c ON t.[object_id] = c.[object_id]
JOIN sys.types y ON c.[user_type_id] = y.[user_type_id]
WHERE y.[name] IN
('geography','geometry','hierarchyid','image','ntext','numeric','sql_variant'
,'sysname','text','timestamp','uniqueidentifier','xml')
OR (y.[name] IN (  'varchar','varbinary') AND ((c.[max_length] = -1) or (c.max_length > 8000)))
OR (y.[name] IN (  'nvarchar') AND ((c.[max_length] = -1) or (c.max_length > 4000)))
OR y.[is_user_defined] = 1;
When you run this query against the sample database, you’ll find that the DatabaseLog table is incompatible. There are no incompatible column types, but the TSQL column is declared as nvarchar (4000) = 8000 bytes in max length.
To resolve the incompatibility, find the actual sizes of this and other variable columns in the DatabaseLog table and their total length using the following TSQL queries:
 SELECT MAX(DATALENGTH([DatabaseUser])),MAX(DATALENGTH([Event])),MAX(DATALENGTH([Schema])),MAX(DATALENGTH([Object])),MAX(DATALENGTH([TSQL]))
FROM DatabaseLog
 SELECT MAX(DATALENGTH([DatabaseUser])) + MAX(DATALENGTH([Event]))+ MAX(DATALENGTH([Schema])) + MAX(DATALENGTH([Object])) + MAX(DATALENGTH([TSQL]))
FROM DatabaseLog
You’ll find that the actual maximum data length of the TSQL column is 3034. The total of the maximum data lengths of the columns is 3162. These are within the maximum allowed column lengths and row lengths in Azure SQL Data Warehouse. No data needs to be truncated to meet the compatibility requirement, and we can instead modify the TSQL column as nvarchar(3034) in the exported schema.
Similarly, the sum of declared column lengths in the DimProduct exceeds the maximum allowed column length. This can be resolved in a similar way.
After you’ve made the necessary changes for Azure SQL Data Warehouse compatibility, export your metadata (schema) so that the same schema can be imported onto Azure SQL Data Warehouse. Script or otherwise automate the metadata export so that it can be done repeatedly without errors. A number of ETL tools can export metadata for popular data sources. Note that some further tasks will be needed after the export. First, while creating tables in Azure SQL Data Warehouse you need to mention the distributed table type (ROUND_ROBIN/HASH). Second, if you are using Polybase to import data, you need to create external tables that refer to the locations of the exported files for each table.
Tip: Refer to the SQLCAT guidance for choosing the type of distributed table in Azure SQL Data Warehouse Service.
Note that Azure SQL Data Warehouse does not support a number of common table features, such as primary keys, foreign keys, and unique constraints. For a full list, please refer to Migrate your schema to Azure SQL Data Warehouse.
The table creation statement for the AdventureWorksBuildVersion table compatible with Azure SQL Data Warehouse is as follows:
IF NOT EXISTS (SELECT * FROM sys.tables WHERE schema_name(schema_id) = 'dbo' AND name='AdventureWorksDWBuildVersion')
CREATE TABLE [dbo].[AdventureWorksDWBuildVersion]([DBVersion] nvarchar(100) NOT NULL,[VersionDate] datetime NOT NULL) WITH(CLUSTERED COLUMNSTORE INDEX, DISTRIBUTION = ROUND_ROBIN)
A full list of sample table creation commands for the AdventureWorks database can be found here.
The external table creation statement for the AdventureWorksBuildVersion table compatible with Azure SQL DW is as follows:
 IF NOT EXISTS (SELECT * FROM sys.tables WHERE schema_name(schema_id) = 'dbo' AND name='AdventureWorksDWBuildVersion_External')
CREATE EXTERNAL TABLE [dbo].[AdventureWorksDWBuildVersion_External]([DBVersion] nvarchar(100) NOT NULL,[VersionDate] datetime NOT NULL)
WITH(LOCATION = '/dbo.AdventureWorksDWBuildVersion.UTF8.txt.gz', DATA_SOURCE = AzSqlDW_AzureBlobStorage, FILE_FORMAT = AzSqlDW_TextFileGz);
Note: /dbo.AdventureWorksDWBuildVersion.UTF8.txt.gz refers to a file location relative to the Azure storage container created under “Azure: preparation”. This file itself does not exist yet—it will be created during data export. So you can’t yet execute the External table creation commands just yet.
A full list of sample external table creation commands for the AdventureWorks database can be found here .
Since the metadata is usually small in size and the format well known, you don’t need further optimization or format conversions. Use SQL Server Data Tools (SSDT) or SSMS (July 2016 release) to execute the table creation statements against the target Azure SQL Data Warehouse database. To connect to Azure SQL Data Warehouse, specify the server name (of the form YourSQLDWServerName.database.windows.net), user name and database name (not the master database, which is the default) as chosen at the time of creation.
Execute the statements using SSDT or SSMS (July 2016 release) to create the tables on Azure SQL Data Warehouse.
Note: You cannot yet execute the External Table Create statements, as the table data needs to be exported and moved to Azure Blob Storage before you can do this.
In addition to changes to metadata for compatibility, you might need to convert data during extraction for error-free import with Azure SQL Data Warehouse. In importing with Polybase, dates must be in the following formats when the DATE_FORMAT is not specified.
Depending on your locale and current date format, you may need to convert date formats during export. Additionally, bcp exports data to field and row delimited files, but bcp by itself does not escape delimiters. You choose a delimiter that does not occur in any of the data in the table. Also, if you have used a data type for a column in an Azure SQL Data Warehouse table that is different from the corresponding column in the source table, ensure that during extraction, the data is converted to a format compatible with the target.
Tip: Invalid export files can result in data being rejected by Azure SQL Data Warehouse during import. Preventing these errors saves you from file correction or re-extraction and retransfer efforts.
The most common mistakes include:
When there are individual rows with errors, you can get error messages like the following which will help determine what went wrong:
“Query aborted– the maximum reject threshold (… rows) was reached while reading from an external source: YYY rows rejected out of total ZZZ rows processed. (…) Column ordinal: .., Expected data type: …Offending value:”
If you use an (un-escaped) comma as a field delimiter, you’ll have import errors with a number of tables in the sample database. A field delimiter not found in the tables is the pipe character. You can extract dates to a target format using the CONVERT function. An example follows for one of the tables in the sample database:
 SELECT REPLACE([DBVersion],'|','||'),CONVERT(varchar(32), [VersionDate], 121)
FROM [AzureSQLDWAdventureWorks].[dbo].[AdventureWorksDWBuildVersion]
For a full list of extraction commands, refer to the “Data: export and format conversion” section.
When you don’t use an ETL tool like SSIS to integrate the steps of export, transfer, and load, or you’re following the differentiated approach in migration as discussed earlier, choose an extraction tool and optionally specify the extraction query to choose columns and filter rows. Data export can be CPU, memory, and IO intensive. To speed up data export, use bulk /batched extraction, parallelize extraction, and scale compute/memory/IO resources as needed.
You can use the bcp utility, which bulk copies data from an instance of Microsoft SQL Server to a data file in a user-specified format. Note that bcp data files don’t include any schema or format information. An independent schema import is essential before you import data generated by bcp on Azure SQL Data Warehouse. bcp can export data in character format (-c option) or Unicode character format (-w option).
Note: Bcp version 13 (SQL Server 2016) supports code page 65001 (UTF-8 encoding). This article demonstrates UTF-8 conversion as earlier versions of bcp did not have this support.
In importing data into Azure SQL Data Warehouse, with Polybase, non-ASCII characters need to be encoded using UTF-8. Hence if your tables have data with extended ASCII characters you need to convert the exported data to UTF-8 before importing. Also, in creating the bcp commands, note the need to escape delimiters, as mentioned in the earlier section.
Tip: If invalid characters in the exported files don’t conform to the expected encoding, data import into Azure SQL Data Warehouse can fail. For example, if you have extended characters in tables, convert the files generated by bcp to UTF-8 programmatically or by using PowerShell commands.
The System.Encoding class in .NET provides support for programmatic conversion between Unicode and UTF-8.
Tip: The speed at which bcp exports data to files depends on a number of factors including command options such as batch_size, packet_size, rows_per_batch, query hints used such as TABLOCK, the extent of parallelism, the number of processing cores and the performance of the IO subsystem. For more information on bcp options, refer to the documentation on the bcp utility.
You can also experiment with parallelizing the process by running bcp in parallel for separate tables, or separate partitions in a single table.
Tip: Export data from large tables into multiple files so that they can be imported in parallel. Decide on a way to filter records based on attributes to implement multi-file export so that batches of records go into different files.
When Azure has network reliability issues, implementing multi-file export per table for large tables increases the chances of individual file transfers Azure being successful.
A sample bcp command to export one of the tables in the sample database follows:
bcp "select REPLACE([DBVersion],'|','||'),CONVERT(varchar(32), [VersionDate], 121) from [AzureSQLDWAdventureWorks].[dbo].[AdventureWorksDWBuildVersion]" queryout "<YouLocalPathForBcpFiles>” /dbo.AdventureWorksDWBuildVersion.txt" -q -c -t "|" -r "\n" -S <YourSQLServerInstance> -T
A full list of sample bcp commands for the sample database can be found here.
After bcp execution is complete, there should be 34 files created on disk, ending with .txt, corresponding to the 34 tables in the sample database.
The sample database has a number of tables with extended characters. Importing the bcp-generated files directly into Azure SQL Data Warehouse can fail. Sample code in C# to do the conversion is as follows:
 public void ConvertTextFileToUTF8(string sourceFilePath, string destnFilePath)
        {
            string strLine;
            using (StreamReader reader = new StreamReader(sourceFilePath, true))
            {
                using (StreamWriter writer = new StreamWriter(destnFilePath))
                    // Encoding is UTF-8 by default
                    while (!reader.EndOfStream)
                    {
                        strLine = reader.ReadLine();
                        writer.WriteLine(strLine);
                    }
            }
        }
You can also chain the Power Shell get-content and set-content cmdlets with the -encoding parameter option to change the encoding, as follows:
Get-Content <input_file_name> -Encoding Unicode | Set-Content <output_file_name> -Encoding utf8
We assume that after implementing one of the above approaches, the files in UTF-8 are named with the convention filename.UTF8.txt. For example, AdventureWorksDWBuildVersion.UTF8.txt.
At the end of this step, there should be 34 UTF-8 encoded files created on disk ending with .UTF8.txt and corresponding to the 34 tables in the sample database.
In transferring large amounts of data to Azure or while working with networks that are limited in bandwidth or reliability, compression can cut down migration times. Exported files from data sources with text content tend to yield good compression ratios, resulting in significant size reduction and file transfer times. Delimited files compressed with the gzip compression format can be imported using Polybase (DATA COMPRESSION = 'org.apache.hadoop.io.compress.GzipCodec') into Azure SQL Data Warehouse. This way, you don’t need to decompress the files on Azure.
Tip: Note that Polybase supports gzip which is different from the popular Zip format. Choosing an unsupported compression format can result in import failures.
Tip: Create one compressed file for each export file. For easy import logic, avoid putting exported files of multiple tables in the same compressed archive file.
Tip: Split large files—larger than 2 GB—before compression. Each compressed file then has to spend a smaller amount of time on the network. It has a greater chance of getting across without interruption.
A popular tool that supports gzip compression is the 7-Zip compression utility. You can also compress files to the gzip format programmatically. In .NET, support for gzip compression is provided through the GZipStream class in the System.IO.Compression namespace.
Sample code in C# that illustrates how to compress all files in a folder to the gzip format follows:
 public static void Compress(string sourceFolderPath, string destnFolderPath)
        {
            string compressedFileName = null;
            string compressedFilePath = null;
            DirectoryInfo dirInfo = new DirectoryInfo(sourceFolderPath);
            foreach (FileInfo fileToCompress in dirInfo.GetFiles())
            {
                using (FileStream originalFileStream = fileToCompress.OpenRead())
                {
                    if ((File.GetAttributes(fileToCompress.FullName) &
                     FileAttributes.Hidden) != FileAttributes.Hidden &
                     fileToCompress.Extension != ".gz")
                    {
                        compressedFileName = Path.GetFileNameWithoutExtension(fileToCompress.FullName) + ".gz";
                        compressedFilePath = Path.Combine(destnFolderPath, compressedFileName);

                        using (FileStream compressedFileStream = File.Create(compressedFilePath))
                        {
                           using (GZipStream compressionStream = new GZipStream(compressedFileStream, CompressionMode.Compress))
                            {
                                originalFileStream.CopyTo(compressionStream);
                            }
                        }
                    }
                }
            }
        }
You can also use 7-Zip or any other compatible compression utility for this purpose.
After completing this step, you can see that the exported files are about 116 MB in size. The compressed files are about 16.5 MB in size—about seven times smaller.
The sample code shown above stores the compressed files with an extension of .gz. For example, dbo.AdventureWorksDWBuildVersion.UTF8.gz.
At the end of this step, there should be 34 compressed files created on disk with the .gz extension, corresponding to the 34 tables in the sample database.
Improving data transfer rates is a common problem to solve. Using compression and establishing a dedicated network to Azure using ExpressRoute have already been mentioned.
Other good approaches are to do data copies concurrently, execute the copy asynchronously, maintain a log of completed options and errors, and build in the ability to resume failed transfer. The AzCopy tool is optimized for large scale copy scenarios. It includes these techniques and many other options. The key features of interest are below:
Tip: Run one AzCopy instance on one machine. Control the concurrency using the /NC option instead of launching more instances.
Tip: A large number of concurrent operations in a low-bandwidth environment may overwhelm the network connection. Limit concurrent operations based on actual available network bandwidth.
Please read the AzCopy documentation to understand the utility and its parameters.
Tip: For some source locations, the network connectivity may be poor, establishing an Express Route connectivity may not be possible, and the size of the data to transfer may be large. In such cases, if data transfers become infeasible to implement—even with compression and AzCopy—explore the Azure Import Export Service. You can transfer data to Azure blob storage using physical hard drives with this service.
You can execute AzCopy after installation from a command prompt using the following syntax:
"<YourAzCopyPath>/AzCopy.exe" /Source:"<YourLocalPathToCompressedFiles>" /Dest:https://<YourStorageAccount>.blob.core.windows.net/<YourStorageContainer> /DestKey:<YourStorageAccountKey> /pattern:*.gz /NC:<YourConcurrencyLevel>
Note the following with respect to the placeholders in the above command:
If the parameters are supplied correctly, AzCopy will start copying the files and report running progress on the number of files copied and the transfer rate as follows (your transfer rate can be different): 
After completion, AzCopy will summarize the results as follows (your elapsed time can be different): 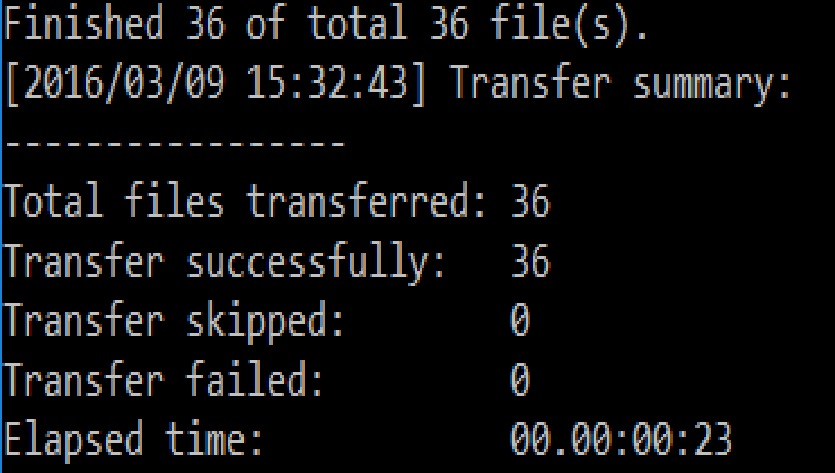
Sometimes your copy may get interrupted.
AzCopy maintains a log file and journal file at %LocalAppData%\Microsoft\Azure\AzCopy.
If the journal file does exist, AzCopy will check whether the command line that you input matches the command line in the journal file. If the two command lines match, AzCopy resumes the incomplete operation. If the two command lines don’t match, you’ll be prompted to overwrite the journal file to start a new operation, or to cancel the current operation with a message like the one below:
Incomplete operation with same command line detected at the journal directory "<YourAzCopyLocation>", do you want to resume the operation? Choose Yes to resume, choose No to overwrite the journal to start a new operation. (Yes/No)
At the end of this step, 36 files should have been transferred to your Azure storage account. You can use the Azure Storage Explorer GUI tool to check if the files are available in the storage account.
Scripted/Programmatic transfer:
PolyBase is the fastest mechanism to import data into Azure SQL Data Warehouse. PolyBase parallelizes loads from Azure Blob storage, reads all the files inside a folder and treats them as one table, supports the gzip compression format and UTF-8 encoding, and Azure Blob store as the storage mechanism. Loading with PolyBase data allows data import to scale in speed and proportion to the allocated data warehouse units (DWUs) on Azure SQL Data Warehouse.
Tip: Choices in the overall migration process contribute to fast loading with Polybase. These are:
If you’ve been following the running example, you’ve practiced most of these techniques already!
Tip: The DWUs allocated for the target Azure SQL Data Warehouse make a difference to the load speed.
Tip: Depending on your specific scenario, there could be a performance advantage in one of two possible techniques, both using Polybase:
What matters is the overall process performance. Depending on the network speed and the data sizes tests, a few tests with both techniques may help determine which works best in your context.
There are two ways to import data with Polybase from blobs in Blob storage:
Before you can execute the load queries, you need to execute external table creation queries that were created in the “Metadata export” step. Since the files referred to by the External Table creation queries have been transferred to Azure Blob Storage, the external table locations are valid. Those queries can be executed at this time. Ensure that the table creation and external table creation steps are successful before attempting to import data.
In our example, we use the INSERT INTO … SELECT * FROM method to import data into Azure SQL Data Warehouse for easy illustration so you can run it multiple times. This requires you to generate an INSERT INTO … SELECT * FROM query for each table in the sample database.
A sample query is as follows:
 INSERT INTO dbo.AdventureWorksDWBuildVersion
SELECT * FROM dbo.AdventureWorksDWBuildVersionExternalGz
A full list of sample INSERT…SELECT queries can be found here .
During import if you receive errors, correct the root cause using the error messages. In the “Data: Compatibility changes” section, we mentioned the causes of most common errors. Note that formats incompatible with Polybase will be rejected. For example, UTF-16 encoding, Zip Compression, and JSON format.Note that Polybase supports:
Once Import is successful, check the source database tables row counts against the row counts in the corresponding Azure SQL Data Warehouse tables.
This completes our example.
Once you have successfully migrated your data into Azure SQL Data Warehouse, the next immediate step is to create statistics on your newly loaded data using the CREATE STATISTICS statement on all columns of all tables.
If you plan to query data using external tables, you need to create statistics on external tables also. After this, you may want to do transformations on the data prior to executing query workloads.
Tip: Distinguish between conversions before load for compatibility (such as date format conversion, and UTF-8 encoding) and data transformations after load that can be done on Azure SQL Data Warehouse after loading is complete. These transformations are better done on Azure SQL Data Warehouse instead of on the source, exploiting the full processing power and scale of Azure SQL Data Warehouse. An Extract Load Transform (ELT)pattern rather than an Extract Transform Load (ETL) pattern may work better for you.
Ask Learn is an AI assistant that can answer questions, clarify concepts, and define terms using trusted Microsoft documentation.
Please sign in to use Ask Learn.
Sign in