SharePoint 2013- Configure On-Premises Users to leverage Office 365 for their Mysite-OneDrive :Part-4
OneDrive for Business Redirection to Office365-SharePoint Online
Part1 and Part2 of this post talks about how we can configure two-way Hybrid search with Directory synchronization password sync and eventually enhance the sign in experience of users in. This post assumes that you have successfully configured Directory Synchronization part that I have documented in Part1 of my post .
What's the difference between OneDrive and OneDrive for Business?
1. OneDrive is free, personal online storage that you can choose to use at home, work, or school. Files are
Technorati Tags: onedrive,onedrive redirection,onedriveredirection,hybrid onedrive,onedrive for business
available from any device by going to OneDrive website or using the OneDrive mobile app for your phone.
2. OneDrive for Business is for organizations to provide online storage to their members. It’s included in SharePoint 2013 and is available with Office 365 SharePoint Online. This is a library intended for storing and organizing work documents. OneDrive for Business is also different from your team site, which is intended for storing team or project-related documents. You can read more about it here . What you see in your SharePoint 2013 and SharePoint Online header/navigation listed as OneDrive is an abbreviation of OneDrive for Business.
I simply like the new announcement that came in recently that states. “Massive increase to OneDrive storage plans: 15 GB free for everyone, 1 TB for Office 365 subscribers” . What is more amazing is the integration with SharePoint Onpremise.
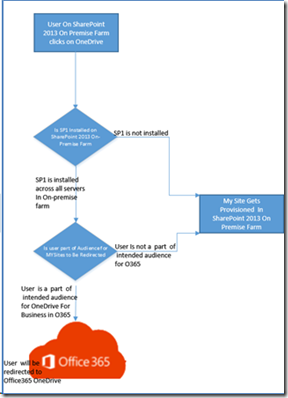
With Service Pack 1 for SharePoint Server 2013, a new feature has been introduced for OneDrive. After you install Service Pack 1, you will have an option to redirect your users in SharePoint 2013 to OneDrive in Office 365. Post configuration of the feature in an On-Premise SharePoint 2013 farm, when a user clicks OneDrive in the navigation bar, or when they click Sites from their personal site, they will be redirected to OneDrive in their Office 365 tenant. This would be a seamless experience for the users while they access the documents from within their corporate network or outside. With this feature, users can continue to use On-Premises SharePoint farm, as well as leverage the rich features of OneDrive in Office 365.
To integrate OneDrive for Business between SharePoint On-Premises and SharePoint Online farm, you need to have access to the following components:
· SharePoint Online Subscription
· SharePoint On- Premise Single Server or Farm
· SharePoint 2013 Service Pack 1
With Service Pack 1 for SharePoint Server 2013, a new feature has been introduced for OneDrive. After you install Service Pack 1, you will have an option
Key Configuration Steps
The following steps should be configured before the users in On-Premises SharePoint farm will be able to host their My Sites in SharePoint Online and leverage the benefits of OneDrive for Business in Office 365.
Office 365 Environment
· Sign up for a new Office 365 subscription or leverage an existing subscription.
· Synchronize users from On-Premise Active Directory using DirSync with password sync.
· Deploy Active Directory Federation Services (AD FS) to have single sign on experience for users (optional).
· Ensure tenant has a functional My Site host (tenantdomain-my.sharepoint.com)
On-Premise SharePoint 2013 Environment
· Install Service Pack 1 in SharePoint 2013 on-premises environment.
· Configure OneDrive and Sites Link in On-premise Farm.
· Create and compile an audience with the list of users who would provision My Site in Office 365.
· Configure Hybrid Search for retrieving documents from OneDrive for business.
Let us now look at the configuration of each of these steps in detail. You can use your existing Office 365 subscription to configure OneDrive for Business. In case you do not have an Office 365 Tenant and want to sign up, click here. To compare the various Office 365 plans, click here. The following steps assume that you have an Office 365 subscription and you would configure OneDrive for Business for your On-Premises domain where SharePoint 2013 is installed.
Identify My Site URL in SharePoint Online
One of the crucial step to get users to redirect to OneDrive for Business in SharePoint Online is to synchronize the user accounts from SharePoint On-Premise Active Directory to Azure AD in Office 365. You can follow the steps in Part1 of my post to configure the same. As mentioned in the beginning of this post Part 1 also includes establishing a server to server authentication which is not a requirement for this configuration. You can enhance the user experience by deploying single-sign on using AD FS and converting your On-Premises domain to federated, which is again optional. The core requirement is to ensure that you have the users from On-premises synchronized to Azure AD.
You should be aware of the My Site Hosts URL of your Office 365 Tenant Domain for the rest of the configuration. When you sign up for an Office 365 Tenant, you will be asked to specify a new Domain Name. something.onmicrosoft.com. The is called as Tenant Domain and it is the default Domain that is used for example as UPN for user accounts. The Tenant Domain is also important with regard to SharePoint Online as something, which is a part of something.onmicrosoft.com is used for some other URLs as follows:
· something.sharepoint.com: The default root Site Collection for SharePoint Online
· something-admin.sharepoint.com: The SharePoint Online Admin Center
· something-my.sharepoint.com: The SharePoint Online My Site Host
· something-public.sharepoint.com: The default SharePoint Online Public Web Site in Wave 15
To validate the My Site Host URL from your Office 365 admin dashboard follow these steps:
· Log on to Office 365 as a global administrator.
· In the Office 365 portal administration site, select Admin on the top navigation bar, and then select SharePoint.
Within SharePoint admin center under the list of private site collections, you should see a site collection with tenantdomain-my.sharepoint.com. Keep a note of this URL, as this is your MySite root URL that you need to provide while you configure your On-Premises farm.
By default, top navigation bar has links to OneDrive, Yammer, Newsfeed, and Sites. From within the Settings tab in from left navigation in SharePoint admin center you can customize the navigation bar by choosing which options to show to users.
In case you have not already done so in your on-premises environment, install SharePoint Service Pack 1 binaries. Binaries should be installed across all the servers if there are multiple servers in the farm. Run PSConfig wizard across all servers to ensure that the upgrade completed successfully. For detailed steps to install a Service Pack, see:
Deploy software updates for SharePoint 2013
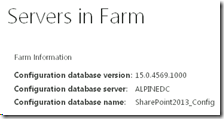
Post a successful upgrade, to verify that SharePoint servers in the farm shows the correct version you can check the version under Servers in Farm which should match the image below
Alternatively, you can bring up Windows Powershell for SharePoint and execute the following command within SharePoint management shell.
<Get-spfarm>.buildversion
This will ensure that the farm has been successfully upgraded to SP1.
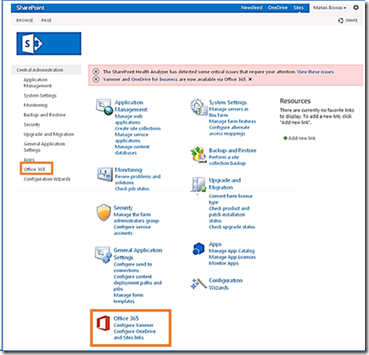
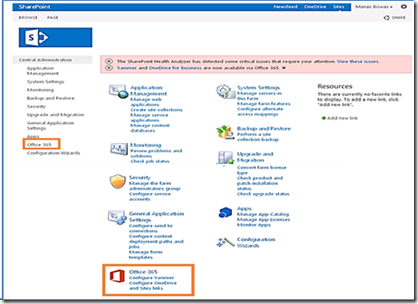
After you install Service Pack 1, browse to Central Administration URL. You will see Office 365 Connections on the left navigation as well as in the center frame. To configure OneDrive and Sites link, click Configure OneDrive and Sites link from the center frame options.
Before you proceed with configuring OneDrive, you need to validate a couple of additional settings.
Validate User Profile Service Application
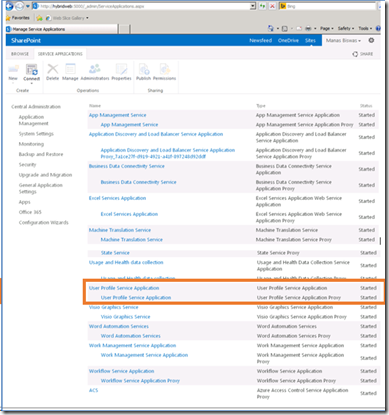
Validate the User Profile Service Application after upgrade to SP1. Verify if the User Profile Service and User Profile Synchronization Service are running. You can browse to Central Administration on your On-Premises farm (https://centraladmin/_admin/Server.aspx) and check the status for User Profile Service Application and User Profile Synchronization Service and validate that the status is Started.
Alternatively, you can run the following command in SharePoint PowerShell
$app=Get-SPServiceApplication | where-object {$_.TypeName -match "User profile "}
$app
$app.status
The output should match the following screenshot:
For best practices on User Profile Application refer to: Administer the User Profile service in SharePoint Server 2013
It is recommended to do a profile import (incremental) to ensure that all user profile attributes of the user is updated with most recent changes.
Validate My Site Creation Permissions
On-premises, users should have the ability to create personal sites. To use this feature, users should also have permission to use OneDrive in Office 365. You need to validate the user’s permissions to create personal sites in User Profile Service Application.
Follow these steps to validate My Site Creation Permissions:
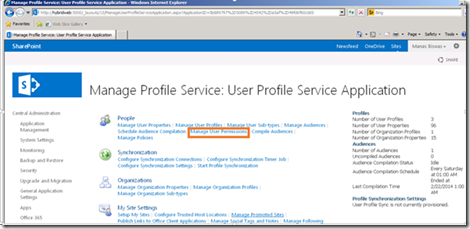
1. In your On-Premises SharePoint Server 2013 farm, where you have installed SP1, browse to Central Admin > Manage Service Applications >User Profile Service Application.
2. From User Profile Service Application, under People section, click Manage User Permissions.
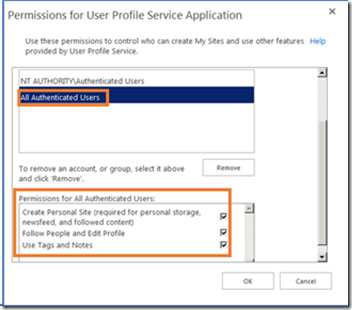
3. From Permissions for User Profile Service Application dialog box, select All Authenticated Users. Ensure that the following check boxes are selected:
· Create Personal Site
· Follow People and Edit Profile
· Use Tags and Notes
You can validate the permissions by executing the following command in a SharePoint management shell:
$app=Get-SPServiceApplicationProxy|Where-Object {$_.TypeName –match “user profile”}
$upasecurity =Get-SPprofileServiceApplicationSecurity –ProfileServiceApplicationProxy $app
$upasecurity
The output should match the output in the below screenshot:
We have checked the permission for all authenticated users . You can definitely use audience targeting to differentiate users who can have their My Sites created in either On-Premises or Office 365. To do so, you have to create an audience or use an existing one that has the list of people you would want to create My Site in Office 365.
· To create an audience in SharePoint 2013, see: Add an audience
· You can also use PowerShell to create an audience. Click here to download the Sample Script.
· Once you create an audience, you need to ensure that the users in the compiled audience has permissions in the User Profile Service Application as discussed above.
Now we are all set to configure OneDrive for Business from Central Administration. To do so browse to Central Administration on your On-Premises SharePoint farm. From the home page select Office 365 > Configure OneDrive and Sites Links.
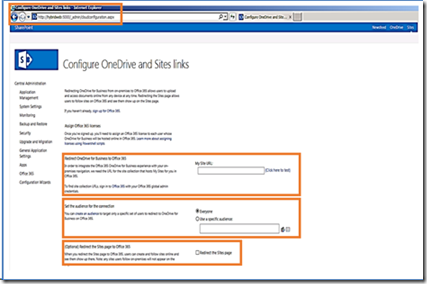
Configure OneDrive and Site links page, is accessible with https://centraladminurl/_admin/cloudconfiguration.aspx . On this page, you can configure settings like My Site URL to redirect users of OneDrive for Business to Office 365. You can also set a target audience to restrict users and optionally choose to redirect the Site pages to Office 365.
On the Redirect OneDrive for Business to Office 365 page, under the My Site URL textbox, type the My Site URL that you got from Office 365 portal administration to test the connectivity.
Choose the audience, if any. In case of no audience, select Everyone. This choice defines the redirection for users to Office 365. Selecting Everyone will redirect all users to Office 365 for provisioning their My Sites.
If you want to redirect the Sites page in users’ personal sites, select the Redirect the Sites page checkbox.
Note : The action of ‘Follow sites’ is available for only Online sites when redirection for Sites page is selected. Click OK to save your settings.
The URL for Hybrid mysite location in SharePoint Online is governed by a property called HybridRemotePersonalSiteHostURL. Execute the following in a SharePoint management shell to retrieve the redirection property.
$ca = Get-spwebapplication -includecentraladministration | where {$_.IsAdministrationWebApplication}
$spsite = $ca.url
$site = Get-SPSite $spsite
$context = Get-SPServiceContext $site
$upsa = New-Object Microsoft.Office.Server.UserProfiles.UserProfileManager($context)
$profile = $upsa.GetEnumerator()
$profile
From the powershell output validate that the value for HybridRemotePersonalSiteHostURL This should point to your My Site host for Office 365
This is all that is required to set up profile settings in the SharePoint On-Premises farm..
Validate Configuration
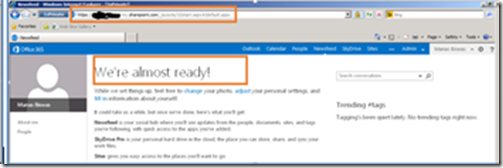
To ensure that the users are able to create their My Site in Office 365, follow these steps. Choose a user, who is part of the audience to provision OneDrive for Business in Office 365. This user should already be synchronized to Office 365 Azure Active Directory using DirSync and should be Active and should have a valid SharePoint Online license in Office365. The user should log on to one of the client machines and browse to SharePoint On-Premises site to which they have access. From within the top navigation the user should click on the OneDrive link on the top navigation.
The browser URL should look identical to the one in the following screenshot. The OneDrive link redirects the user to the SharePoint Online URL.
Depending on if, you have chosen to deploy AD FS for Single Sign-On or DirSync with password sync, the user experience would vary.
a. In case of Single Sign-On, the user should seamlessly sign in to the SharePoint Online environment.
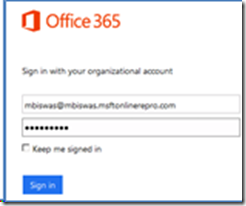
b. In case the environment has DirSync password sync enabled, it would require the user to enter their credentials for authentication.
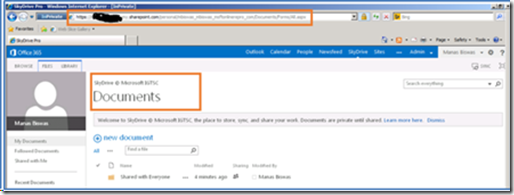
Once provisioning for My Site is completed, the user should be able to navigate to OneDrive and see OneDrive in SharePoint Online and see Shared with Everyone folder.
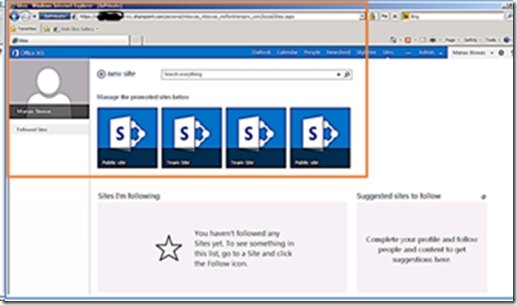
Within configure OneDrive and Site links page, if site redirection option was selected, clicking sites from the top navigation will redirect users to Office 365.
The user logs on to a SharePoint On-Premises site and clicks OneDrive. With the above configuration in place, the user should be redirected to SharePoint Online. Since the user has been synchronized to Office 365 and has a SharePoint license, if they log on to SharePoint Online and click OneDrive, they should be redirected to same OneDrive as above. If the user experience matches the experience above, then OneDrive for Business is successfully configured for SharePoint On-premise environment to be hosted in Office365.
In the next part of this post, I will talk about how you can configure OneDrive as a Hybrid search vertical in SharePoint Onpremise search center.
POST BY [MANAS BISWAS]
Technorati Tags: onedrive,onedrive redirection,onedriveredirection,hybrid onedrive,onedrive for business

