Configure a SharePoint 2013 Web Application with Forms Based Authentication with a LDAP membership provider
This blog article provides a step-by-step guide with screenshots on how to configure a new Web Application with Forms Based Authentication (FBA) using a LDAP membership provider. While the steps are described in TechNet article https://technet.microsoft.com/en-us/library/ee806890%28v=office.15%29.aspx , when it comes to put them in practice you might stumble across difficulties, where this blog comes to your assistance J Enjoy!
Summary:
1. Create a new user in Active Directory.
2. Create a new Web Application in Central Administration that uses forms-based authentication.
3. Configure the web.config files.
4. Create a new site collection for the new created Web Application and add the FBA user as site collection administrator.
5. Browse to the new created site and test the functionality.
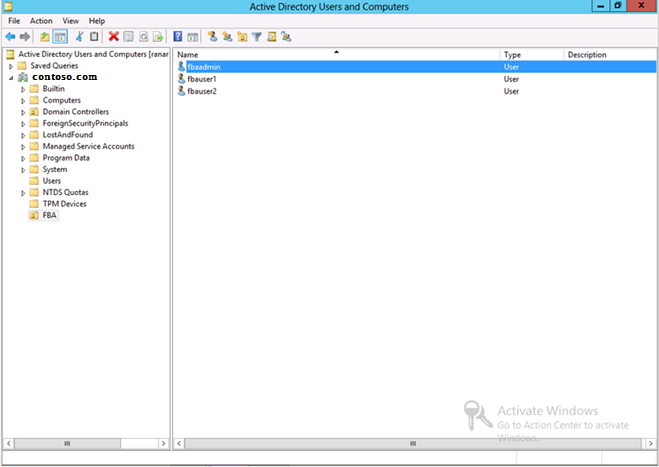
1. Create a new user in Active Directory
I named the user ‘fbaadmin’ and placed it in an organization unit called FBA’.
2. Create a new Web Application in Central Administration that uses forms-based authentication.
a. Browse to Central Administration > Application Management > Manage Web Applications and click ‘New’.
b. Type in a port number (e.g. 1100) and check the boxes next to “Enabled Windows Authentication | Integrated Windows authentication | NTLM” and “Enabled Forms Based Authentication (FBA)”.
c. Type in a name for the “ASP.NET Membership provider name” (I named it ‘membership’) and for the “ASP.NET Role manager name” (I named it ‘rolemanager’).
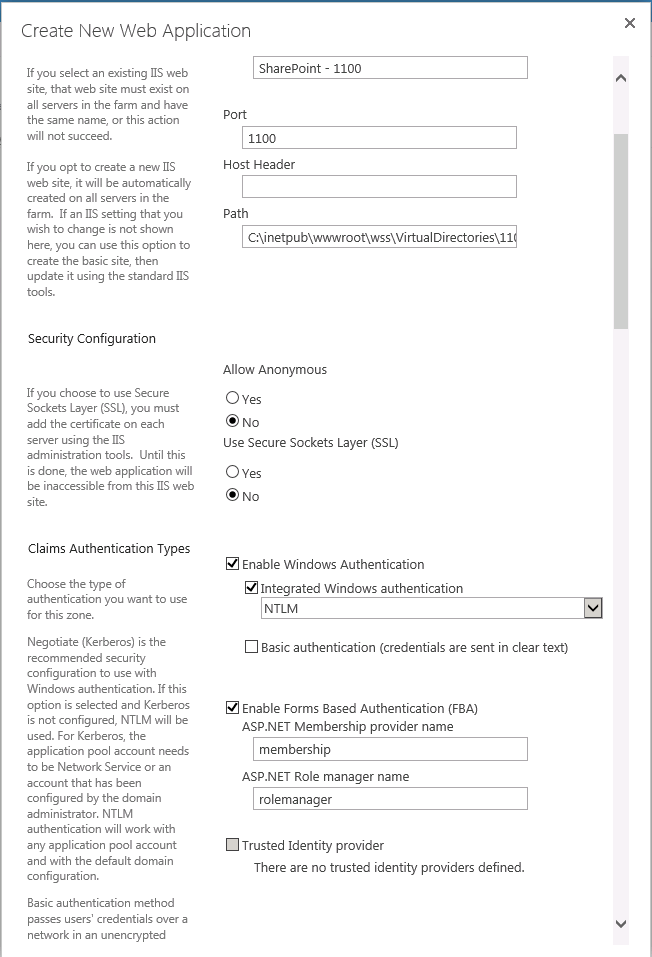
d. Click OK to create the Web Application.
3. Configure the web.config files for:
Ø Central Administration
Ø Security Token Service
Ø The new Web Application created
a. To configure the Central Administration web.config file
i. Open IIS Manager via Start > Run > inetmgr.
ii. In the console tree, open the server name, and then Sites.
iii. Right-click the SharePoint Central Administration v4 site, and then click Explore.
iv. In the folder window, double-click the web.config file.
v. In the <Configuration> section, find the <system.web> section and add the following example entry
<membership defaultProvider="AspNetSqlMembershipProvider">
<providers>
<add name="membership"
type="Microsoft.Office.Server.Security.LdapMembershipProvider, Microsoft.Office.Server, Version=15.0.0.0, Culture=neutral, PublicKeyToken=71e9bce111e9429c"
server="contosodc.contoso.com"
port="389"
useSSL="false"
userDNAttribute="distinguishedName"
userNameAttribute="sAMAccountName"
userContainer="OU=FBA,DC=contoso,DC=com"
userObjectClass="person"
userFilter="(ObjectClass=person)"
scope="Subtree"
otherRequiredUserAttributes="sn,givenname,cn" />
</providers>
</membership>
<roleManager enabled="true" defaultProvider="AspNetWindowsTokenRoleProvider" >
<providers>
<add name="roleManager"
type="Microsoft.Office.Server.Security.LdapRoleProvider, Microsoft.Office.Server, Version=15.0.0.0, Culture=neutral, PublicKeyToken=71e9bce111e9429c"
server="contosodc.contoso.com"
port="389"
useSSL="false"
groupContainer="DC=contoso,DC=com"
groupNameAttribute="cn"
groupNameAlternateSearchAttribute="samAccountName"
groupMemberAttribute="member"
userNameAttribute="sAMAccountName"
dnAttribute="distinguishedName"
groupFilter="((ObjectClass=group)"
userFilter="((ObjectClass=person)"
scope="Subtree" />
</providers>
</roleManager>
Note: you have to substitute the yellow highlighted parts with the information specific to your environment, as follows:
· For server you need the FQDN of your domain controller (in my case it is ‘contosodc.contoso.com’)
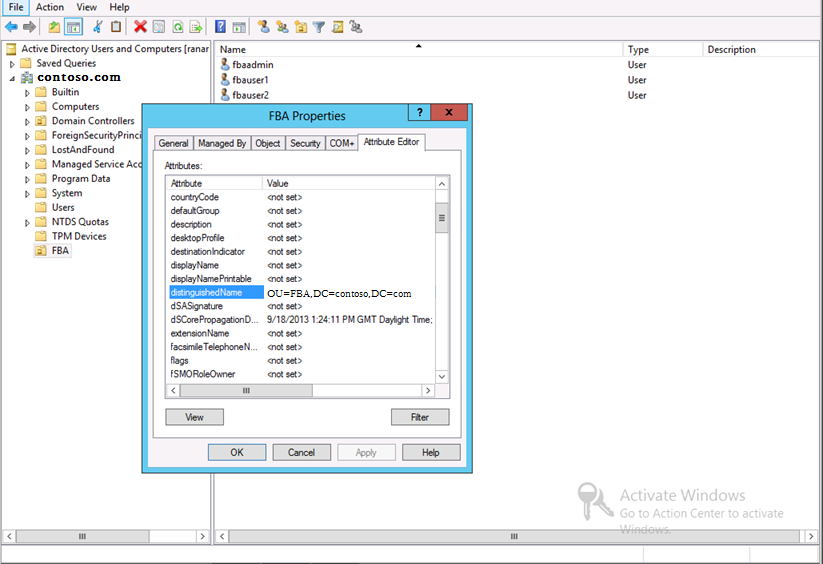
· For userContainer you need the distinguished name of your user container – you can find it on the Domain Controller > Active Directory Users and Computers > ‘your domain’ > right click on the corresponding OU and switch to the ‘Attribute Editor’ tab:
· The name of your role manager in <add name="roleManager".
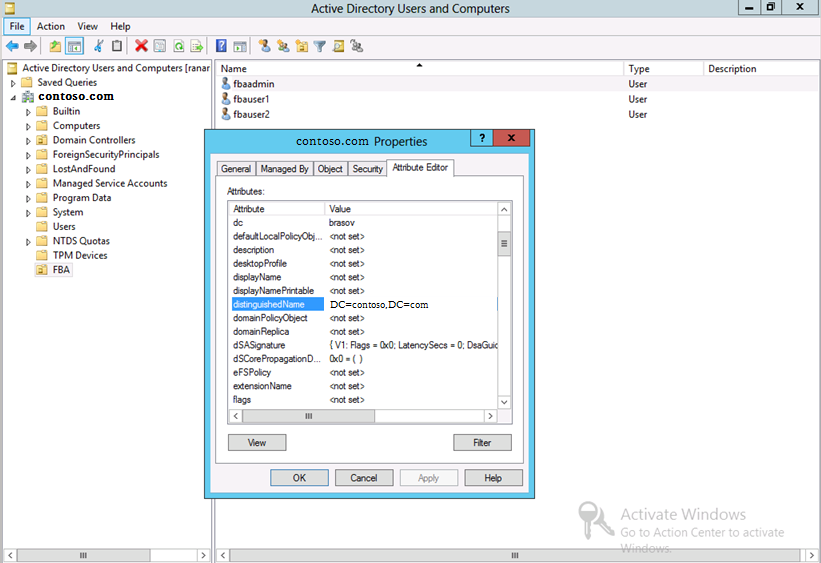
· For groupContainer you need the distinguished name of your group container – you can find it on the Domain Controller > Active Directory Users and Computers > right click on ‘your domain’ and switch to the ‘Attribute Editor’ tab:
b. To configure the Security Token Service web.config file
i. In the console tree of Internet Information Services (IIS) Manager, open the SharePoint Web Services site.
ii. In the console tree, right-click SecurityTokenServiceApplication, and then click Explore.
iii. In the folder window, double-click the web.config file.
iv. In the <Configuration> section, create a new <system.web> section and add the following example entry:
<membership>
<providers>
<add name="membership"
type="Microsoft.Office.Server.Security.LdapMembershipProvider, Microsoft.Office.Server, Version=15.0.0.0, Culture=neutral, PublicKeyToken=71e9bce111e9429c"
server="contosodc.contoso.com"
port="389"
useSSL="false"
userDNAttribute="distinguishedName"
userNameAttribute="sAMAccountName"
userContainer="OU=FBA,DC=contoso,DC=com"
userObjectClass="person"
userFilter="(&(ObjectClass=person))"
scope="Subtree"
otherRequiredUserAttributes="sn,givenname,cn" />
</providers>
</membership>
<roleManager enabled="true" >
<providers>
<add name="rolemanager"
type="Microsoft.Office.Server.Security.LdapRoleProvider, Microsoft.Office.Server, Version=15.0.0.0, Culture=neutral, PublicKeyToken=71e9bce111e9429c"
server="contosodc.contoso.com"
port="389"
useSSL="false"
groupContainer="DC=contoso,DC=com"
groupNameAttribute="cn"
groupNameAlternateSearchAttribute="samAccountName"
groupMemberAttribute="member"
userNameAttribute="sAMAccountName"
dnAttribute="distinguishedName"
groupFilter="(&(ObjectClass=group))"
userFilter="(&(ObjectClass=person))"
scope="Subtree" />
</providers>
</roleManager>
Note: you have to substitute the yellow highlighted parts with the information specific to your environment, as described above at point 3.a.v.
c. To configure the new web application’s web.config file
i. In the console tree of Internet Information Services (IIS) Manager, right-click the site that corresponds to the name of the web applications that you just created, and then click Explore.
ii. In the folder window, double-click the web.config file.
iii. In the <Configuration> section, find the <system.web> section.
iv. Find the <membership defaultProvider="i"> section and add the following example entry to the <Providers> section:
<add name="membership"
type="Microsoft.Office.Server.Security.LdapMembershipProvider, Microsoft.Office.Server, Version=15.0.0.0, Culture=neutral, PublicKeyToken=71e9bce111e9429c"
server="contosodc.contoso.com"
port="389"
useSSL="false"
userDNAttribute="distinguishedName"
userNameAttribute="sAMAccountName"
userContainer="OU=FBA,DC=contoso,DC=com"
userObjectClass="person"
userFilter="(&(ObjectClass=person))"
scope="Subtree"
otherRequiredUserAttributes="sn,givenname,cn" />
Note: you have to substitute the yellow highlighted parts with the information specific to your environment, as described above at point 3.a.v.
v. Find the <roleManager defaultProvider="c" enabled="true" cacheRolesInCookie="false"> section and add the following example entry to the <Providers> section:
<add name="roleManager"
type="Microsoft.Office.Server.Security.LdapRoleProvider, Microsoft.Office.Server, Version=15.0.0.0, Culture=neutral, PublicKeyToken=71e9bce111e9429c"
server="contosodc.contoso.com"
port="389"
useSSL="false"
groupContainer="DC=contoso,DC=com"
groupNameAttribute="cn"
groupNameAlternateSearchAttribute="samAccountName"
groupMemberAttribute="member"
userNameAttribute="sAMAccountName"
dnAttribute="distinguishedName"
groupFilter="(&(ObjectClass=group))"
userFilter="(&(ObjectClass=person))"
scope="Subtree" />
Note: you have to substitute the yellow highlighted parts with the information specific to your environment, as described above at point 3.a.v.
After you have done all changes in the web.config files, save and close the files.
4. Create a new site collection for the new created Web Application and add the FBA user as site collection administrator
a. Browse to Central Administration > Application Management > Create site collection.
b. Choose the Web Application which you have created at step 2.
c. Add a Title for the site, e.g. rootsite.
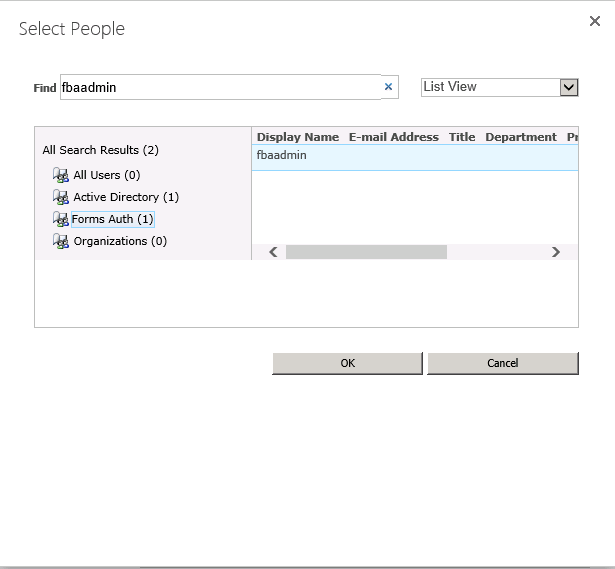
d. In the Primary Site Collection Administrator click on the  symbol and search for the user name created at step 1.
Select the user found under “Forms Auth” and click OK.
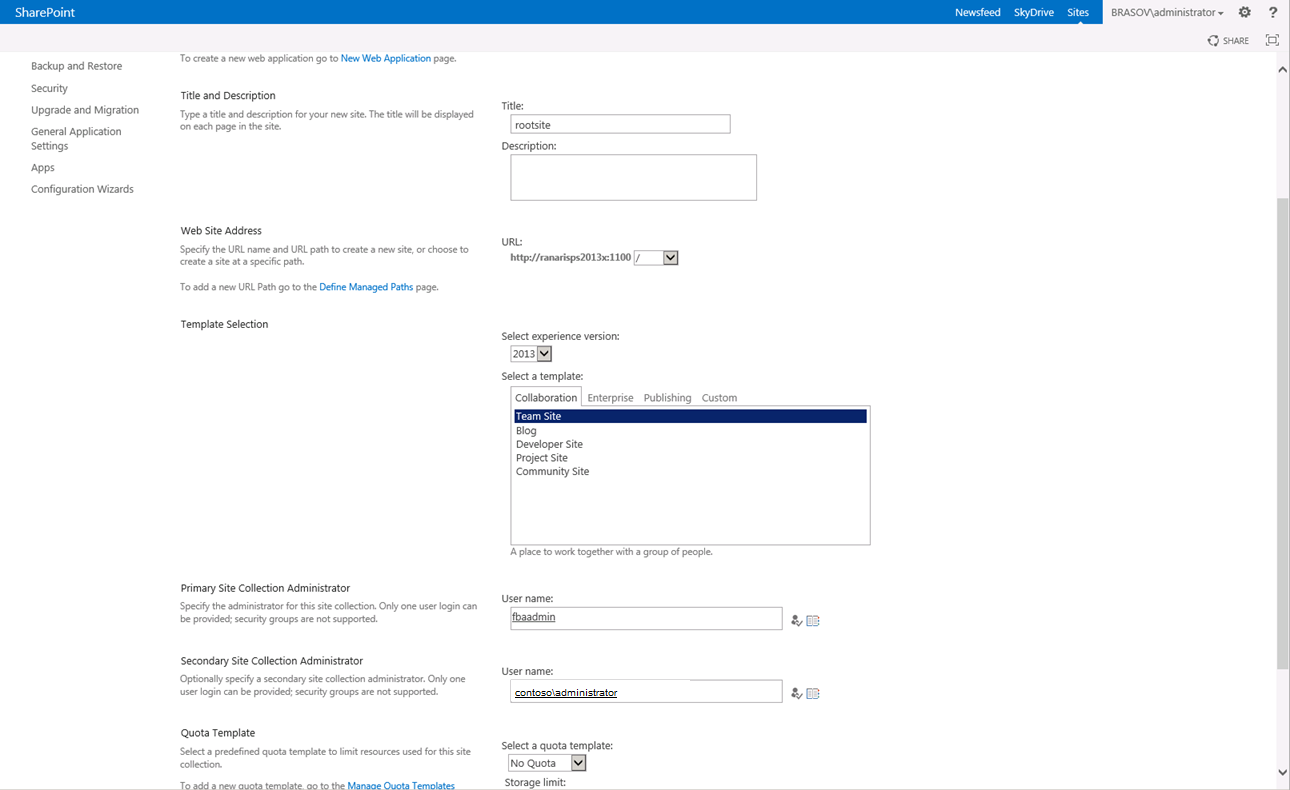
The settings for the new site collection will look like this (I added also a secondary site collection administrator):
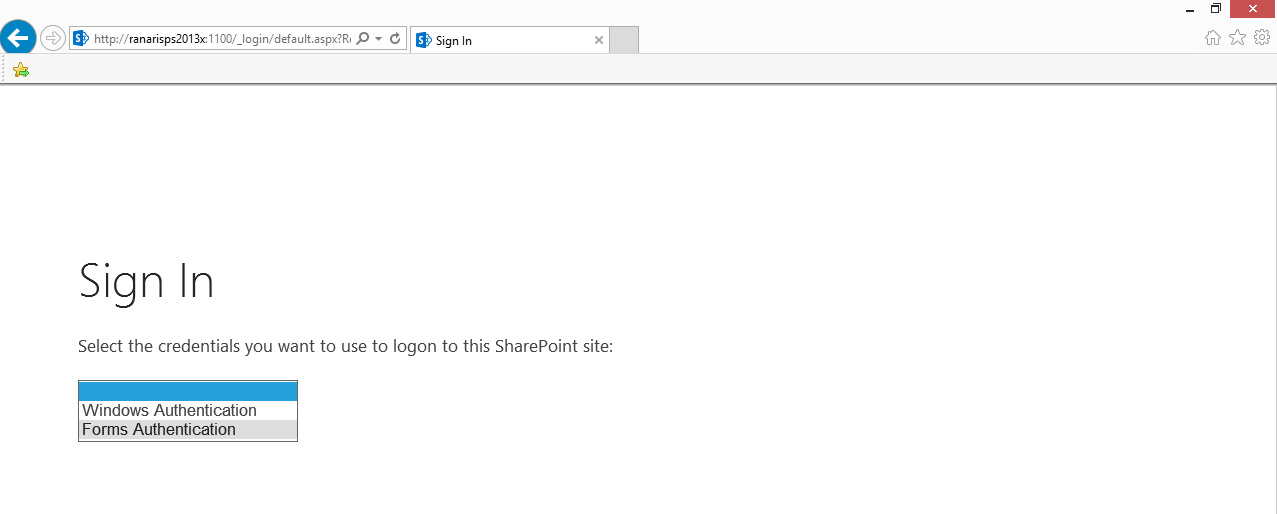
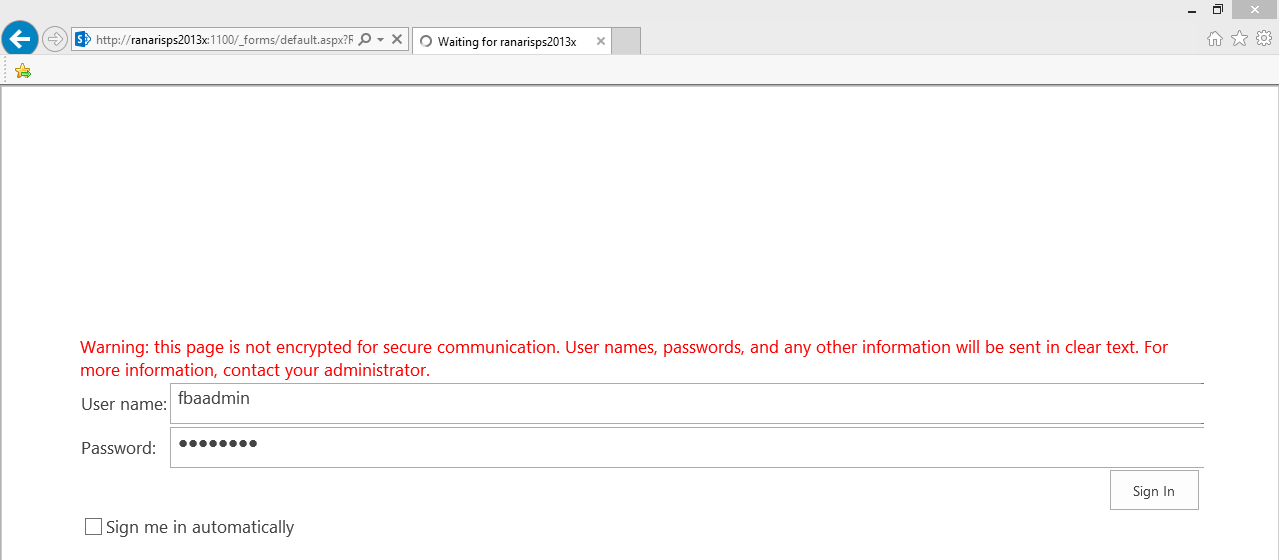
5. Browse to the new created site and test the functionality.
If you have selected both Windows NTLM and FBA authentication, you will get a dropdown menu where you can choose between the 2 authentication mechanisms: