How to bulk import Test Cases into Visual Studio Online
A customer of mine didn’t want to renew their license with Quality Centre as all of their requirements were in TFS and the business were planning iterations there; but their test cases were not linked up with those requirements.
Here is a step-by-step guide on how to easily move your Test Cases from QC into TFS. This does not take attachments and is a one way migration.
Step 1: Go to your Team Project and click the ‘TEST’ tab at the far right. Please bear in mind that new features are added at the end, so by the time you read this it may not be the last item!
You will be presented with some guidance that you can only create test cases in a test plan.
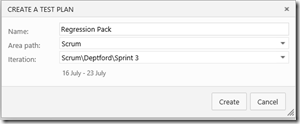
Step 2: Here you will have to give the Test Plan a name to group these test cases with. You will notice that my area path is called ‘Scrum’, this is because this is test Team Project called scrum using the Scrum Process Template. You can change this to any existing team (area path) you require. You can also chose the iteration that these tests will be created in. The wizard will chose the current sprint for you. However, because I am migrating my regression test scripts in, I am going to create these at a Release level and not a sprint level.
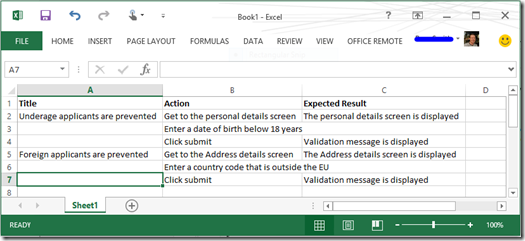
Step 3: Look at your export from Quality Centre in your Excel file and tidy it up so that it is in a 3 column format, like so
Step 4: Go to the Grid View in Visual Studio Online. Change List to Grid
Step 5: You should now be able to paste your spread sheet into the grid – don’t copy the headings!
Any formatting in the columns, other than multiline, will not be copied into the worksheet. After you click the ‘Save’ icon, TFS will generate you some work item Id’s. Notice that TFS has greyed out some cells as these are not editable anymore in this context. You can add test step actions and you can do simple formatting of the cell like bold and italic.
Have a play!


