Windows Azure Service Token Acquisition Explained
As I journey into Windows cloud-land (otherwise known as Azure and Azure Services), I am finding the path to getting starting to be a bit tricky. I have run into several gotchas as I worked through the process of requesting and using the various token types that are needed. To that end, I decided to talk about what I've learned here.
First - all token types will at some point require you to log in with a Windows Live ID. For testing purposes you may want to create a new, unique Windows Live ID. Alternatively, you may wish to use an existing Live ID. In either case, to prepare whichever Live ID you choose to use, you'll want to visit the Microsoft Billing site at https://billing.microsoft.com and then to fill in any blank or 'TBD' fields for EACH account associated with the Live ID that will use. I had, for example, three account types associated with the Windows Live ID I choose to use (regular, Geneva [internal] beta, and XBox). The immediate reason for this is that some token types require a credit card for authorization (there are no fees during the beta period) and that credit card authorization will fail if there is missing information for any of the accounts at the billing site.
Second - you'll want to take a look at the Azure stack to decide which parts you wish to work with. Each of these three main types has a different token acquisition and usage method currently. Here are your choices:
1) Core Azure Services - there are two service types - Azure Storage (table, blob, or queue) or Azure Hosting (currently for .NET apps only) This is represented by the large rectangle at the bottom of the graphic above.
2) Live Services - there are two service types - Live Framework CTP or Live Services Existing APIs
3) Premium Azure Services - there are two offerings - either all (includes .NET Services, SQL Services and Workflow) or SQL Services only
To get started, you'll want to navigate to the core Azure Services Platform website registration page (shown in the screenshot below).
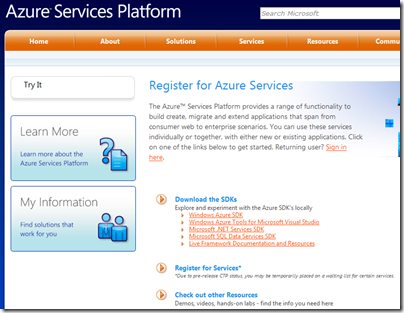
Third - set up your development environment. You must have VS2008, and I would recommend downloading every SDK shown on the main Azure Services Platform website section (shown in the screenshot above). That is the Windows Azure SDK, Windows Azure Tools for VS (2008), etc...
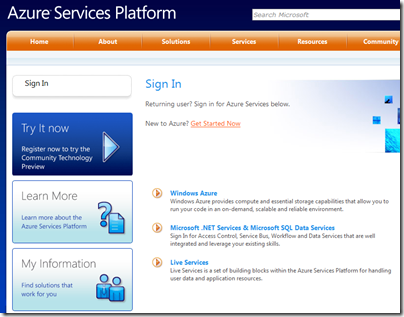
Fourth - request your first token. I am going to first describe the process for requesting a Core Azure Services token. Go to the main Microsoft Azure Service Platform website and then sign in with the Live ID that you have chosen to use. You'll note that when you click 'Sign In' you will see the three types of projects described above, i.e. Windows Azure, Microsoft .NET & Microsoft SQL Data Services or Live Services. If you click on 'Windows Azure' or 'Live Services' you'll be prompted for a Windows Live ID. If you click on 'Microsoft .NET & Microsoft SQL Data Services' you'll be prompted to enter a token (we'll come back to this option later). Click on Windows Azure and then sign in with your Live ID.
You will be redirected to another site Microsoft Connect. Here you sign up and wait to receive an email response which contains a token that must redeem at which ever developer web site is associated with the service type that you've requested. The amount of time it takes to receive a response (and a token) will vary due to the capacity for the beta and the status of your invite. After you get your response email (sent to the email address associated with the Windows Live ID you used to sign in), then...
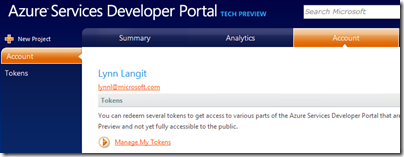
Fifth - redeem your token. For core Azure Services, you go to the Azure Services Platform registration website (shown in the previous screenshot), sign in and then click on 'Windows Azure', you will then be re-directed to the Azure Developer Portal (shown below). There you click on the 'Account' tab and then on the 'Manage my Tokens' link. Then you copy and paste the token value you received in email into the text box and then click on the 'Claim Token' button. The portal will generate a Token ID and display it on the 'Tokens' page. This generated value (tokenID) is NOT needed when your coded solutions, rather it is used for account validation in general. Having a valid tokenID will enable you create an Azure Services Project, which you have to do BEFORE you write any code for your particular solution.
Azure Services tokens have two types of functionality - either core Azure Services (in that either hosting or data storage or both) -OR- Live Services. Live Services Tokens also have two flavors (either Public APIs or Live Framework CTP). For this first example, I'll assume you've requested a token for the former. That being said, you should see the 'Bucket' column on the Tokens page with the value 'Compute Only'.
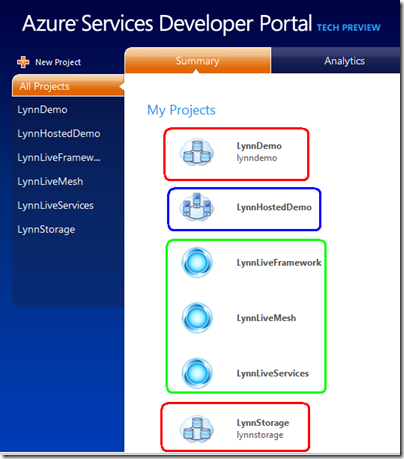
Sixth - create a project. After the token redemption process is complete, you should be able to create a new project in Azure Services Developer Portal website (shown above) by clicking on the 'New Project' Link. Your choices are either Windows Azure (core) or Azure Services Platform (currently the two types of Live Services). You'll note in the screen below that I have already used all the allotment from my tokens (created project names are listed down the left side, 'LynnDemo', etc...) because the Windows Azure project type is greyed out and says '0 project(s) remaining.' Remember that tokens are issued EITHER for core or live, so if you expected your token to allow you to create core projects and this option is greyed out, then you probably got a token that is only valid to create live projects.

After you've successfully created a project, then you'll want to click on the project name (listed on the left side of the main Azure Services Developer Portal) to see details which you will need when you write code to work with that project. For example, for an Azure storage project, the details will include the blob, queue and table storage endpoint URIs as well as the primary and secondary access key values. You normally include these values in your config file. Fortunately, before you work directly with cloud storage or hosting, azure hosted services and storage have a the ability to test locally first. This is a fantastic feature, for more about how it works, read this blog post.
You can see in the screenshot below that I've been busy working with Azure Services projects. In Red, LynnDemo and LynnStorage are projects of type Azure Storage Account. In Blue, LynnHostedDemo is a project of type Azure Hosted Services. In Green, LynnLiveFramework, LynnLiveMesh and LynnLiveServices are projects of type Azure Services Platform (or Live Services).
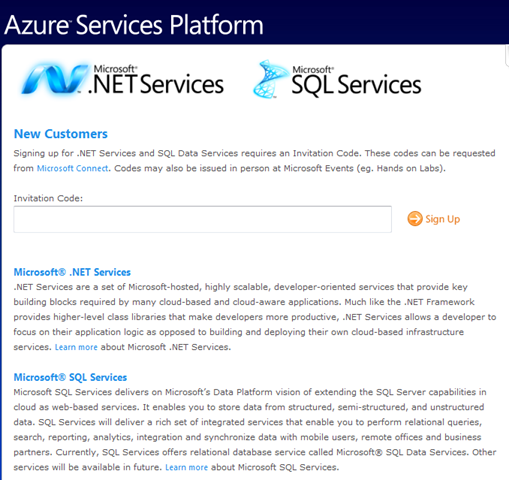
Seventh - now you may want to work with SQL Data Services. The process for requesting a token is a bit different for this. From the main Azure Service portal site sign in page, click on the Microsoft .NET & Microsoft SQL Data Services link. This will open a new site, shown below. You'll note that you need to enter an invitation code in the text box. As with core Azure services tokens, you request a code (or token) via the Microsoft Connect site (linked on the page).
After you receive two emails from Connect with the invite code and another one with more information, then return to this page and enter the invitation code that was emailed to you here. Then click on the 'Sign Up' link. You'll be take to a validation page where you must enter valid credit card information for authorization. As I mentioned earlier, you won't be charged during the beta period. One point to be aware of is that all fields must match exactly and ARE CASE SENSITIVE. If you are getting rejected by the validation page and you don't know why, then call your credit card company and get their authorization number and send that number in an email back to the email address where you got the invitation code and you will receive further instructions on how to resolve the issue.
After you successfully authenticate, then you will create a solution name and password. Passwords must be 10 characters. The solution name is the username for your SQL Services account. You will also need to provision an authority (which represents a geo-location) to work with SQL Services. Be aware that at this time Authority string values must be all lower-case character values only. For testing purposes you can generate a Authority value using a web-based utility that community .NET developer Mike Amundsen wrote. Use this only for testing as the utility requires you to enter your username and password in clear text into his website. When you are developing with SQL Data Services, be aware there is no local testing mechanism at this time. If you receive 'authority not found' errors in test clients, then your URI construction is invalid, if you receive 'container not found' errors, remember that must first CREATE the container in the cloud (this differs from Azure table storage).
You may also wish to download the SDS SDK (which includes the SDS Explorer [shown in the screenshot below] and the SDS tool) as well as the Azure Services Training Kit. The latter includes hands on labs, whitepapers and more.

Happy coding!