Running Code Metrics as Part of a TFS 2010 Build – The Poor Man’s Way
 Code Metrics, not to be confused with code analysis, has always been
 tough impossible to run as part of a build in Team Foundation Server. Previously, the only way to run code metrics was to do so inside Visual Studio itself.
In January, Microsoft released the Visual Studio Code Metrics PowerTool, a command line utility that calculates code metrics for your managed code and saves the results to an XML file (Cameron Skinner explains in detail on his blog). The code metrics calculated are the standard ones you’d see inside Visual Studio (explanations of metric values):
- Maintainability Index
- Cyclomatic Complexity
- Depth of Inheritance
- Class Coupling
- Lines Of Code (LOC)
Basically, the power tool adds a Metrics.exe file to an existing Visual Studio 2010 Ultimate or Visual Studio 2010 Premium or Team Foundation Server 2010 installation.
So what does this mean? It means that you can now start running code metrics as part of your builds in TFS. How? Well, since this post is titled “The Poor Man’s Way”, I’ll show you the quick and dirty (read: it works but is not elegant) way to do it.
As a note, Jakob Ehn describes a much more elegant way to do it, including a custom build activity, the ability to fail a build based on threshold, and better parameterization. I really like how flexible it is! Below is my humble, quick & dirty way.
The below steps will add a sequence (containing individual activities to the build process workflow that will run just prior to copying binaries to the drop folder. (These steps are based on modifying DefaultBuildTemplate.xaml.)
- Open the build process template you want to edit (it may be simpler to create a new template (based on the DefaultBuildProcessTemplate.xaml) to work with.
- Expand the activity “Run On Agent”
- Expand the activity “Try, Compile, Test and Associate Changesets and Work items”
- Click on “Variables”, find BuildDirectory, and set its scope to “Run On Agent”
- In the “Finally” area, expand “Revert Workspace and Copy Files to Drop Location”
- From the toolbox (Control Flow tab), drag a new Sequence onto the designer, just under/after the “Revert Workspace for Shelveset Builds”. (Adding a sequence will allow you to better manage/visualize the activities related to code metrics generation).
- In the Properties pane, set the DisplayName to “Run Code Metrics”
- From the toolbox (Team Foundation Build Activities), drag a WriteBuildMessage activity into the “Run Code Metrics” sequence.
- In the Properties pane
- set DisplayName to Beginning Code Metrics
- set Importance to Microsoft.TeamFoundation.Build.Client.BuildMessageImportance.Normal (or adjust to .High if needed)
- set Message to “Beginning Code Metrics: “ & BinariesDirectory
- In the Properties pane
- From the toolbox, drag an InvokeProcess activity into the sequence below the “Beginning Code Metrics” activity (this activity will actually execute code metrics generation) .
- In the Properties pane
- set DisplayName to Execute Coded Metrics
- set FileName to “””<path to Metrics.exe on the build machine>”””
- set Arguments to “/f:””” & BinariesDirectory & “\<name of assembly>”” /o:””” & BinariesDirectory & “\MetricsResult.xml” (you can also omit the assembly name to run matrics against all assemblies found)
- set WorkingDirectory to BinariesDirectory
- In the Properties pane
- (optional) From the toolbox, drag another InvokeProcess activity below “Execute Code Metrics” (This activity will copy the XSD file to the binaries directory)
- In the Properties pane
- set DisplayName to Copy Metrics XSD file
- set FileName to “xcopy”
- set Arguments to “””<path to MetricsReport.xsd>”” ””” & BinariesDirectory & “”””
- In the Properties pane
- Save the XAML file and check it in to TFS.
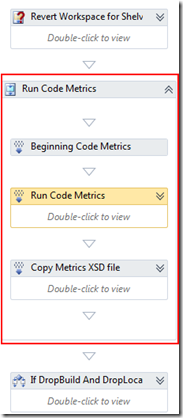
 The sequence you just added should look like (boxed in red):
You basically have a sequence called “Run Code Metrics” which first spits out a message to notify the build that code metrics are beginning.
Next, you actually execute the Metrics.exe executable via the InvokeProcess activity, which dumps the results (XML) file in the Binaries directory (this makes it simpler to eventually copy into the drop folder).
The “Copy Metrics XSD file” activity is another InvokeProcess activity which brings along the appropriate XSD file with the metrics result file. This is optional of course.
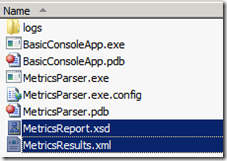
After you run a build using this updated template, your drop folder should have something like this:

Pay no attention to the actual binaries – it’s the presence of MetricsReport.xsd and MetricsResults.xml that matter.
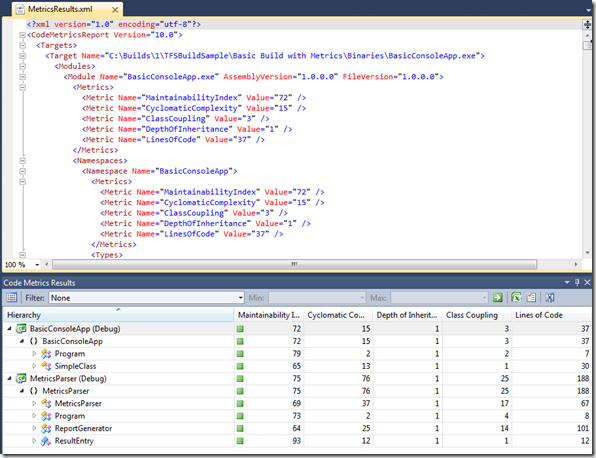
Pretty cool, but there’s one annoyance here! The metrics results are still in XML, and aren’t nearly as readable as the results pane inside Visual Studio:

Don’t get me wrong – this is a huge first step toward a fully-baked out-of-VS code metrics generator. The actual report generation formatting will surely be improved in future iterations.
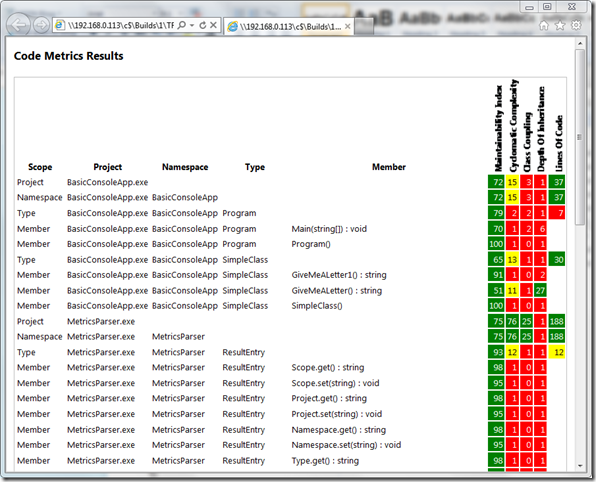
I decided to take one additional step and write a simple parser and report generator to take the XML results and turn them into something more pretty, like HTML.
Before I dive into code, this is the part where I remind you that I’m not (nor have I ever been) a developer by trade, so the code in this blog is purely for functional example purposes. ![]()
I created a relatively simple console application to read in a results XML file, parse it, and spit out a formatted HTML file (using a style sheet to give some control over formatting).
I’m posting the full example code to this post, but below are the highlights:
I first created some application settings to specify the thresholds for Low and Moderate metric values (anything above ModerateThreshold is considered “good”).

I created a class called MetricsParser, with properties to capture the results XML file path, the path to output the report, and a path to a CSS file to use for styling.
To store individual line item results, I also created a struct called ResultEntry:
struct ResultEntry
{
public string Scope { get; set; }
public string Project { get; set; }
public string Namespace { get; set; }
public string Type { get; set; }
public string Member { get; set; }
public Dictionary<string, string> Metrics { get; set; }
}
I then added:
private List<ResultEntry> entries![]()
which captures each code metrics line item.
If you look at the results XML file, you can see that in general the format cascades itself, capturing scope, project, namespace, type, then member. Each level has its own metrics. So I wrote a few methods which effectively recurse through all the elements in the XML file until a complete list of ResultEntry objects is built.
private void ParseModule(XElement item)
{
string modulename = item.Attribute("Name").Value.ToString();
ResultEntry entry = new ResultEntry
{
Scope = "Project",
Project = modulename,
Namespace = "",
Type = "",
Member = ""
};
List<XElement> metrics = (from el in item.Descendants("Metrics").First().Descendants("Metric")
select el).ToList<XElement>();
entry.Metrics = GetMetricsDictionary(metrics);
entries.Add(entry);
List<XElement> namespaces = (from el in item.Descendants("Namespace")
select el).ToList<XElement>();
foreach (XElement ns in namespaces)
{
ParseNamespace(ns, modulename);
}
}
Bada-bing, now we have all our results parsed. Next, to dump them to an HTML file.
I simply used HtmlTextWriter to build the HTML, the write it to a file. If a valid CSS file was provided, the CSS was embedded directly into the HTML header:
#region Include CSS if available
string cssText = GetCssContent(CssFile);
if (cssText != string.Empty)
{
writer.RenderBeginTag(HtmlTextWriterTag.Style);
writer.Write(cssText);
writer.RenderEndTag();
}
#endregion
After that, I looped through my ResultEntry objects, inserting them into an HTML table, applying CSS along the way. At the end, the HTML report is saved to disk, ideally in the build’s binaries folder. This then allows the report to be copied along with the binaries to the TFS drop location.

You’ll notice that this layout looks much like the code metrics in Visual Studio if exported to Excel.
So again, not the most sophisticated solution, but one that a pseudo-coder like me could figure out. You can expand on this and build all of this into a custom build activity which would be much more portable.
Here is the code for MetricsParser:
Again I recommend looking at Jakob’s solution as well. He puts a much more analytical spin on build-driven code metrics by allowing you specify your own thresholds to help pass or fail a build. My solution is all about getting a pretty picture
Happy developing!