Data-Driven Tests in Team System Using Excel as the Data Source
There is some documentation to explain this already, but below is a step-by-step that shows how to use an Excel spreadsheet as a Data Source for both unit and web tests.
First, let’s set the stage. I’m going to use a solution containing a class library and a web site.

The class library has a single class with a single method that simply returns a “hello”-type greeting.
 namespace SimpleLibrary
{
    public class Class1
    {
        public string GetGreeting(string name)
        {
            return "Hello, " + name;
        }
    }
}
For my VB friends out there:
 Namespace SimpleLibrary
    Public Class Class1
        Public Function GetGreeting(ByVal name As String) As String
            Return "Hello, " & name
        End Function
    End Class
End Namespace
Unit Testing
So now I’m going to create a unit test to exercise the “GetGreeting” method. (As always, tests go into a Test project. I’m calling mine “TestStuff”.)

Here’s my straightforward unit test:
 [TestMethod()]
public void GetGreetingTest()
{
   Class1 target = new Class1();
   string name = "Steve";
   string expected = "Hello, " + name;
   string actual;
   actual = target.GetGreeting(name);
   Assert.AreEqual(expected, actual);
}
In VB:
 <TestMethod()> _
Public Sub GetGreetingTest()
   Dim target As Class1 = New Class1
   Dim name As String = "Steve"
   Dim expected As String = "Hello, " & name
   Dim actual As String
   actual = target.GetGreeting(name)
   Assert.AreEqual(expected, actual)
End Sub
I’ll run it once to make sure it builds, runs, and passes:

I have an Excel file with the following content in Sheet1:

Nothing fancy, but I reserve the right to over-simplify for demo purposes. :)
To create a data-driven unit test that uses this Excel spreadsheet, I basically follow the steps you’d find on MSDN, with the main difference being in how I wire up my data source.
I click on the ellipsis in the Data Connection String property for my unit test.
Follow these steps to set up the Excel spreadsheet as a test data source for a unit test.
In the New Test Data Source Wizard dialog, select “Database”.
Click “New Connection”.
In the “Choose Data Source” dialog, slect “Microsoft ODBC Data Source” and click “Continue”. (For additional details about connection strings & data sources, check this out.)

In “Connection Properties”, select the “Use connection string” radio button, then click “Build”.
Choose if you want to use a File Data Source or a Machine Data Source. For this post, I’m using a Machine Data Source
Select the “Machine Data Source” tab, select “Excel Files” and click Ok
Browse to and select your Excel file.

Click “Test Connection” to make sure everything’s golden.

Click Ok to close “Connection Properties”
Click Next
You should see the worksheets listed in the available tables for this data source.

In my example, I’ll select “Sheet1$”
Click “Finish”
You should get a message asking if you want to copy your data file into the project and add as a deployment item. Click Yes.

You should now see the appropriate values in Data Connection String and Data Table Name properties, as well as your Excel file listed as a deployment item:

Now I return to my unit test, note that it’s properly decorated, and make a change to the “name” variable assignment to reference my data source (accessible via TestContext):
[DataSource("System.Data.Odbc", "Dsn=Excel Files;dbq=|DataDirectory|\\ExcelTestData.xlsx;defaultdir=C:\\TestData;driverid=1046;maxbuffersize=2048;pagetimeout=5", "Sheet1$",DataAccessMethod.Sequential),DeploymentItem("TestStuff\\ExcelTestData.xlsx"), TestMethod()] public void GetGreetingTest() { Class1 target = new Class1(); string name = TestContext.DataRow["FirstName"].ToString() ; string expected = "Hello, " + name; string actual; actual = target.GetGreeting(name); Assert.AreEqual(expected, actual); }
Again, in VB:<DataSource("System.Data.Odbc", "Dsn=Excel Files;dbq=|DataDirectory|\ExcelTestData.xlsx;defaultdir=C:\TestData;driverid=1046;maxbuffersize=2048;pagetimeout=5", "Sheet1$",DataAccessMethod.Sequential)><DeploymentItem("TestStuff\ExcelTestData.xlsx")> <TestMethod()> _ Public Sub GetGreetingTest() Dim target As Class1 = New Class1 Dim name As String = TestContext.DataRow("FirstName").ToString() Dim expected As String = "Hello, " + name Dim actual As String actual = target.GetGreeting(name) Assert.AreEqual(expected, actual) End Sub
Now, running the unit test shows me that it ran a pass for each row in my sheet

Yippee!
Web Testing
You can achieve the same thing with a web test. So I’m going to first create a simple web test that records me navigating to the website (at Default.aspx), entering a name in the text box, clicking, submit, and seeing the results. After recording, it looks like this.
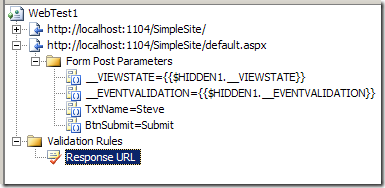
See “TxtName=Steve”? The value is what I want to wire up to my Excel spreadsheet. To do that:
Click on the “Add Data Source” toolbar button.
Enter a data source name (I’m using “ExcelData”)
Select “Database” as the data source type, and click Next
Go through the same steps in the Unit Testing section to set up a data connection to the Excel file. (Note: If you’ve already done the above, and therefore the Excel file is already in your project and a deployment item, browse to and select the copy of the Excel file that’s in your testing project. That will save you the hassle of re-copying the file, and overwriting.)
You’ll now see a Data Sources node in my web test:
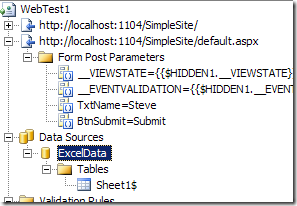
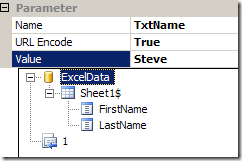
Select the parameter you want to wire to the data source (in my case, TxtName), and view its properties.
Click the drop-down arrow in the Value property, and select the data field you want to use.
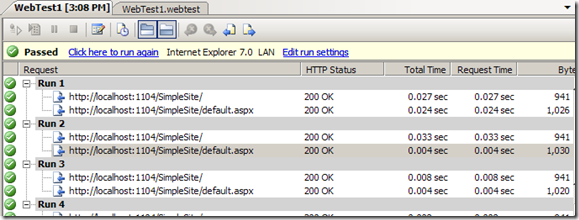
Now save and run your web test again. If you haven’t used any other data-driven web tests in this project, you’ll notice that there was only one pass. That’s because your web test run configuration is set to a fixed run count (1) by default. To make changes for each run, click “Edit run settings” and select “One run per data source row”. To make sure all rows in data sources are always leveraged, edit your .testrunconfig file to specify as such.
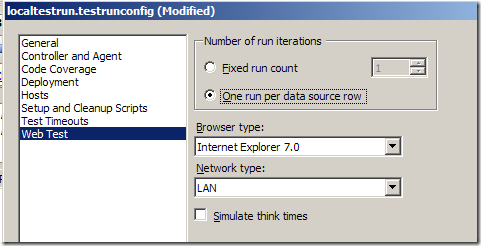
Now run it again, and you should see several passes in your test results:
That’s it in a simple nutshell! There are other considerations to keep in mind such as concurrent access, additional deployment items, and perhaps using system DSNs, but this should get you started.
