Using ASP.NET Dynamic Data in an existing Web Site
One of the tasks I used to hate when building a new system was adding admin pages to allow simple create/update functionality for lookup data. For example, maintaining a simple list of Products. It takes ages to write, and is very boring – even if you write templates to generate code it consumes a lot of time for such a commonly repeated and simple task.
ASP.NET Dynamic Data has now arrived, which gives a great way to “scaffold” CRUD pages over an Entity Framework Object Context (or other sources). But what if I have a web site that is mostly a line-of-business system, with complex business logic and custom UI, and I need to administer a small set of tables too?
Well, you can add Dynamic Data to a portion of your existing web site! This means you no longer need to write your own administration pages.
* Before you start off on this merry path, read this to make sure the relevant sections of your Entity Framework model are supported by Dynamic Data... for example, Complex Types are not.
How?
There’s a walkthrough that covers adding Dynamic Data to an existing web site here, so give that a read and you’ll be 80% of the way there. [Note: I also had to add a reference to System.Web.Entity at the end of the walkthrough to get it all working]
Next, make sure you have set ScaffoldAllTables to false – the last thing you want to do is expose your non-lookup data for direct editing by admin staff. All that should be exposed is a few key tables of static data. So, in Global.asax, make sure your data model registration looks like this;
model.RegisterContext(
typeof(OrderDbEntities),
new ContextConfiguration()
{ ScaffoldAllTables = false });
But how does the user get to this administration functionality? I’d recommend putting it under a virtual subfolder in your web site – perhaps named “Admin”. This is really just a route (read up on the new ASP.NET Routing features if this is unfamiliar) and needn’t really exist as a physical folder. So in Global.asax, we set it up as follows;
routes.Add(new DynamicDataRoute("Admin/{table}/{action}.aspx")
{
Constraints = new RouteValueDictionary(
new { action = "List|Details|Edit|Insert" }),
Model = model
});
Note that my route begins with “Admin/...”, which means the user will browse to URLs as follows to get to the admin pages;
https://{add address here}/myfakewebsite/Admin/Product/List.aspx
You can of course link to these pages from elsewhere within your site to save the user typing them in.
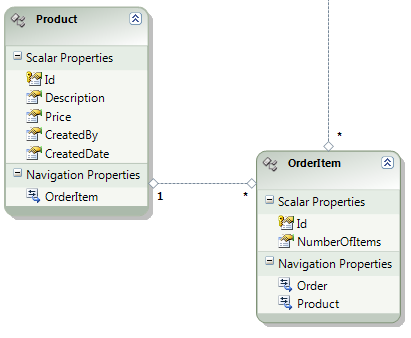
At the moment, we’re not scaffolding any of our tables, so none of these URLs will work yet. The next step, then, is to pick a table to expose for administration. I’m going to use a Product table that has ID, Description, Price and CreatedBy/CreatedDate fields. In my EF model the entity also has an OrderItems navigation property which allows me to get all Order Item records that are an instance of an order for the current product...
Due to the way EF supports partial classes, I can tell the Dynamic Data runtime to scaffold the Product table using an attribute (from the System.ComponentModel.DataAnnotations namespace & assembly) on a partial class. I added a C# class to the Web Site with the same namespace as the Entity Framework model, and pasted in the following code;
[ScaffoldTable(true)]
public partial class Product
{
}
Immediately this attribute is added the Product table is available for editing. There are a few problems when I browse to the new page though;
1. It is displaying the link to Order Items even though it isn’t editable (because Order Item isn’t scaffolded).
2. I can edit the columns I’m using for Audit – CreatedBy and CreatedDate. Not good.
It turns out changing this is quite easy. Using some additional attributes and a metadata class as follows customises the model sufficiently (see here for more info on this metadata class approach);
[MetadataType(typeof(ProductMetadata))]
[DisplayColumn("Description")]
[ScaffoldTable(true)]
public partial class Product
{
}
public class ProductMetadata
{
[UIHint("TextReadOnly")]
public string CreatedBy;
[UIHint("TextReadOnly")]
public string CreatedDate;
[ScaffoldColumn(false)]
public EntityCollection<OrderItem> OrderItem;
}
I’ve now instructed the runtime not to display the Order Item navigation property, and to use the Description field should I display Products in a list somewhere (as part of a foreign key drop-down, for example).
I’ve also asked it to use the “TextReadOnly” user control to render my CreatedDate and CreatedBy fields instead of the standard Text control, by placing a [UIHint] attribute on two metadata properties. To create the TextReadOnly control I copied-and-pasted the “Text.ascx” control twice, and renamed the copies to “TextReadOnly.ascx” and “TextReadOnly_Edit.ascx”. This control will now be used whenever the CreatedDate and CreatedBy fields are displayed (note I’ve cheated here – CreatedDate is really a date but as I’m happy with the default ToString display mechanism for it I didn’t bother creating a DateTime ReadOnly control).
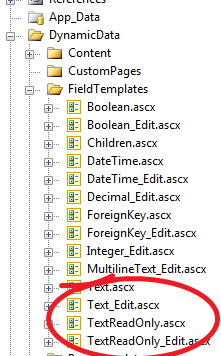
As you can see, these user controls are available for you to edit under the DynamicData/FieldTemplates folder that was copied in as part of the original walkthrough. If you want to change this folder to be somewhere else, check out this article.
Finally, we probably want to limit access to the admin pages to a limited set of privileged users. The easiest way to do this is using standard ASP.NET authorisation, by adding a location and authorisation element to web.config;
<location path="Admin">
<system.web>
<authorization>
<allow roles="domain\role"/>
<deny users="*"/>
</authorization>
</system.web>
</location>
Next steps...
There’s plenty more you might like to do, so I would recommend looking further into the features that Dynamic Data provides.
One that is particularly likely to be of interest is customising validation of data that is maintained... a good starting point is the ValidationAttribute.
You probably also want to change Site.master to better reflect your site (or move it, rename it, and update the templates under DynamicData/PageTemplates to use the new one). As long as you have a ScriptManager and the required Content Placeholder on there, it should work great. You can obviously make use of your own CSS too, or even go as far as changing all the field templates.
If you’d like a general overview of how Dynamic Data fits together, have a read of the Infrastructure Overview.
Finally, remember that I’m basing mine on an Entity Framework model, so I could customise the model too – for example, hooking up to the SavingChanges event to perform processing and/or validation on the Product table before it is saved to the database.
I hope all that is useful, and saves you time and boredom for your next system... enjoy!