Web-client development with Ember.js and Windows Azure Mobile Services - Part 4
In the previous posts (1, 2, 3) I covered creating an Ember.js-based single page application, then wiring it up to Windows Azure Mobile Services for data storage. But currently it allows everyone to post anonymously. I at least want some basic authentication so I can verify the user is a real person and maybe hold them accountable for things they post.
Restricting permissions
I only want authenticated users to be able to write posts, but I want everyone to be able to read them. This can be accomplished pretty easily using the Windows Azure Management portal by performing the following steps:
Open a browser and navigate to your Mobile Service instance, select Data, the posts table, and finally select Permissions.
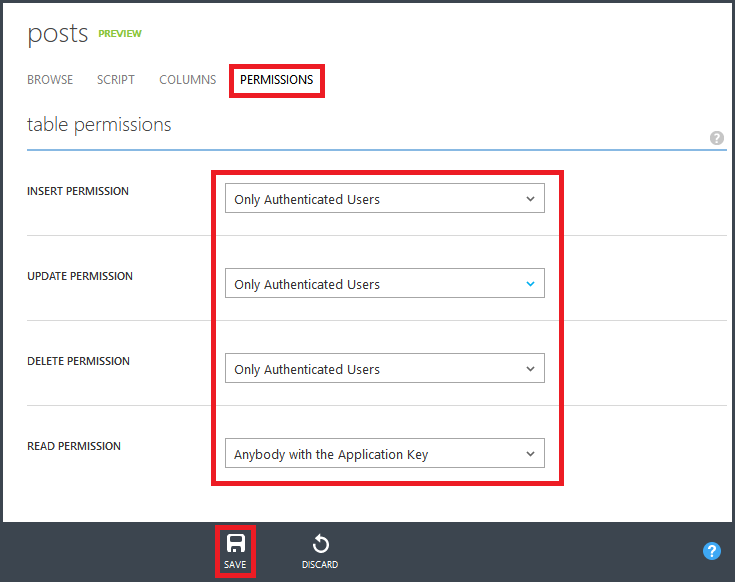
Set the insert, update, and delete permissions to Only Authenticated Users. Leave Read at Anybody with the Application Key.
Click the Save button at the bottom to apply the changes.
At this point, if you attempt to create a new post using the application, it will silently fail.
Setting up authentication
Windows Azure Mobile Services makes it trivially easy to set up authentication using Facebook, Google, Microsoft account (formerly LiveID), or Twitter as the authentication provider. The documentation on WindowsAzure.com is pretty comprehensive on setting this up already, so for this step I just followed the Register your app for authentication and configure Mobile Services section of the document. For my providers, I just used Google and Twitter.
If you are following along, just do that section and stop when you hit the "Restrict permissions to authenticated users" section, since that's already been done in the previous step.
Implementing login/logout
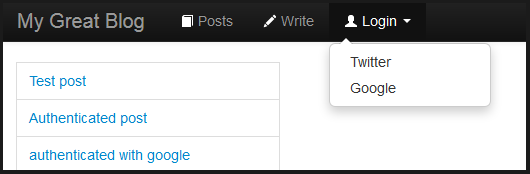
Since login/logout is a global thing, I wanted the link to be highly visible. So putting it at the end of the navigation bar was a natural choice.
I also needed a way to globally track the login state, so I used Ember.StateManager to track that state.
Then there's the actions to handle login & logout. These need to work regardless of the page I'm viewing; I don't want to have to implement these actions on all controllers. Luckily, actions bubble up to the ApplicationController if they're not handled by other controllers.
State
Thanks to StackOverflow thread for pointing me to the solution for this. Here's the LoginStateManager
The state is either isNotAuthenticated (the default) or isAuthenticated. It will log to the console when a state change occurs. Notice the manager.transitionTo(). This is the transition between states.
Controller(s)
I needed to define the ApplicationController, since that's where I wanted to handle the login/logout events. This also needs to tell the state machine to change state as well as provide an isAuthenticated property that the navbar can use to determine whether to show login/logout. I also wanted to use this in the NewpostController, so I added it there as well. And I want to pull the user name in automatically from the authentication token, so I just removed the author field here and in the template below. Here's the code:
Note that isAuthenticated is just checking the authState of the LoginStateManager to determine state. But to get to this point, you have to wire up a binding that returns the current state.
For login events, I'm passing the provider from the user selection in the navbar as the provider parameter, then using this with client.login() to tell Windows Azure Mobile Services which of the configured providers to use for this authentication request.
For transitioning between login/logout state, it just sends a login/logout to the state manager, along with the currentUser information returned by the client.login() request for logins.
Navbar
The following is a version of application.hbs updated to provide login/logout functionality:
The {{#if isAuthenticated}} displays login or logout menu choices as appropriate.
For the login menu item, I went with a drop-down selection between Twitter and Google. The important bit here is the {{action login "twitter"}} and {{action login "google"}}. Both invoke the login action and pass it a string of either "twitter" or "google". This will be shows up in the controller as the provider parameter discussed earlier, if you are using a different provider, just change the fields appropriately.
For logout, this just calls the logout action.
Post writing improvements
I mentioned earlier that after restricting access to the CRUD functions on Windows Azure Mobile Services that if you submitted a new post while logged out that it would silently fail. Who actually wants to fill out a huge blog post, hit send, and see all their work lost? Pretty much nobody. So to make this better, I added a check for isAuthenticated and display an alert if you aren't logged in.
I also removed the author field, as I set that from the authentication returned from Mobile services.
Getting the user name
One of the things Mobile Services provides is server-side JavaScript (node.js) for CRUD operations. I use the insert operation to pull in the user name and add it to the post as it is saved to the data store. Here's the steps to accomplish this.
Using the Windows Azure management portal, go to your Mobile Services instance and select the posts table.
Select Script, and finally select Insert from the Operation dropdown.

Replace the existing code with the following, then click the Save button
This will perform a lookup of the friendly user name based on the unfriendly user ID returned by the authentication provider, and then use that to populate the Authors field.
Also, big thanks to Carlos Figueira and Devhammer for their blogs on accomplishing this.
Testing the new changes
If you run the application locally using grunt server, you'll notice that there is now a login menu, and that selecting one of the items from it presents you with an authentication/login page for that provider. If you visit the Write link while logged out, you'll notice that you get a nice message now stating that you need to login in order to write a post.
But, there's a slight problem at this point; some browsers (cough IE cough) don't like the fact that you're running the page locally, but the authentication is happening on the internet. So while you are presented with the authentication window, it doesn't actually work. You can make it work by disabling some security stuff to test this locally. To do this, open the Security tab of Internet Options, click Local Intranet, click Sites, and disable Automatically detect intranet network. Remember to turn it back on after testing.
Or you can just publish this to a Windows Azure Web Site and try it that way.
Create a Windows Azure Web Site
You can create a new Web Site from the Windows Azure Management Console by performing the following steps:
Click +NEW, select Compute, Web Site and Quick Create. When prompted, give it a unique URL and select a region.
If Web Site isn't an option, you will have to follow the steps to enable the preview for your account.
Once the site has been created, select it and navigate to the Dashboard. Here you'll see some quicklinks for things like the site URL, resetting/creating deployment credentials, etc. If you haven't already enabled FTP deployment or set credentials, you can do that using the links here.
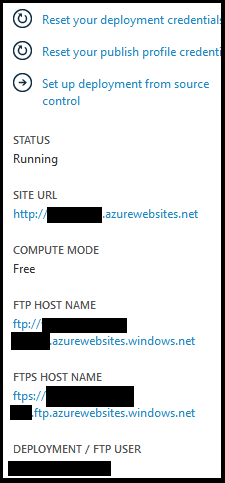
The pieces you want are the FTP HOST NAME and DEPLOYMENT / FTP USER. Save these.
Configure Grunt for FTP deployment
There's a Grunt task that will deploy the compiled application using FTP. Here are the steps to configure this:
From a command-prompt/bash/terminal session, change directories to the emberapp directory and run the following command:
npm install grunt-ftp-deploy --save-devThis will install the ftp-deploy task bits, and save it to the devDependencies section of the package.json file.
Open the gruntfile.js file and add the following to it and then save the file:
Replace the host with the FTP host returned from the Dashboard of your web site. For example, if the FTP HOST NAME in the dashboard is displayed as ftp://waws-prod-blah-001.ftp.azurewebsites.windows.net/, you'd just set the host as waws-prod-blah-001.ftp.azurewebsites.windows.net.
I just added this between the
clean:andjshint:sections of the gruntfile, so that should be a safe location.Open the .gitignore file and add a new line at the end that contains the following value and then save the file:
.ftppassThe .ftppass file contains the username/password for the FTP server. Adding it to .gitignore prevents Git from recording the value in the repository.
Create a new file named .ftppass in the emberapp directory. Add the following to it, replacing the 'website\username' and 'website password' with your username and password.
You can obtain your username for the FTP server from the Dashboard. Note that it has a '\' character in it. You will have to double this when recording it to the .ftppass file, as one '\' is interpreted as an escape sequence.
Save the file.
Build and deploy
To build and deploy, perform the following actions:
From a command-line\bash\terminal session, run the following:
grunt buildThis will spin a while, then eventually say Done without errors. You should now have a dist folder under emberapp. The build task takes the files for the application, minifies the JS, compresses things, etc. and this is what you get.
Next, deploy:
grunt ftp-deployThis should go through a few Uploaded file statements for each file in the dist folder, and finally give you a **Done without errors."
Authorize your web site to use Mobile Services
By default, Mobile Services allows requests from localhost, but not anywhere else. So we need to add your Windows Azure Web Site so that it can work with Mobile Services. To do this, perform the following steps:
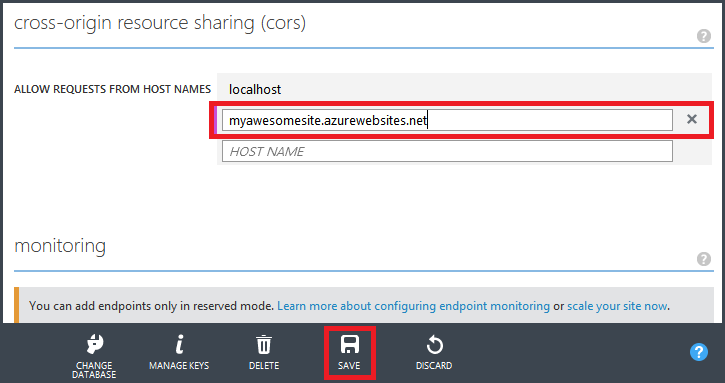
Go to your Windows Azure Web site Dashboard, and find the link under Site URL. Grab the host name from there. For example, if the Site URL is https://myawesomesite.azurewebsites.net, then the host name is just myawesomesite.azurewebsites.net.
Go to your Windows Azure Mobile Services instance and select Configure. Scroll down the page until you find the Cross-Origin Resource Sharing (CORS) section. Enter the hostname for your site here, and then click the Save button at the bottom to save the changes.
At this point, you should be able to visit the site URL in the browser and it should allow you to login/out, view and create posts.
Summary
This post ended up longer than I anticipated, hopefully it wasn't TL;DR. And hopefully you learned that it's pretty easy to wire up Mobile Services to Ember.js, and that the server-side scripting for Mobile Services is pretty neat. So where to next? Not sure. For this app I'm done for the moment, though I think it'd be neat to add an actual users table where I can store user IDs and flag then as 'authenticated' so not just any random user with a login can post. That's something I may tackle over the summer.
I've uploaded the bits for authentication to auth branch of the repository at https://github.com/Blackmist/emberapp/tree/auth so feel free to clone/fork and hack around.