Web-client development with Ember.js and Windows Azure Mobile Services - Part 3
Last week I created a new single page application using Ember.js as the client framework (see Part 1 and Part 2). Today, I finish up the application by adding Windows Azure Mobile Services for data storage. In case you don't want to slog through the previous two posts, I've uploaded the current application to GitHub at https://github.com/Blackmist/emberapp.
Get Windows Azure Mobile Services
Mobile Services is a preview feature of Windows Azure, so you may need to enable the preview for your account. Once you've done this, perform the following steps to create a new service and get the HTML and JavaScript code to add a client to the application.
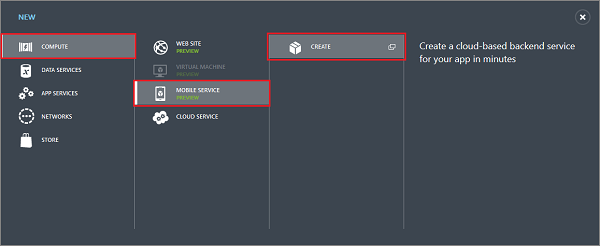
From the Windows Azure management portal select the +NEW button, and then select Compute, Mobile Service, Create.
In the Create a Mobile Service dialog, enter a unique value as the URL. You can either create a new database or use an existing one; either way you will have to provide the username and password to connect to the database.
Note: Windows Azure Mobile Services uses SQL Database as the back-end data store, but it abstracts everything away from you through a Node.js-based service that provides the CRUD API for you. In theory, Microsoft could swap the back-end to something else, like Table storage, and it wouldn't impact the client.
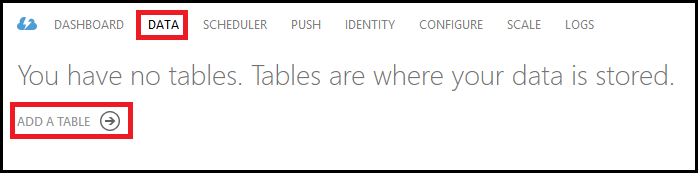
Once you get the "Your mobile service was created" page, select the Data menu, and then Add table.
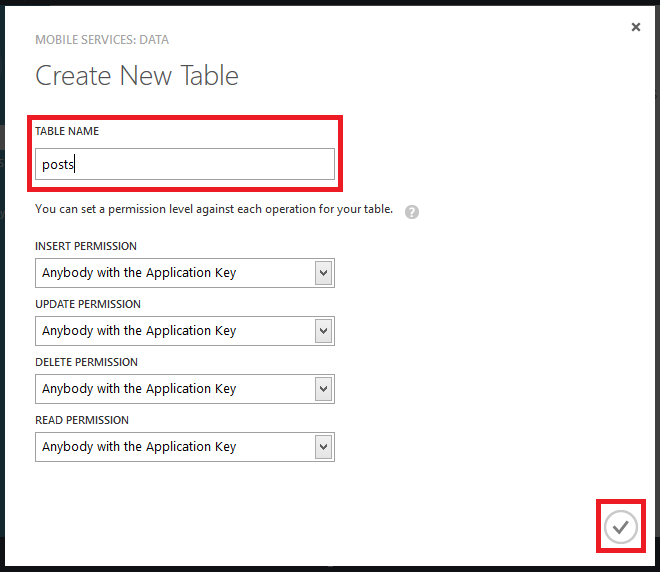
When prompted, create a new table named posts. Accept all the defaults by clicking the checkbox.
Next, click the lightning bolt icon (quickstart) on the left of the tabs for your project. This takes you back to the Getting Started page. Here, select Connect an existing HTML app.
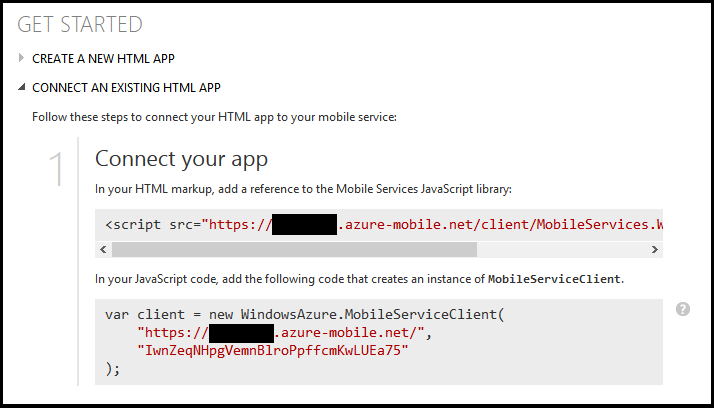
Copy and paste this <script>....</script> line into the index.html file. A safe place to paste it is before the following line:<!-- build:js scripts/main.js -->Save the index.html file.
Next, copy the JavaScript code that defines the client. Add this to the app.js file. Place it immediately after the following line:
var App = window.App = Ember.Application.create();Save the app.js file.
At this point, the application is loading the Windows Azure Mobile Services client, but not doing anything with it.
Ember-model
To wire Mobile services to Ember, I used ember-model. Why? It provides a basic framework with the assumption that you will bring your own data access; you just implement the create/save/etc. functions that are already stubbed out.
Note: In theory, you'd think that any REST client would work since Mobile Services has a REST API, but in practice many REST clients are pretty opinionated. Like they expect a root node in the JSON data, or they want to use PUT instead of PATCH for updates and things like that. Can be made to work with some effort, but there's already a client so why not use that?
To add Ember-model to the project, perform the following steps:
Open a new command-prompt/BASH/Terminal session and use Git to make a local clone of the repository. NOTE! This should be a new directory and NOT inside the emberapp directory.
git clone https://github.com/ebryn/ember-modelChange directories to the new ember-model directory and perform the following commands to build the project
 bundle
rake dist
Copy the ember-model/dist/ember-model.js file to the emberapp/app/scripts directory.
Add a reference to scripts/ember-model.js to the index.html file, directly beneath the line that references "scripts/ember-model.js". For example:
 <script src="components/ember/ember.js"></script>
<script src="scripts/ember-model.js"></script>
<!-- endbuild -->
Define a Windows Azure Mobile Services adapter
To create an adapter that ember-model can use to speak to Windows Azure Mobile Services, add the following to the app.js file. This should come after the var client = new WindowsAzure.MobileServiceClient(.....); line:
This was pretty easy to wire up, as it just requires passing the data returned from a Mobile Services operation to Ember.run, along with a few other things that the ember-mobile framework provides.
Define the model
Add the following after the adapter. This defines the model for a post and creates a new instance of the adapter. Note that I'm specifying the table to use (posts) as part of the create call to the adapter:
Wire up templates & controller
In Part 2 I created some templates that used static content and/or didn't do anything with the data you entered. Time to fix that.
The following are updates to posts.hbs, the app.js file (Routes, controllers) and a new post.hbs template to display individual posts.
NewpostController
The controller now actually saves data when a new post is submitted. It uses App.Post.create to create a new post, then post.save() to save it. Since the database is initially empty, you'll need to create a post or two to notice the rest of the changes.
Posts.hbs
Notice that in the posts.hbs file, the static list is replaced with iteration over the elements in the collection, and a list item is returned for each one. Initially this list will be empty until you've added some posts.
Also, note that for each item there's a {{#linkTo}} that links to a route named 'post'. This is so each item in the list can be selected to display the individual post. It will be displayed in the {{outlet}} at the bottom of posts.hbs
Post.hbs & the post route
To support the new link from the Posts template, a new route was added to app.js. This is a nested route, since an individual post is a child of the posts collection.
this.resource('posts', function() { this.resource('post', { path: ':post_id' }); });
This also passes the ID field of the post to the post route, which allows us to specify individual posts through the URL. For example, https://localhost:9000/#/posts/1 would load the post with an ID of 1.
The post.hbs template itself is nothing amazing, as it just displays the selected post.
Index route
Notice that I've redirected the index route to the posts route. This just ensures that visitors are routed to the posts page by default.
Test it out
If you use the Write link on the navbar, when you save a post it should redirect you to the Posts page and display the new post as a link in the list of posts. Clicking on the link should display the post on the right-hand side of the page. If you go to the Windows Azure Management portal and navigate down to your mobile services instance, and the Posts table, you should be able to see the records that have been created there.
Summary
At this point, the application allows you to store and retrieve data from Windows Azure Mobile Services, but it's a little open for a blogging platform as it allows anyone to post without any type of authentication or authorization. In the next article, I'll demonstrate how to enable authentication using Windows Azure Mobile Services.