Access Roaming Data in the Cloud using Windows Azure Mobile Services
The following article was written and contributed to the blog by Katrina Lyon-Smith, a Senior Content Publishing Lead at Microsoft.
Do you want to create an app that can store data in the cloud?
Do you want to access that data from any device running your app?
Do you want to update live tiles on devices running your app?
Then read on...
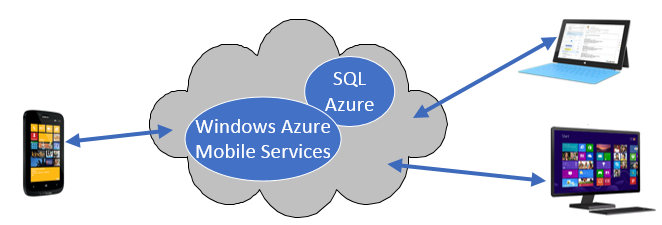
Let's say you want to create a sticky note app that lets you add a sticky note on your Windows 8 desktop computer. Then this sticky note is sent to a live tile on your Windows 8 phone and your Windows Surface, so you simply can't forget or ignore it! Windows Azure Mobile Services helps you easily put together Windows Store and Windows 8 phone apps that can do this.
Here are some things you should know before you get started.
Accounts
There are three accounts you need. Three? I know! But it's straightforward to sign up if you don't have them yet.
- You need a Microsoft account
- For access to the cloud: a Windows Azure account with Windows Azure mobile services enabled
- To register your apps: a developer account
You will use existing tutorials that show you how to create an Azure mobile service and put an app together to access roaming data.
Build Windows Azure Mobile Services Apps
Step 1: Create your mobile service app
Use this tutorial to create an Azure mobile service and an app that can access that service. This tutorial steps you through how to do this for a Windows Store app or a Windows 8 phone app. It creates a to do list app for you. You can then change this app to work for the data that you need to store in your SQL Azure tables for your Azure mobile service. If you use the tutorial, the correct references are added so that you can quickly learn how to work with your Azure mobile service.
Step 2: Authenticate a user
Use this tutorial to learn how to authenticate a user with Azure mobile services. The following identity providers are supported:
- Microsoft Account
- Facebook login
- Twitter login
- Google login
Enabling single sign on for your app makes it easier for users. To authenticate your user if they are already signed in on a device, use this tutorial.
Note: When you configure a Windows 8 phone app and get its client ID, you must specify that you are configuring a mobile app. Mobile apps use a different OAuth 2.0 authentication flow. Details are here.
Step 3: Only I can see my data
Now you are authenticating users, you need to make sure that each user only accesses their own data. I don't want to see your to do item to feed the dogs when I don't have any dogs. This tutorial shows you how to use server side scripts to do this.
Step 4: Update live tiles for your app
If you add a to do item using the app, you want that latest to do item sent to the live tile for any device.
To do this, use push notifications with your Azure mobile service. You have to find out the channel uri for the device where your app is running. Then add the logic to notify the user to your server side scripts. Because it is a server side script, it is used by any app that accesses the SQL Azure table.
You need to follow these two tutorials:
- Set up your Azure mobile service to send push notifications
- Add a table to store the channels and user ids to send out push notifications
Now your app pushes notifications to all channels in the channel table. In a real world app, you may only want to push notifications to those channels associated with the user that is running your app.
Continue with the next step to limit sending live tile notifications only to devices where a specific user is logged in.
Step 5: Update live tiles for a specific user
There are different push notifications for Windows Store apps and Windows 8 Phone apps. You can decide which one is best for your app. To send notifications to the channels that are associated with a specific user, you need to update the server side scripts from the Windows Azure Management Portal.
1. Update the server side script for insert for the channel table
You first need to update the server side script so that each channel uri only has one user associated with it.
This script adds a user id to the channel table. It checks if there is an existing channel for the uri. If there is, it checks if the user id is the current user id. If not, it updates the channel record for that uri with the current user id.
If there is no existing channel, then it adds a record to the table for that uri and user id.
 function insert(item, user, request) {


    item.userId = user.userId;

    var channelTable = tables.getTable('Channel');
    channelTable
        .where({ uri: item.uri})
        .read({ success: insertChannelorUpdate});

    function insertChannelorUpdate(existingChannels) {
        if (existingChannels.length > 0) {
            if (existingChannels[0].userId == user.userId)
                {request.respond(200, existingChannels[0]);}
            else
                { var channelItem = { id: existingChannels[0].id,
                            uri: existingChannels[0].uri,
                            userId: user.userId };
                    channelTable.update(channelItem);
                }
            }
          else { request.execute(); }
         }
     }
Next you need to update the server side script that inserts data in your table so that you can send a push notification when that happens.
2. Update the server side script for insert to your data table
This script only sends push notifications to the channels connected to that user when your data table has a record added. For example, you add an item "Pick up milk" and the text "Pick up milk" is pushed to the live tile for any device that is logged into the app as you.
This script pushes both a Windows 8 phone and a Windows store app notification to demonstrate both.
 function insert(item, user, request) {


    item.userId = user.userId;

    request.execute({
        success: function() {
            request.respond();
            sendNotifications(); }
         });

            function sendNotifications() {
                var channelTable = tables.getTable('Channel');
                channelTable.where({userId: user.userId}).read({
                    success: function(channels) {
                        channels.forEach(function(channel) {
                            push.wns.sendTileSquareText02(channel.uri, {
                                    text2: item.text },
                            {
                        success: function(pushResponse) {
                            console.log("Sent push windows store:", pushResponse);
                    }
                });
                push.mpns.sendFlipTile(channel.uri, {
                    title: item.text
                },{
                        success: function(pushResponse) {
                            console.log("Sent push windows 8 phone:", pushResponse); }
                    });
                    }
                );
            }
          });
        }
    }
Now you can access roaming data in the cloud with your app. You can also add functionality to notify a user of an event.