Deploying PHP and ASP.NET Sites in a Single Azure Web Role
Last week, a colleague approached me with a question he’d been asked by a customer: How do you deploy both a PHP website and an ASP.NET website on the same Web Role in Windows Azure? Given the mixed environments many people work with today, I thought sharing the answer to his question might be helpful to others. However, unlike many of my other posts, the particular solution I’m going to share requires Visual Studio 2010 with the .NET SDK for Windows Azure installed. It should be possible to deploy both sites without Visual Studio…I just haven’t investigated that approach yet. (I will speed up that investigation if I hear clamoring for it in the comments.)
A couple of things before I get started…
First, I highly recommend that you watch this episode of Cloud Cover from minute 9:00 to minute 28:00: Cloud Cover Episode 37: Mulitple Websites in a Web Role. Even though the video looks at how to deploy multiple .NET websites, it contains just about all the information you need to deploy websites of mixed flavors. The video will provide context for the steps below…all I do is fill in a couple of minor details. (Big thanks to Steve Marx for helping me figure out the details.)
Second, before you build, package and deploy your applications, I suggest you do a little preliminary work. First create an empty Hosted Service on Windows Azure to provision the domain name for your ASP.NET website (e.g. mysite.cloudapp.net). Then, create a CNAME record for the domain name of your PHP site (e.g. www.myphpsite.com) that points to your Azure domain name (mysite.cloudapp.net). (I’m assuming you have a domain name, like www.myphpsite.com, registered already.) You can do these steps later, but doing them in advance makes the process below clearer.
Now you’re ready to get started…
1. Create a Windows Azure project with Visual Studio. You will be prompted to add a Web Role in this process. Choose any ASP.NET Web Role (I chose an ASP.NET MVC 3 Web Role). Click OK to accept default settings through the rest of the process.
2. Open the service definition file (ServiceDefinition.csdef). Add a <Site> element similar to the one below to the <Sites> element. (There will already be one <Site> element that corresponds to your ASP.NET site. This one will correspond to your PHP site.)
 <Site name="YourSiteName" physicalDirectory="path\to\your\PHP\app">
   <Bindings>
     <Binding name="Endpoint1" endpointName="Endpoint1" hostHeader="www.yourdomain.com" />
   </Bindings>
 </Site>
Note that you need to fill in values for the the name, physicalDirectory, and hostHeader attributes. The value for the name attribute is somewhat arbitrary, but the physicalDirectory attribute should point to your local PHP application, and the hostHeader value should be the domain name for your PHP application.
3. While you have the service definition file open, add the following <Startup> element right after the <Sites> element.
 <Startup>
       <Task commandLine="add-environment-variables.cmd" executionContext="elevated" taskType="simple" />
       <Task commandLine="install-php.cmd" executionContext="elevated" taskType="simple" >
         <Environment>
           <Variable name="EMULATED">
             <RoleInstanceValue xpath="/RoleEnvironment/Deployment/@emulated" />
           </Variable>
         </Environment>
       </Task>
       <Task commandLine="monitor-environment.cmd" executionContext="elevated" taskType="background" />
 </Startup>
These startup tasks will install PHP and configure IIS to handle PHP requests when you deploy your applications. (We’ll add the files that are referenced in these tasks to our project next.)
Note: I’m borrowing the startup tasks and the referenced files from the default scaffold that you can create by using the Windows Azure SDK for PHP.
4. Add the files referenced in the startup tasks to your ASP.NET project. (The necessary files are in the .zip file attached to this post). When you are finished, you should have a directory structure that looks like this:

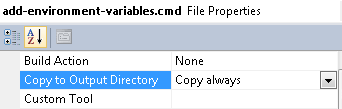
4a. For all the start up scripts (not files in the resources directory), you'll need to set the Copy to Output Directory property to Copy always. You can do this in the Properties window for each file (right click on a file and select Properties):
5. If you want to run your application using the Compute and Storage Emulators, you need to edit your hosts file (which you can find by going to Start->Run, and typing drivers - the hosts file will be in the etc directory). Add this line to the hosts file:
127.0.0.1 www.myphpsite.com
Now, press Ctrl+F5 (or select Start Without Debugging) to run your application in the emulator.

You should see your site brought up at https://127.0.0.1:81. If you browse to https://www.myphpsite.com:81, you should see you PHP site.
6. When you are ready to deploy your app, you can use the Visual Studio tools: https://msdn.microsoft.com/en-us/library/windowsazure/ff687127.aspx#Publish. After publishing, you should be able to browse to mysite.cloudapp.net to see your ASP.NET application, and (assuming you have set up a CNAME record for your PHP site) and browse to www.myphpsite.com to see your PHP site.
That’s it…hope this proves useful.
Thanks.
-Brian