Using Active Record with SQL Azure
[Updated 3/12/2013]
Active Record is an object-relational mapping (ORM) that makes it easy to work with databases. While there are other ORMs out there for Ruby, Active Record is very popular and I wanted to walk through using it with SQL Azure Windows Azure SQL Database. Active Record can be installed by running gem install activerecord, however most people probably install it as part of the Rails installation. The examples in this post use Rails, so gem install rails is the command I used to install Rails, Active Record, and all the other bits that Rails comes with.
Next we need an adapter that Active Record can use to talk to SQL Azure. I’m using the SQL Server Adapter (gem install activerecord-sqlserver-adapter,) though I’m told that if you’re using JRuby that the activerecord-jdbc-adapter works as well.
The Active Record SQL Server adapter can connect to SQL Database using either ODBC (through the Ruby-ODBC gem,) or dblib (through the TinyTDS gem.) While both allow connectivity, I’ll be using ODBC since the TinyTDS gem currently requires a manual build process to enable SQl Database support. If you’re interested in using TinyTDS, I documented my experience building it with SQL Database support at https://social.technet.microsoft.com/wiki/contents/articles/connecting-to-sql-azure-from-ruby-applications.aspx#tinytds. To install the Ruby-ODBC gem, use gem install ruby-odbc.
Now we just need to provision a new SQL Database server, create a database, create a Rails application, and tell it to use our database.
Create a SQL Database [Updated for the new portal experience]
Perform the following steps to create a new SQL Database:
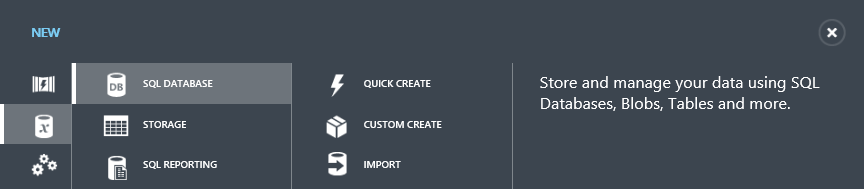
- In your browser, login to https://manage.windowsazure.com and select +NEW, Data Services, SQL Database. Finally, select either Custom Create or Quick Create and fill in the requested information. During this process, you can either select an existing SQL Database server or create a new one.
- Once the database has been created, you'll be presented with the quickstart page. Click the link to setup Windows Azure firewall rules.
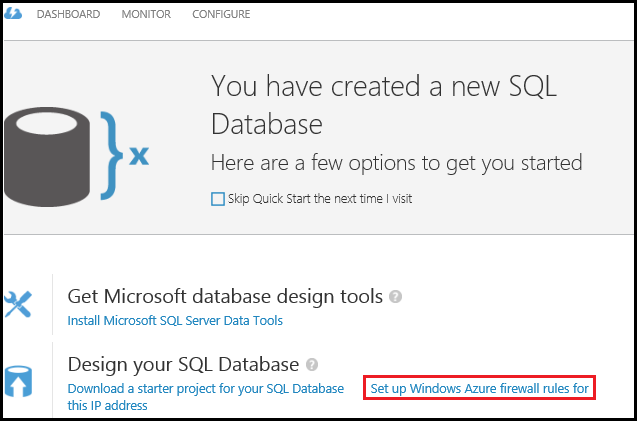
This will add the IP Address of the machine you are currently on to the firewall rules. You can add additional IP addresses by visiting the DASHBOARD link at the top of the page, and then selecting Manage allowed IP addresses in the quick glance section. - At the bottom of the quickstart page (you can get back to it by selecting the cloud with thunderbolt icon from the top of the page) is the actual server name that your new database resides on, as well as the port number (1433.) You can also use the links in the Connect to your database to view various connection strings.

At this point you will have a new database, the server information for it, and have added firewall rules to allow your machine to access the server.
Create a Rails application [Updated to change order slightly]
For a test application, I created a simple blog using the following commands at the command line:
 rails new blog
cd blog
To configure this application to use SQL Azure, perform the following steps:
Edit the Gemfile and comment out the gem ‘sqlite3’ entry. Add the following entries:
 gem ‘activerecord-sqlserver-adapter’
gem ‘ruby-odbc’
Save the Gemfile and run bundle install to ensure that the new gems we added are installed.
Next, open the database.yml file from the blog/config directory and replace the existing development section with the following:
 development:
 adapter: sqlserver
 mode: ODBC
 dsn: Driver={SQL Server};Server=servername.database.windows.net;Uid=user@servername.database.windows.net;Pwd=password;Database=databasename
 azure: true
Replace the servername, username, password, and databasename with the values for your SQL Azure Server, database administrator login, password, and database name.
Save the database.yml file and run rails generate scaffold Post title:string body:text to generate scaffolding for Posts. With the latest version of Rails, this touches the database, so you have to configure the database.yml before running this command.
Note: You may receive an error similar to the following:C:/Ruby193/lib/ruby/gems/1.9.1/gems/activerecord-sqlserver-adapter-3.2.10/lib/ac
tive_record/connection_adapters/sqlserver_adapter.rb:222:in `initialize': Curren
tly, only 2005, 2008, 2010, 2011, and 2012 are supported. We got back Microsoft
SQL Azure (RTM) - 11.0.2295.0 (NotImplementedError)
Feb 15 2013 18:38:26
Copyright (c) Microsoft CorporationThis is being tracked in Issue 247 on GitHub, but a quick fix is to create a new file under app/config/initializers (for example, add_2013_to_sql_server_adapter.rb) and add the following line to it:
ActiveRecord::ConnectionAdapters::SQLServerAdapter::SUPPORTED_VERSIONS << 2013This patches the gem to accept the 2013 date returned by SQL Database.
Finally, run rake db:migrate to create the database structure.
If you're using a recent version of Rails and the activerecord-sqlserver-adapter, everything should just work. However if you're using older versions you might receive an error staging that ‘Tables without a clustered index are not supported in this version of SQL Server’. To fix this error, go back to the Windows Azure portal in your web browser and perform the following steps:
Select your database and then click the DASHBOARD link at the top of the page.
From the quick links section, select the MANAGE URL. This will launch the SQL Database management portal.
When prompted to login, ensure that the Database name is correct and then enter the database administrator username and password. Click Log on to proceed.
Select the New Query icon from the ribbon, and enter the following statement in the query window:
CREATE CLUSTERED INDEX [idx_schema_migrations_version] ON [schema_migrations] ([version])Click the Execute icon on the ribbon to run this statement. Once this has completed, issue the rake db:migrate command again and it will succeed.
Run the Application
You can now start the blog web site by running rails s. Navigate to https://localhost:3000/posts to create and view posts, which will be stored into SQL Database.
Update notes
Updated this on March 12, 2013 to add the following:
- change from SQL Azure to SQL Database
- update steps and database.yml information
- reorder steps for rails generate scaffolding, as this now seems to go out and touch the DB even before you run rake db:migrate
- note that if you're using recent versions of Rails and ActiveRecord-SQLServer-Adapter gem that you no longer get the clustered index error