Windows Azure Remote Desktop Connectivity for PHP Applications
(Updated 7 Oct. 2011. Added Option 2.)
If you are someone who is experimenting with PHP on Azure (or even if you have some experience in this area), it is often helpful to have remote access to your running deployments. Remotely accessing deployments can be helpful in debugging problems that might otherwise be very difficult to figure out. In this article, I’ll show you how to configure, deploy, and remotely access a PHP application in Windows Azure.
I’ll assume that you have created a ready-to-deploy Azure/PHP application by following this tutorial: Build and Deploy a Windows Azure PHP Application. (i.e. I’ll assume you have run the scaffolder tool on the default scaffold, you have added your application files to the PhpOnAzure.Web directory, and that you’ve tested your application in the local development environment).
Note: Once you have a ready-to-deploy application, the instructions below apply (it doesn't necessarily have to be a PHP application).
Option 1
1. Download the encutil.exe. You can download the encutil.exe tool here: https://wastarterkit4java.codeplex.com/releases/view/61026
2. Create a certificate (if you don’t already have one). You can use the encutil.exe to create a self-signed certificate (which is fine for basic testing situations), but using a trusted certificate issued by a certificate authority is the most secure way to go. The following command will create a self-signed certificate in the same directory that the encutil.exe tool is in (you may need to execute this from a command prompt with Administrator privileges):
c:\>encutil.exe -create -cert "phptestcert.cer" -pfx "phptestcert.pfx" -alias "PhpTestCert" -pwd yourCertificatePassword
You should see two files created: phptestcert.cer and phptestcert.pfx.
3. Get the certificate thumbprint. Execute the following command to get your certificate’s thumbprint:
c:\>encutil -thumbprint -cert "phptestcert.cer"
This thumbprint (which you will add to your project’s ServiceConfiguration.cscfg file) must correspond to the certificate you upload to Windows Azure in order for your remote access configuration to be valid.
4. Add certificate thumbprint to ServiceConfiguration.cscfg file. To do this, open the ServiceConfiguration.cscfg file in your PhpOnAzure.Web directory and add the following element as a child of the <Role> element (adding your certificate thumbprint):
 <Certificates>
     <Certificate name="Microsoft.WindowsAzure.Plugins.RemoteAccess.PasswordEncryption"
                  thumbprint="your_certificate_thumbprint_here"
                  thumbprintAlgorithm="sha1"/>
 </Certificates>
5. Encrypt your remote login password. The following command will encrypt the password you will use to remotely login to your Windows Azure instance:
c:\>;encutil -encrypt -text YourLoginPassword -cert "phptestcert.cer" >> encryptedPwd.txt
Your encrypted login password will be written to a file (encryptedPwd.txt in the example above) in the same directory that encutil.exe is in.
6. Add remote settings to ServiceConfiguration.cscfg file. Add the elements below as children of the <ConfigurationSettings> element in your ServiceConfiguration.cscfg file. Note that you will need to add values for…
- AccountUserName (the user name you will use to login remotely)
- AccountEncryptedPassword (from the previous step)
- AccountExpirationDate (in the format shown)
 <Setting name="Microsoft.WindowsAzure.Plugins.RemoteAccess.Enabled" value="true" />
 <Setting name="Microsoft.WindowsAzure.Plugins.RemoteAccess.AccountUsername" value="login_user_name" />
 <Setting name="Microsoft.WindowsAzure.Plugins.RemoteAccess.AccountEncryptedPassword" value="your_encrypted_login_password" />
 <Setting name="Microsoft.WindowsAzure.Plugins.RemoteAccess.AccountExpiration" value="2011-09-23T23:59:59.0000000-07:00" />
 <Setting name="Microsoft.WindowsAzure.Plugins.RemoteForwarder.Enabled" value="true" />
7. Add <Import> elements to ServiceDefinition.csdef file. Add the following elements as children to the <Imports> element in your project’s ServiceDefinition.csdef file.
 <Import moduleName="RemoteAccess" />
 <Import moduleName="RemoteForwarder" />
Your ServiceConfiguration.cscfg and ServiceDefinition.csdef files should now look similar to these:
ServiceConfiguration.cscfg
 <?xml version="1.0" encoding="utf-8"?>
 <ServiceConfiguration serviceName="PhpOnAzure" xmlns="https://schemas.microsoft.com/ServiceHosting/2008/10/ServiceConfiguration" osFamily="2" osVersion="*">
   <Role name="PhpOnAzure.Web">
     <Instances count="1" />
     <ConfigurationSettings>
       <Setting name="Microsoft.WindowsAzure.Plugins.Diagnostics.ConnectionString" value="UseDevelopmentStorage=true"/>
       <Setting name="Microsoft.WindowsAzure.Plugins.RemoteAccess.Enabled" value="true" />
       <Setting name="Microsoft.WindowsAzure.Plugins.RemoteAccess.AccountUsername" value="testuser" />
       <Setting name="Microsoft.WindowsAzure.Plugins.RemoteAccess.AccountEncryptedPassword" value="MIIBnQYJKoZIhvcNAQcDoIIBjjCCAYoCAQAxggFOMIIBSgIBADAyMB4xHDAaBgNVBAMTE1dpbmRvd3MgQXp1cmUgVG9vbHMCEGTrrnxrjs+HQvP1BWHaJGswDQYJKoZIhvcNAQEBBQAEggEAIKtZV4cEog2V9Ktf89s+Km8WBZZ5FPH/TPrc7mQ02lMgn9wblusf5F8xIDQhgzZNRyIPh6wzAeHJ/8jy6i/pBWjcgT1jZ2eHzBxQ78EUpCubuLNYq1WoH6mLQ3Uy9GqCmA3zB67hUOyt7nzjOV8zsYWa8LYF10swWiDIqYKcIbMCACPonSFtY6BEDA/duPoOkcWHytj4FdHLu9yrgscIV/iVT7bJlmbZg7yo8Mb5Svf1DBkLubKHLVaT//0Sj4BUOaqIBpP6l2A5sruNRKBEB9bNX/C8ChlGOWWth5mCDbsg6Qy9njdac9e4KeO4DkGyRbsqMvH9DesneChuudGunDAzBgkqhkiG9w0BBwEwFAYIKoZIhvcNAwcECKskiIAhPkHCgBAQDpUxflSHQCFaHvihEH6y" />
       <Setting name="Microsoft.WindowsAzure.Plugins.RemoteAccess.AccountExpiration" value="2011-09-23T23:59:59.0000000-07:00" />
       <Setting name="Microsoft.WindowsAzure.Plugins.RemoteForwarder.Enabled" value="true" />
     </ConfigurationSettings>
     <Certificates>
       <Certificate name="Microsoft.WindowsAzure.Plugins.RemoteAccess.PasswordEncryption" thumbprint="7D1755E99A2ECA6B56F8A6D9A4650C65C1B30C72" thumbprintAlgorithm="sha1" />
     </Certificates>
   </Role>
 </ServiceConfiguration>
ServiceDefinition.csdef
 <?xml version="1.0" encoding="utf-8"?>
 <ServiceDefinition name="PhpOnAzure" xmlns="https://schemas.microsoft.com/ServiceHosting/2008/10/ServiceDefinition">
   <WebRole name="PhpOnAzure.Web" enableNativeCodeExecution="true">
     <Sites>
       <Site name="Web" physicalDirectory="./PhpOnAzure.Web">
         <Bindings>
           <Binding name="Endpoint1" endpointName="HttpEndpoint" />
         </Bindings>
       </Site>
     </Sites>
     <Startup>
       <Task commandLine="add-environment-variables.cmd" executionContext="elevated" taskType="simple" />
       <Task commandLine="install-php.cmd" executionContext="elevated" taskType="simple" />
     </Startup>
     <Endpoints>
       <InputEndpoint name="HttpEndpoint" protocol="http" port="80" />
     </Endpoints>
     <Imports>
       <Import moduleName="Diagnostics"/>
       <Import moduleName="RemoteAccess" />
       <Import moduleName="RemoteForwarder" />
     </Imports>
     <ConfigurationSettings>
     </ConfigurationSettings>
   </WebRole>
 </ServiceDefinition>
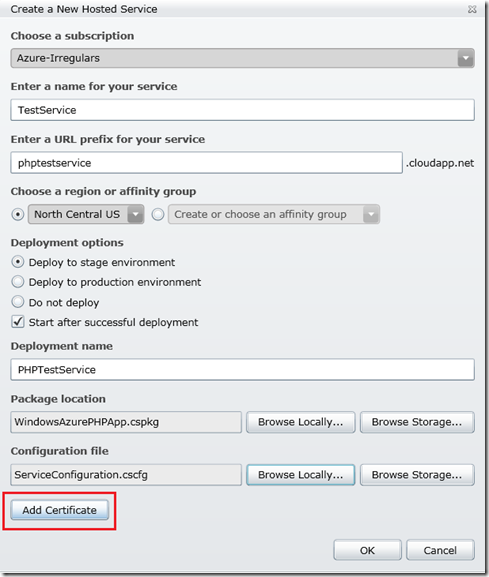
You are now ready to deploy your application to Windows Azure. Follow the instructions in this tutorial to do so, Deploying your first PHP application to Windows Azure, but be sure to add your certificate when you create the deployment:
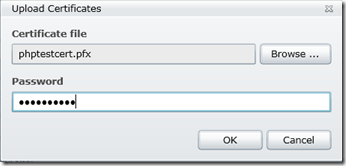
Browse to the .pfx file you created in step 2 and supply the password that you specified in that step:
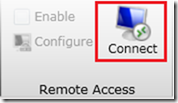
When your deployment is in the Ready state, you can access your running Web role via Remote Desktop by selecting your role in the portal and clicking on Connect (at the top of the page):
Clicking on Connect will download an .rdp file which you can open directly (for immediate remote access) or save and use to gain remote access at any later time.
Option 2
The Windows Azure SDK 1.5 contains tools for creating certificates that enable remote desktop connections. Here's how to use them:
1. Download the Windows Azure SDK 1.5: Download Windows Azure SDK 1.5.
2. Start the Windows Azure SDK Command Prompt with administrator priviliges and execute the following command to create a new certificate:
csencrypt New-PasswordEncryptionCertificate -FriendlyName phptestcert
This will create a certificate in your certificate store with the name phptestcert. See CSEncrypt Command-Line Tool for mor information. You will need to export this certificate. Directions for exporting a certificate can be found in the Creating a Certificate section of this post.
3. To get the thumbprint of the certificate, execute the following command:
csencrypt Get-PasswordEncryptionCert
This will list information (including the thumbprint) for all the certificates in your certificate store. Find the phptestcert and copy the thumbprint.
4. To encrypt your remote desktop password, execute the following command:
csencrypt encrypt-password -CopyToClipboard -Thumbprint "thumbprint for your certificate"
5. Modify your service configuration and service definition files as detailed in steps 4, 6, and 7 in Option 1 above.
Now you are ready to deploy...follow the instuctions in Option 1 above after step 7.
For more information about the tools available in the Windows Azure SDK 1.5, see the Windows Azure SDK Tools Reference.
That’s it! You now have full access to your running Web role. A couple of things to note:
- Your web root directory is E:\approot.
- As mentioned earlier, remote access to running web roles is primarily for debugging purposes. Any changes you make to a running instance will not be propagated to other instances should you spin more of them up.
Happy debugging!
-Brian


