DrawingPanel
#wpdev_jp #win8dev_jp
サンプルが気に入らなかったら、自分で治す、ということでタッチで描画するサンプルがタッチに対応してなかったり、いろいろ変えたかったので変えてみた。
今回場描画ができるパネルをユーザーコントロールとして定義しています。
作り方
- 空のプロジェクトを作成
- プロジェクト>新しい項目の追加>Windows ストア(Windows Phone)>ユーザーコントロール でユーザーコントロールを追加(DrawingPanel.xaml)
- DrawingPanel.xaml と DrawingPanel.xaml.cs を実装
DrawingPanel.xaml
 <UserControl x:Name="userControl"
    x:Class="DrawingPanel.DrawingPanel"
    xmlns="https://schemas.microsoft.com/winfx/2006/xaml/presentation"
    xmlns:x="https://schemas.microsoft.com/winfx/2006/xaml"
    xmlns:local="using:DrawingPanel"
    xmlns:d="https://schemas.microsoft.com/expression/blend/2008"
    xmlns:mc="https://schemas.openxmlformats.org/markup-compatibility/2006"
    mc:Ignorable="d"
    d:DesignHeight="300"
    d:DesignWidth="400" Background="#FF004B00" >


 <Grid x:Name="InkGrid"           Background="{Binding Background, ElementName=userControl}"           PointerPressed="InkGrid_PointerPressed"           PointerMoved="InkGrid_PointerMoved"           PointerReleased="InkGrid_PointerReleased"/>
</UserControl>
DrawingPanel.xaml.cs
 using System;
using System.Collections.Generic;
using System.IO;
using System.Linq;
using Windows.Foundation;
using Windows.Foundation.Collections;
using Windows.UI;
using Windows.UI.Input;
using Windows.UI.Input.Inking;
using Windows.UI.Xaml;
using Windows.UI.Xaml.Controls;
using Windows.UI.Xaml.Controls.Primitives;
using Windows.UI.Xaml.Data;
using Windows.UI.Xaml.Input;
using Windows.UI.Xaml.Media;
using Windows.UI.Xaml.Navigation;
using Windows.UI.Xaml.Shapes;

namespace DrawingPanel
{
    public sealed partial class DrawingPanel : UserControl
    {

        public Color penColor { get; set; }
        public double penSize { get; set; }
        public bool bDrawable { get; set; }
        //InkManager _inkKhaled = new Windows.UI.Input.Inking.InkManager();
        private bool bDraw = false;
        private Point _previousContactPt;

        public DrawingPanel()
        {
            this.InitializeComponent();
            penColor = Colors.Red;
            penSize = 10.0;
            bDrawable = true;
        }

        private void InkGrid_PointerPressed(object sender, PointerRoutedEventArgs e)
        {
            if (!bDrawable) return;

            //最初のタッチ位置を覚えておく
            PointerPoint pt = e.GetCurrentPoint(InkGrid);
            _previousContactPt = pt.Position;

            //タッチイベントを捕獲
            e.Handled = true;

            //描画開始フラグ
            bDraw = true;
            //_inkKhaled.ProcessPointerDown(pt);
        }

        private void InkGrid_PointerMoved(object sender, PointerRoutedEventArgs e)
        {
            //描画開始中でなければ無視
            if (bDraw == false) return;

            //現在の位置を取得
            PointerPoint pt = e.GetCurrentPoint(InkGrid);
            Point currentContactPt = pt.Position;

            //前回の位置と現在の位置を結ぶ線を作り画面に追加
            Line line = new Line()
            {
                X1 = _previousContactPt.X,
                Y1 = _previousContactPt.Y,
                X2 = currentContactPt.X,
                Y2 = currentContactPt.Y,
                StrokeThickness = penSize,
                Stroke = new SolidColorBrush(penColor),
                StrokeEndLineCap = PenLineCap.Round,
                StrokeStartLineCap = PenLineCap.Round
            };
            InkGrid.Children.Add(line);

            //現在位置を次回の前回位置として設定
            _previousContactPt = currentContactPt;

            //_inkKhaled.ProcessPointerUpdate(pt);
        }

        private void InkGrid_PointerReleased(object sender, PointerRoutedEventArgs e)
        {
            //ペン・タッチを画面から離した描画処理の終了
            bDraw = false;
        }
    }
}
いったんコンパイルしておく。(Ctrl-Shift-B)
-
MainPage に作成した DrawingPanelをドラッグ&ドロップで配置。書式>レイアウトのリセット>すべて(Ctrl-Shift-R) で全画面に広げる。
以上で完了。
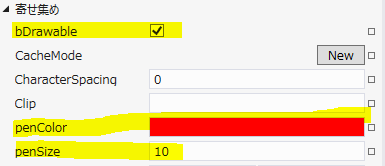
プロパティの寄せ集め欄でいくつか設定ができる。bDrawable は描画処理のON/OFFスイッチ。あとはペンの色とペンの太さが変えられる。パネル自体はバックグラウンドを変更すれば色を変えることができる。
以上!


