Deploying WSPs as part of an automated build (Chris O'Brien)
In this fifth article of our SharePoint Continuous Integration series, we will look at how to implement automated WSP deployment as part of a Team Foundation Server (TFS) build. We have dealt with most prerequisites in our earlier articles, but since we still have one outstanding prerequisite to cover, this article is split into two sections:
- Configuring PowerShell remoting
- Deploying WSPs as part of the build process
Additionally, we are also introducing a SharePoint/TFS Continuous Integration Starter Pack – this is a Codeplex project which contains the TFS workflows and PowerShell deployment scripts referenced in this article.
Configuring PowerShell Remoting
Once you have automated the build of the assemblies and WSP packages using TFS Build, most likely you’ll want to deploy the WSPs to a SharePoint environment to test them. Unless SharePoint 2010 is installed on the TFS build server(s) (a configuration rarely recommended for several reasons, not least of which is resource requirements), this means deploying the WSPs to a remote physical or virtual server. Since PowerShell is the most effective means of scripting WSP deployment, PowerShell Remoting must be configured between the TFS build server(s) and SharePoint server to ensure remote communication can take place. The good news is this is fairly straightforward. The steps listed here are the same as documented in Jie Lie’s SharePoint 2010 with Windows PowerShell Remoting Step by Step blog article – the process here just has some extra context around automated builds. In configuration terms we need to achieve the following:
- Enable PowerShell remoting
- Configure CredSSP authentication to allow delegation of credentials from the build server to the SharePoint server. This allows cmdlets which work with SharePoint to originate from the build server
- Raise the memory limit of the PowerShell session to a value appropriate for long-running SharePoint commands
Required permissions
To run PowerShell cmdlets against SharePoint, the account used must be a member of the WSS_Admin_WPG Windows security group, and also be a member of the SharePoint_Shell_Access role in the specific database being worked with (e.g. the SharePoint configuration database or a content database containing team sites). This combination is known as Shell access, and is granted by running the Add-SPShellAdmin cmdlet.
Configuration process
- On the SharePoint server:
- Open the SharePoint 2010 Management Shell with elevated administrative permission, by selecting ‘Run as administrator’
- Enable PowerShell remoting by running the following cmdlet: Enable-PSRemoting
- Enable the server to accept credentials using CredSSP: Enable-WSManCredSSP –Role Server
- Raise the PowerShell memory level to 1GB: Set-Item WSMan:\localhost\Shell\MaxMemoryPerShellMB 1024
- On the TFS build agent server(s):
- Open the Windows PowerShell prompt with elevated administrative permission by selecting ‘Run as administrator’
- If not previously done on this server, set the PowerShell execution policy to allow scripts to be run – at a minimum, the policy must be RemoteSigned:
Set-ExecutionPolicy RemoteSigned - Enable the server to pass credentials using CredSSP – replace the sample name with the name of your SharePoint server:
Enable-WSManCredSSP -Role client -DelegateComputer "MySharePointServer" - Note that other permissible values for the DelegateComputer parameter include “*.mydomain.com” and “*”. However, a security best practice would be to limit the credential delegation to as small a scope as possible
- Test PowerShell remoting and CredSSP authentication:
- On the TFS build agent server, test remoting by starting a remote session to the SharePoint server: Enter-PSSession -ComputerName "MySharePointServer" A successful test is one where the command prompt location changes to [MySharePointServer]: PS C:\Users\ <username>
- Type exit to close the remote session
- Also on the TFS build agent server, test CredSSP authentication with the following cmdlet: Enter-PSSession -ComputerName "MySharePointServer" -Authentication CredSSP –Credential Get-Credential - This will force an authentication prompt to enter a username and password – specify a domain account which has permissions to the SharePoint server. As before, a successful test is one where the location of the command prompt changes.
The remoting configuration should now be in place to allow remote deployment of WSP packages.
Deploy WSP packages as part of build process
As a recap, so far in this series we have accomplished the following things:
- Configured a build definition to compile our code and build WSPs
- Added a test modification to the build workflow, similar to the real modification needed to deploy WSPs
- Configured PowerShell remoting to support the WSP deployment steps
We are now ready to implement automatic deployment of our WSPs as part of the build process. This article does not provide a step-by-step guide; we will discuss the key mechanisms here, but recommend instead that you download the completed files for the implementation outlined here. These are available for download as part of the following Codeplex project:
SharePoint/TFS Continuous Integration Starter Pack
Setup documentation is provided in the project, but this article provides additional detail and is recommended reading for those considering implementing.
Introduction
When tackling the challenge of deploying WSPs automatically as part of a build, one approach is to implement a process which will ‘poll’ the drop folder on a scheduled basis to pick up the packages. However, this is sub-optimal since the build process takes longer and there can be timing issues. A more preferable way to do this is to implement a purely event-driven process, where the WSP deployment begins as soon as the packages are built. This requires modifying the build process workflow, but results in a more robust solution. The process outlined in this article uses this approach.
The two high-level areas of focus are:
- Build workflow - modifying one of the templates shipped with TFS to include an activity that will trigger the WSP deployment process
- PowerShell scripts – implementing a script to take the WSPs which were built and perform deployment steps. This could be to deploy, retract and deploy, or update the packages, but consider also that additional provisioning steps (such as activating Features) may also be needed. This will vary depending on the application
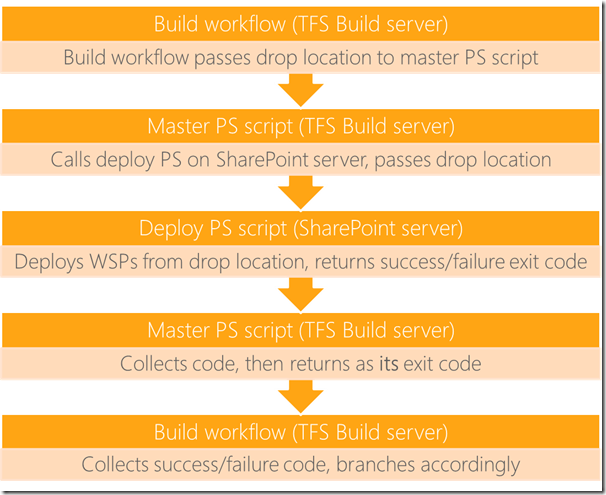
The following diagram gives an overview of the relationship between these artifacts, assuming a multi-server CI environment: 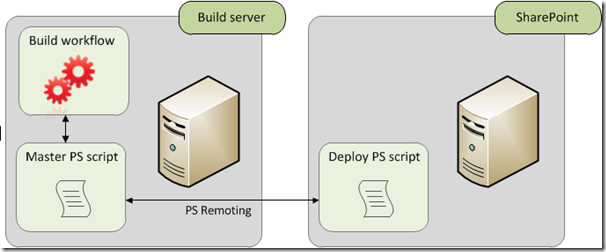
Effectively, the build workflow calls a local PowerShell script, which in turns uses PowerShell Remoting to call over to a PowerShell script located on the SharePoint server. It is this script which deploys the WSPs and performs any other provisioning steps. The results are then returned to the build workflow.
The following challenges must be addressed:
- Build-specific output folder - for every build, TFS Build creates a new subfolder within the drop folder specified in the build definition. This subfolder path is known as the “drop location”. We must ensure that the full drop location is used by the WSP deployment process to find the packages, otherwise the correct files will not be deployed
- Logging – any console output from external processes (such as PowerShell) must be logged by the build workflow. This ensures that error messages are shown in the build report to facilitate troubleshooting
- Collecting success/failure – a return value must be passed from the deploy script to the master script, and from there back to the build workflow. This is necessary since it is common to branch in the workflow depending on the result (e.g. run UI tests if the build was successfully deployed, but skip if not)
Much of the complexity of implementing Continuous Integration is establishing mechanisms within the workflow/PowerShell for dealing with these challenges. The SharePoint/TFS Continuous Integration Starter Pack provides a framework with such mechanisms in place, and the next sections discuss this implementation.
Build workflow – challenges and resolutions
When a build is triggered, the build workflow associated with the running build definition executes. While none of the build workflow templates that ship with TFS have any native knowledge of WSP deployment in SharePoint, it is fairly simple to extend one to integrate this – usually DefaultTemplate.xaml is the best starting point. As discussed in the earlier article Creating your first TFS Build Process for SharePoint projects, an InvokeProcess activity can be dropped onto the workflow to call out to an external process such as PowerShell. This activity is one of the most useful activities in the .NET 4 workflow toolbox, and is key to our WSP deployment goal.
Once the InvokeProcess activity has been dropped onto the workflow it can be configured, and it’s here that several of the CI challenges discussed earlier are addressed. The following table summarizes the approach for each:
Build workflow challenge |
Solution |
Build-specific output folder |
The unique drop folder is available in the build workflow from the BuildDetail.DropLocation property. Since PowerShell scripts can accept parameters, we should pass this string as a command-line argument to the script. |
Logging |
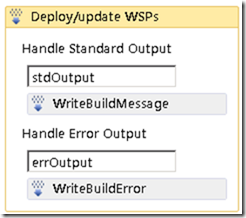
InvokeProcess supports logging of Standard and Error output from the called process – child workflow activities can be added for these conditions. The common approach is to add a WriteBuildInformation and WriteBuildError activity for the Standard and Error output respectively. |
Collecting success/failure |
The Result property of the InvokeProcess will be set to the exit code of the called process. Care must be taken to ensure the exit code convention of the calling process is understood. Typically, 0 represents ‘no error’ and any non-zero value represents an error state. |
While this gets us most of the way there, there is more work to do on the PowerShell side to pass values between the master script on the build server and the deploy script on the SharePoint server. This is detailed in the next section, but before we leave the build workflow, let’s take a look at what configuring the above properties on InvokeProcess looks like.
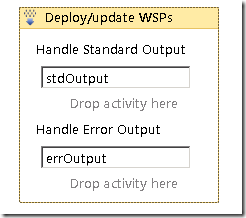
Adding the logging activities to the InvokeProcess activity:
Un-configured Configured
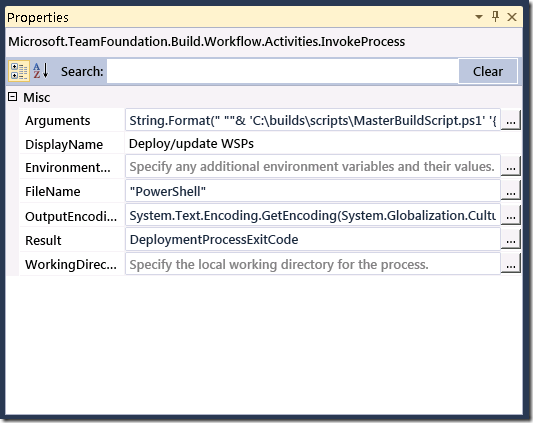
Configuring the actual properties on InvokeProcess (notice we call out to PowerShell.exe (FileName), pass it some arguments such as the script to run, and then collect the exit code into a workflow variable named ‘DeploymentProcessExitCode’):
When passing the arguments to PowerShell, one crucial detail is to pass the unique folder location for the current running build by reading from the BuildDetail.DropLocation property. So, if we click on the ellipsis next to the Arguments property, we can see the full value which shows this:
Once the build workflow has been configured it can be checked in. The next step is to deal with the PowerShell part of the build process.
PowerShell deployment scripts
In this section we will focus on mechanisms required for communication across the PowerShell scripts: namely. passing the drop location folder and returning a value to indicate whether the deployment steps were successful. In-depth coverage of PowerShell for the deployment steps themselves is out-of-scope here – in the real world there is an extremely wide range of steps which may be required, and these depend on many factors such as:
- The application being deployed
- Whether the deployment steps represent the full provisioning of the application, or provisioning of a set of newly-created artifacts against the current production state (e.g. deployment of upgrades to the latest release)
Consequently. each project (and indeed, each release within a project) needs to write the appropriate PowerShell for their provisioning needs. However, the sample scripts in the SharePoint/TFS Continuous Integration Starter Pack provide the following:
- Methods to run Update-SPSolution on each of the WSPs built (assuming they are already deployed and the site is running)
- Methods to delete and recreate a test site collection (so that any tests run against the latest version of site and list templates)
- Many utility methods to support robust WSP deployment (e.g. application pool recycle/warm-up, waiting for timer jobs to complete, restarting services if they are found to be stopped etc.)
The next section discusses how parameters flow from the build workflow to the master PowerShell script to the deploy script and back again.
PowerShell deployment scripts – challenges and resolutions
We saw earlier that the InvokeProcess activity in the build workflow passed the drop location to the master PS script as a command-line argument. But how is that received by the script, and more to the point, how do we use this value to call over to the deploy script on the remote server? While these questions may be answered easily by a PowerShell expert, for others it’s useful to break the flow down into smaller challenges in the same way we did with the build workflow:
- Collecting the drop location parameter – the build workflow passes the value in, but we need to use it as a PowerShell variable in our scripts
- Calling the deploy script from the master script, passing through the drop location value – using the PowerShell Remoting framework we configured earlier, we need to call from the build machine to the WSP deployment script on the SharePoint machine
- Returning success/failure – this value must pass from the deploy script to the master script, then back to the build workflow.
PowerShell Challenge |
Solution |
Collecting the drop location |
Since this value was passed from the build workflow as a command-line argument, it comes in the ‘args’ collection passed to the master script. Assuming it’s the first parameter, we can collect it into a PowerShell variable with: $dropLoc = $args[0] |
Calling the remote script |
In PowerShell, the Invoke-Command cmdlet (not to be confused with the InvokeProcess workflow activity) is used to execute script on one or more remote machines. The PowerShell Remoting infrastructure is used when this cmdlet is called. Invoke-Command has an –ArgumentList parameter which can be used to pass values to the remote command – we use this for the drop location value. Assuming a PowerShell Remoting session has been started to the correct machine using New-PSSession and stored in a value named $s, the abbreviated call looks like: Invoke-Command -Session $s { param($dropLocation) C:\builds\scripts\DeployCoreSolutions.ps1 @PSBoundParameters } -ArgumentList $dropLoc |
Returning success/failure |
A common way to return success/failure from a PowerShell script is by using exit codes. The following indicates success: exit 0 A challenge here is that when using Invoke-Command in the master script, the exit code of the remote script is not passed back as a return value. Instead, a separate command must be executed to the remote machine, where the inbuilt PowerShell variable $LASTEXITCODE is read: $remotelastexitcode = Invoke-Command –session $s -ScriptBlock {$LASTEXITCODE} Once we have the value in this local variable in the master script, it can be passed back to the build workflow as the exit code of the master script: exit $remotelastexitcode This value will then be stored in the Result property of the InvokeProcess workflow activity. |
Summary
We discussed some key mechanisms between the TFS build workflow and PowerShell which the SharePoint/TFS Continuous Integration Starter Pack uses to implement automatic WSP deployment. The following diagram may help piece these together:
While it isn’t necessary to understand every detail of how the process works, teams who go ahead and implement Continuous Integration by using our starter pack (or those simply looking for an insight) will benefit from this background.
In our series we have now accomplished several important things: we’ve done the initial TFS install, created the build definition, implemented assembly versioning, configured PowerShell Remoting and have now implemented automated WSP deployment. The next article in our series will look at implementing automated testing as part of the build, with a particular focus on Visual Studio 2010’s Coded UI Tests.
Resources:
