Creating your first TFS Build Process for SharePoint projects (Chris O'Brien)
Once you have a Team Foundation Server (TFS) 2010 build configured, you’re ready to create a build definition to automatically build your SharePoint codebase. This area is well-documented on MSDN (see the Define Your Build Process section within the Visual Studio Application Lifecycle Management area), but the aim of this post is to provide guidance on the specifics required for building SharePoint projects and to highlight key information for those starting out in this area.
Here’s an overview of what we’ll discuss in this post:
- Configuring the build server to compile SharePoint assemblies
- Configuring the build to generate SharePoint solution (WSP) packages, not just assemblies
- Creating your first build definition – process overview
- Editing the build workflow
- Dealing with dependencies between projects
Configuring the build server to compile SharePoint assemblies
By default, a TFS 2010 Build Agent will not be able to compile SharePoint code. This is because these projects refer to SharePoint assemblies (such as Microsoft.SharePoint.dll) and these assemblies don't usually exist on the build server, meaning compilation will fail. The one exception to this is if SharePoint 2010 is also installed directly on the build server – a topology rarely recommended for performance reasons.
For compilation to succeed, the SharePoint assemblies must be copied to the build server. This process is documented on MSDN, and Microsoft also provides a PowerShell script to ‘collect’ assemblies from a SharePoint server, and then ‘install’ them into the correct file system location on a build server. So the first steps should be:
- Follow the process detailed in How to Build SharePoint Projects with TFS Team Build.
- Use the SharePointProjectToTfsBuildServer.ps1 PowerShell script (also linked to from the above article) published in the MSDN Code Gallery.
Although the PowerShell script simplifies the process considerably, note that additional assemblies may be required to those collected by default. Furthermore, some of the SharePoint assemblies can only be copied directly from the GAC of a SharePoint machine (i.e. by navigating to the GAC_MSIL folder within the GAC). The precise list of additional assemblies required depends on the code you are building. As a guide, when implementing continuous integration (CI) for my project, I found I needed the following assemblies:
- Microsoft.Office.Server.dll
- Microsoft.Office.Server.UserProfiles.dll
- Microsoft.SharePoint.Client.dll
- Microsoft.SharePoint.Client.Runtime.dll
- Microsoft.SharePoint.Client.ServerRuntime.dll
- Microsoft.SharePoint.Linq.dll
- Microsoft.SharePoint.Portal.dll
- Microsoft.SharePoint.Publishing.dll
- Microsoft.SharePoint.Taxonomy.dll
- Microsoft.SharePoint.WorkflowActions.dll
- Microsoft.Web.CommandUI.dll
To add assemblies to the PowerShell script change the assignment at line 37-41 like this.
Original script |
| $Script:SharePoint14ReferenceAssemblies = @( "Microsoft.SharePoint.dll", "Microsoft.SharePoint.Security.dll", "Microsoft.SharePoint.WorkflowActions.dll" ) |
After editing |
| $Script:SharePoint14ReferenceAssemblies = @( "Microsoft.SharePoint.dll", "Microsoft.SharePoint.Security.dll", "Microsoft.SharePoint.WorkflowActions.dll", "Microsoft.Office.Server.dll", "Microsoft.Office.Server.UserProfiles.dll", "Microsoft.SharePoint.Client.dll", "Microsoft.SharePoint.Client.Runtime.dll", "Microsoft.SharePoint.Client.ServerRuntime.dll", "Microsoft.SharePoint.Linq.dll", "Microsoft.SharePoint.Portal.dll", "Microsoft.SharePoint.Publishing.dll", "Microsoft.SharePoint.Taxonomy.dll", "Microsoft.SharePoint.WorkflowActions.dll", "Microsoft.Web.CommandUI.dll" ) |
Note that occasionally you may find that adding some new code means the build process now requires an additional SharePoint assembly that hadn't been previously installed.
Creating your first build definition – process overview
Creating a build definition in TFS 2010 is fairly simple. In this section, we’ll walk through the process and main configuration steps. What we’ll end up with is a basic automated build that creates WSPs from the latest checked-in code and then copies them to a drop location. In later posts, we’ll show how to actually deploy the WSPs to a SharePoint server after each build, as well as introducing assembly versioning, automated testing, and so on. Notably, even a very simple build can add value by making builds less prone to human error. An example of this is building assemblies in Release rather than Debug mode. Let’s now walk through the process of creating a new build definition. (For more detail on each section, see Define Your Build Process on MSDN.)
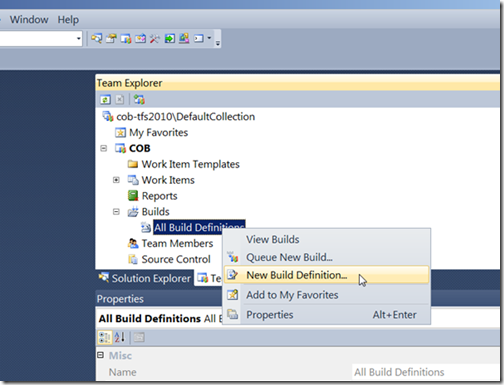
1. Ensure Visual Studio 2010 is connected to TFS, and then in Team Explorer, select New Build Definition.. . on the Builds context menu.
2. Give the build definition a name and description.
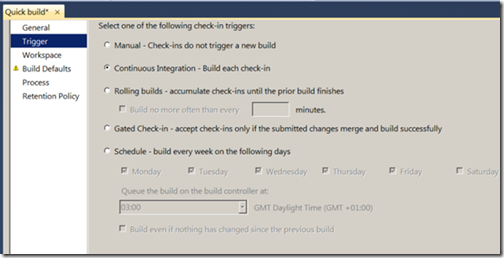
 3. On the Trigger tab, define the trigger i.e. when the build should execute. The trigger is important and plays a big part in defining what type of build this will be. As an example, you could choose to have a lightweight quick build on a ‘Continuous Integration’ trigger, but have a more complete (and long-running) build on a nightly schedule. Most types are clear in their meaning, but some are less obvious. See Specify Build Triggers and Reasons for more detail.
 4. The Workspace tab lets you specify the working location for a build. Similar to a developer, the build process performs a ‘get latest’ operation on files from TFS source control, and a workspace mapping is needed to specify where on the file system the files should go.

When setting up the workspace, consider the following points:
- The ‘get latest’ operation will include all folders and files in the specified source control folder. If your build only includes a few Visual Studio projects from a large list, the build may not need the entire source tree. Specifying a path to a subfolder containing only the desired projects is more efficient and reduces build times.
- The $(SourceDir) token corresponds to a directory underneath the ‘Working Directory’ property of the build agent (this is configured in the Team Foundation Server Administration Console).
- If you change the value specified in Build Agent Folder, note that although the browse dialog looks at the local computer, the path is actually used on the build agent. Therefore, you may need to type the path rather than browse to the location.
- Always use a short path for the workspace. There is a limitation in Windows of 260 characters in a path, and the extra characters in a build working directory can mean that regular development is fine, but the automated build process hits the limitation and fails. Changing the default Working Directory property of the build agent can also help.
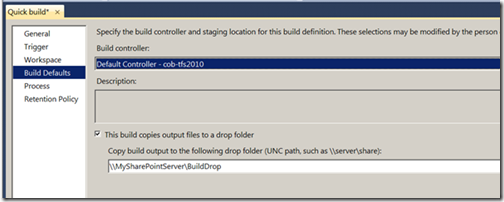
5. On the Build Defaults tab, specify the default build controller (if you have multiple) and also the location (a Windows shared folder) where the results of the build should be copied to. Later in the series when we look at automatically deploying WSP files, this setting is used to copy the packages across to the SharePoint environment that will be used for testing. Note that the Windows share (named ‘BuildDrop’ in the image below) must already exist, and Read/Write permission granted to the TFS build and TFS service accounts.
6. The Process tab is where many of the most important settings are. Here, we specify the solutions and projects to include in the build, the build workflow to use (something we’ll change later), and many other important parameters that get passed into the build workflow. One crucially important parameter for SharePoint builds is the /p:IsPackaging=true value passed in the MSBuild Arguments field. This value tells the build process that it should call into the SharePoint tools and produce WSP packages the same way Visual Studio 2010 does. If this is omitted, your build output will only include assemblies.
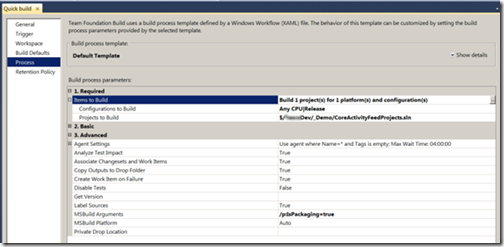
In terms of selecting which Visual Studio projects and solutions should be built, consider that dependencies between projects need to be managed carefully in automated builds. See the later section ‘A note on dependencies and references’ for more information.
For a full description of the other settings available on the Process tab, see Define a Build Using the Default Template on MSDN.
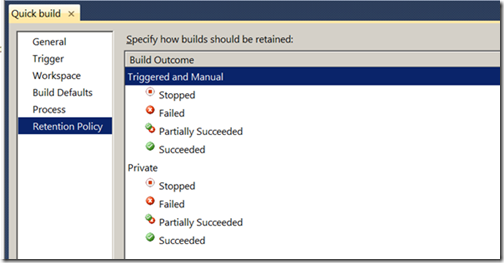
7. The Retention Policy tab is used to specify how long builds should be kept. We don’t need to change anything here but it’s useful to be aware of the options. Since it’s common to have many builds occur over a given time period (e.g. one happens on each check-in if the trigger is ‘Continuous Integration’), TFS automatically manages these so they don’t accumulate forever. By default, the last ten builds are kept for most outcome types.
8. Save the build definition.
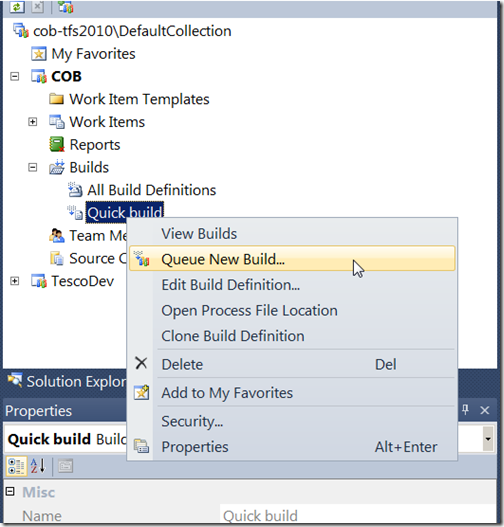
9. Now that the initial build definition is complete, test it by starting a manual build. Right-click the build definition in Team Explorer and select Queue New Build... .
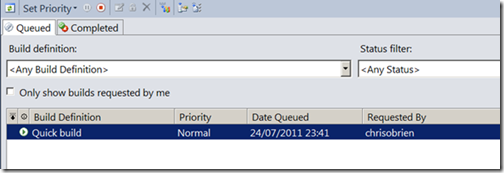
10. The build should now run and appear in the Build Explorer window (which opens automatically).
11. Once the build has completed, double-click an item in the list to display the build summary. Clicking the View Log link in the navigation pane shows a more detailed log which should look something like the following.
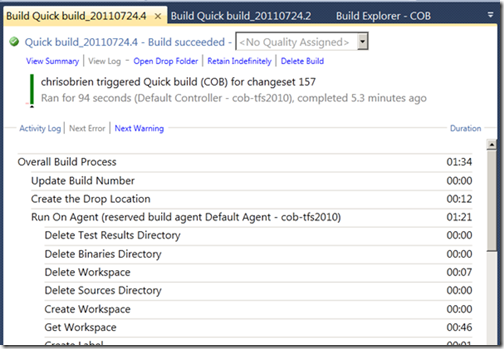
If the Windows share on the drop location (specified in step 5) is configured properly, the files generated by the build should now appear. Assuming you have connectivity from the client machine to this location, you can click the Open Drop Folder link on the build report to open Windows Explorer. Note that any assemblies referenced by the built projects also appear here (see Jeremy Jameson’s article for a tip on suppressing these). Also within the list you will see the assemblies and, more importantly, the WSP files that the build generated automatically from the latest code.
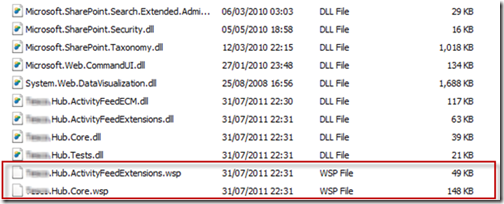
You now have build automation for your SharePoint projects.
An introduction to editing the build workflow
Once you have a custom build definition, you will most likely need to edit the build process workflow at some point. Whilst many aspects of the build can be changed by editing build parameters, more extensive customizations require changes to the workflow – one example would be configuring the build to deploy WSP packages.
In this section, we’ll cover some basics and show you how to make a simple change to the workflow. In future articles, we’ll cover the specific changes required to increment assembly versions and deploy WSP packages.
Build workflow fundamentals
The Develop a Customized Build Process section on MSDN has comprehensive documentation on customizing the build workflow, and the topic is covered in the excellent Build Customization Guide from the Visual Studio ALM Rangers team too. However, let’s cover some core details here:
- In TFS 2010 Build, the build process is implemented as a .NET Framework 4 workflow. Editing a workflow requires .NET Framework 4 to be installed on the developer machine.
- Build workflows are stored in TFS source control. The latest checked-in version of a definition is used.
- TFS 2010 ships with several sample build workflows. These can be used as-is or copied and modified to produce a customized process. The workflows are:
- DefaultTemplate.xaml – The best general starting point for most purposes.
- LabDefaultTemplate.xaml – Supports management of lab environments (e.g. virtual machines, snapshots) via Microsoft System Center Virtual Machine Manager.
- UpgradeTemplate.xaml – Provides a means to use an existing TFS 2008 build process (written in MSBuild) without re-engineering.
Like any .NET Framework 4 workflow, the build workflow is simply a series of workflow activities that perform the actual work. TFS 2010 ships with many build-related activities that are useful when customizing the workflow. The following table lists activities that are frequently the most important when starting out customizing builds.
Activity |
Purpose |
Used to call an external process e.g. a PowerShell script or .exe. |
|
Used to write messages of varying severities to the build log. |
|
Used to get the file system path from the path in TFS source control, or vice-versa. |
Note also that a working knowledge of a couple of the generic .NET Framework 4 activities in System.Workflow.Activities, such as SequenceActivity and IfElseActivity, goes a long way in helping you implement branching logic in your workflows. .
Customizing the build workflow
This section walks through the process customizing the workflow. The recommended pattern is to make a copy of one of the shipped workflows and modify it, leaving the original workflows in place for other builds and for reference. Dialogs in Visual Studio assist you through this process.
1. Identify the shipped workflow that provides the best starting point for your needs (usually DefaultTemplate.xaml).
2. In the Process tab of the build definition, click the New... button to begin the process of copying an existing definition.
3. In the dialog that appears, ensure Copy an existing XAML file is selected and that the file being copied is ‘DefaultTemplate.xaml’. Give the new file an appropriate name and click OK.
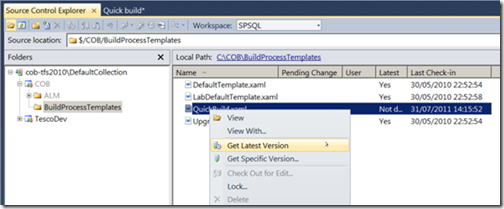
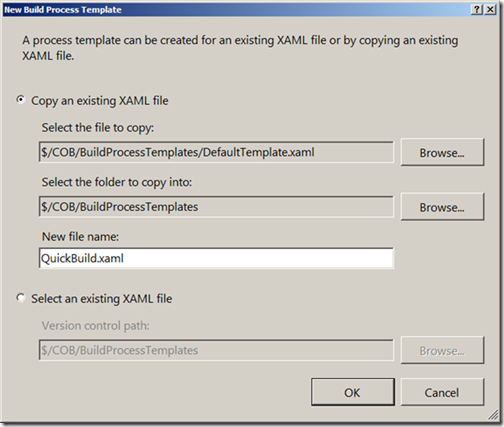 4. After clicking OK you can click the link under the Click to go to location in Source Control Explorer text to go to the newly copied file in source control. Once there, perform a ‘get latest’ to your workspace on the developer machine.
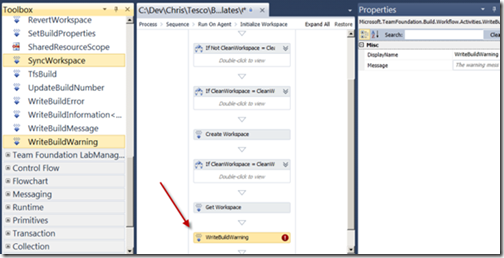
5. Double-click the XAML file to open it in the workflow designer. When the workflow opens, navigate to the Process > Sequence > Run On Agent > Initialize Workspace location. (See Navigate in a Complex Windows Workflow if you are new to editing workflows.) Ensure the toolbox window is visible in Visual Studio and drag a WriteBuildWarning activity from the Team Foundation Build Activities area of the toolbox. (Note that we use a ‘warning’ rather than standard ‘message’ activity because messages of lower severities do not appear in the build report by default.) Ensure that the WriteBuildWarning activity is the last activity in the ‘Initialize Workspace’ sequence:
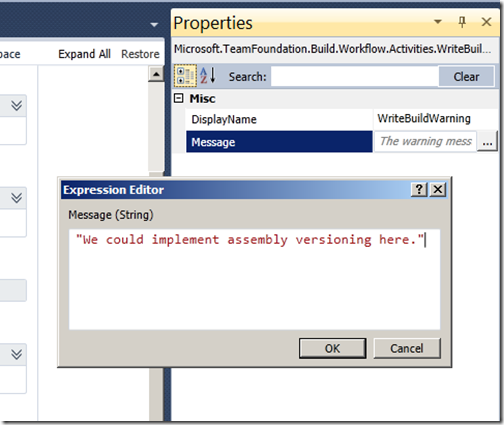
6. Configure the WriteBuildWarning message by specifying the message to write to the build log. In the Properties window, find the Message property and click the ellipsis (…) to open the Expression Editor window. Type a string message – in my case I’m using, “We could implement assembly versioning here.” since a future post in this series will do just that.
7. Click OK, then save the workflow and check-in.
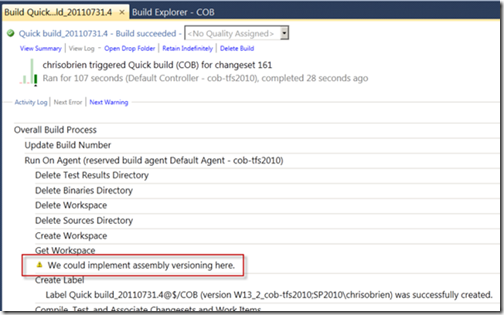
8. Manually trigger a build to test the workflow (by using ‘Queue a new build’ as we did earlier). If the change was successful, in addition to compiling the specified projects and solutions, you should notice the following message in your build report:
You have now tested a customization to the build workflow. We will build on this knowledge to automate the deployment of WSPs to a SharePoint server later in the series.
A note on dependencies and references
Most developers are familiar with the difference between file and project references when referencing other assemblies. For automated builds, using project references is the simplest approach. This is because the build order is evaluated automatically and dependent assemblies are guaranteed to build when required. This means that the solutions and projects checked into TFS and selected in the ‘Items to build’ parameter should be set to use project references. A good approach is to group related projects into a solution (with project references between dependencies), and then select each solution in the Items to build dialog. Even where many projects reference a ‘core’ project, having the core project exist in many solutions is an acceptable tradeoff compared to the complexities of managing file references in an automated build.
Summary
In this article, we started with the process to enable a TFS build server to build SharePoint projects. From there, we created a new build definition (based on the default build workflow shipped with TFS), which is the minimum to implement automated builds. We proceeded to create a custom build workflow (starting with a copy of one of the shipped workflows), and introduced the process to edit the workflow. This is the groundwork for changes we will add later, such as deploying WSPs, implementing assembly versioning, and running coded UI tests. The next post in the series will cover these steps.
