Importing a SharePoint Designer (SPD) Workflow with InfoPath Task Forms to Visual Studio 2010 (Huma Qureshi)
SharePoint Designer (SPD) workflows are declarative i-e they have no code and the entire workflow is defined using xml files. When working against SharePoint Server 2010 SPD auto-generates InfoPath task edit forms for the workflow with fields defined by the user in the workflow for each task action. When you import this workflow to Visual Studio 2010, using ‘Import Reusable Workflow’ template, the InfoPath forms are brought over in Visual Studio but they are not hooked up to run on F5 with the converted Visual Studio workflow. Here are the steps explaining how to get SPD’s task forms working in Visual Studio. The below steps are for an SPD workflow having a single task form which is generated in SPD when you add a “collect data from user” action in the workflow definition. Remember, if you have initiation/association forms as well in the SPD workflow you need to import those as well in-order to see your task form working (see my previous post on how to do this - https://blogs.msdn.com/b/sharepointdev/archive/2010/12/14/importing-a-sharepoint-designer-spd-workflow-with-initiation-association-infopath-forms-to-visual-studio-2010-huma-qureshi.aspx).
1. Set up the form for deployment
1) After you import your workflow into Visual Studio using the “Import Reusable Workflow” project type, the imported form is placed under the “other imported files” folder in solution explorer. In the Visual Studio solution explorer, drag the form (*.xsn) under the workflow SharePoint Project Item (SPI) to which the form belongs.
2) Using the property grid, change the ‘Deployment Type’ property of the *.xsn form to be “Element File”. This will automatically deploy the form on the server along with the workflow.
2. Set form registration settings
1) Now that the form is set to be copied over on deployment with the workflow, you need to make sure that it is also registered on the forms server when it is deployed. To do this, you need to add a feature receiver to the workflow feature which will take care of forms registration. To do this, select the workflow node in solution explorer, then in the property grid expand the feature receiver property, and set the following two sub-properties:
FeatureReceiverAssembly: Microsoft.Office.Workflow.Feature, Version=14.0.0.0, Culture=neutral, PublicKeyToken=71e9bce111e9429c
FeatureReceiverClass: Microsoft.Office.Workflow.Feature.WorkflowFeatureReceiver
2) In the property grid, in the ‘Feature Properties’ collection add these two property/value pairs.
GloballyAvailable: true
RegisterForms: [MIGRATED_WORKFLOW_NAME]\*.xsn
3) Hookup the form with the workflow
In order to hook up the form with the workflow you need to add its URN to the workflow elements manifest.
1) Open the form folder in windows explorer and right click and choose ‘design’. This will open the form in InfoPath in design mode.
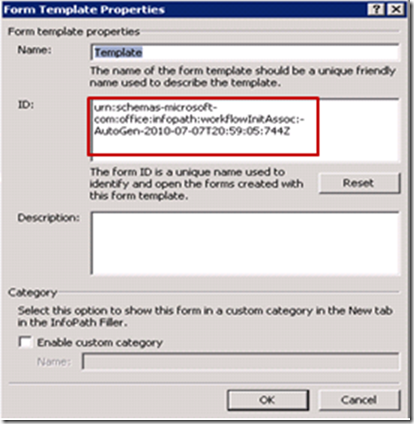
2) Click File->Info->Form template properties and you will see ID of the form:
3) Copy the form ID from InfoPath in the following XML snippet and add the following snippet in workflow elements manifest file in Visual Studio under the MetaData element:
<Task0_FormURN>[FORM_URN]</Task0_FormURN>
Now the form is all hooked up set and will be deployed with the workflow. There is one catch though; SPD forms are not generated to run with code-based workflows. We can however do a little fix-up on the form to make sure it runs with our code based workflow.
Note: This example only applies to a single task form in a workflow. If you have multiple forms you need to add multiple <TaskID_FormURN> entries in the workflow elements manifest containing each forms URN with TaskID being the TaskId property of corresponding CollectDataTask activity in the workflow definition. For more details on usage of this see: https://msdn.microsoft.com/en-us/library/aa640807.aspx
4) Fix-up the auto-generated InfoPath form
1) Add references to
a. Microsoft.Office.Workflow.Pages.dll - located in %programfiles% \Common Files\Microsoft Shared\Web Server Extensions\14\CONFIG\BIN directory.
b. Microsoft.Office.InfoPath.dll - located in GAC.
c. Microsoft.Office.InfoPath.Server.dll - located in GAC
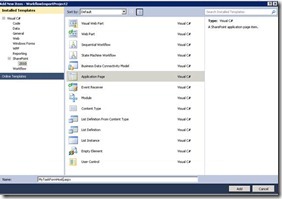
2) Add a new application page to the project. This is the custom host page which will host our InfoPath form. In below example I have named this “MyTaskFormHost.aspx”
3) Add below code to the application page code behind. Change the highlighted text to match your code behind file and class name.
<%@ Assembly Name="$SharePoint.Project.AssemblyFullName$" %>
<%@ Assembly Name="Microsoft.Office.Workflow.Pages, Version=14.0.0.0, Culture=neutral, PublicKeyToken=71e9bce111e9429c"%>
<%@ Import Namespace="Microsoft.SharePoint.ApplicationPages" %>
<%@ Assembly Name="Microsoft.SharePoint, Version=14.0.0.0, Culture=neutral, PublicKeyToken=71e9bce111e9429c"%>
<%@ Page Language="C#" DynamicMasterPageFile="~masterurl/default.master" CodeBehind="MyTaskFormHost.aspx.cs" Inherits="WorkflowImportProject5.Layouts.WorkflowImportProject5.MyTaskFormHost" EnableSessionState="true" AutoEventWireup="false" %>
<%@ Import Namespace="Microsoft.SharePoint.WebControls" %>
<%@ Register Tagprefix="SharePoint" Namespace="Microsoft.SharePoint.WebControls" Assembly="Microsoft.SharePoint, Version=14.0.0.0, Culture=neutral, PublicKeyToken=71e9bce111e9429c" %>
<%@ Register Tagprefix="Utilities" Namespace="Microsoft.SharePoint.Utilities" Assembly="Microsoft.SharePoint, Version=14.0.0.0, Culture=neutral, PublicKeyToken=71e9bce111e9429c" %>
<%@ Import Namespace="Microsoft.SharePoint" %>
<%@ Assembly Name="Microsoft.Web.CommandUI, Version=14.0.0.0, Culture=neutral, PublicKeyToken=71e9bce111e9429c" %>
<%@ Register Tagprefix="InfoPath" Namespace="Microsoft.Office.InfoPath.Server.Controls" Assembly="Microsoft.Office.InfoPath.Server, Version=14.0.0.0, Culture=neutral, PublicKeyToken=71e9bce111e9429c" %>
<%@ Register TagPrefix="wssuc" TagName="LinksTable" src="/_controltemplates/LinksTable.ascx" %>
<%@ Register TagPrefix="wssuc" TagName="InputFormSection" src="/_controltemplates/InputFormSection.ascx" %>
<%@ Register TagPrefix="wssuc" TagName="InputFormControl" src="/_controltemplates/InputFormControl.ascx" %>
<%@ Register TagPrefix="wssuc" TagName="LinkSection" src="/_controltemplates/LinkSection.ascx" %>
<%@ Register TagPrefix="wssuc" TagName="ButtonSection" src="/_controltemplates/ButtonSection.ascx" %>
<%@ Register TagPrefix="wssuc" TagName="ActionBar" src="/_controltemplates/ActionBar.ascx" %>
<%@ Register TagPrefix="wssuc" TagName="ToolBar" src="/_controltemplates/ToolBar.ascx" %>
<%@ Register TagPrefix="wssuc" TagName="ToolBarButton" src="/_controltemplates/ToolBarButton.ascx" %>
<%@ Register TagPrefix="wssuc" TagName="Welcome" src="/_controltemplates/Welcome.ascx" %>
<asp:Content ID="Content1" ContentPlaceHolderId="PlaceHolderAdditionalPageHead" runat="server">
</asp:Content>
<asp:Content ID="Content2" ContentPlaceHolderId="PlaceHolderPageTitle" runat="server">
<SharePoint:EncodedLiteral ID="EncodedLiteral1" runat="server" text="<%$Resources:dlc, WrkTask_PageTitle%>" EncodeMethod='HtmlEncode'/>
</asp:Content>
<asp:Content ID="Content3" ContentPlaceHolderId="PlaceHolderPageTitleInTitleArea" runat="server">
<a tabindex=1 id=onetidListHlink HREF=<% SPHttpUtility.AddQuote(SPHttpUtility.UrlPathEncode(List.DefaultViewUrl,true),Response.Output);%>><%SPHttpUtility.HtmlEncode(List.Title,Response.Output);%></A>: <% SPHttpUtility.HtmlEncode(m_taskName,Response.Output); %>
</asp:Content>
<asp:Content ID="Content4" ContentPlaceHolderId="PlaceHolderTitleBreadcrumb" runat="server">
<asp:SiteMapPath SiteMapProvider="SPContentMapProvider" id="ContentMap" SkipLinkText="" runat="server"/>
</asp:Content>
<asp:Content ID="Content5" ContentPlaceHolderId="PlaceHolderLeftNavBar" runat="server">
</asp:Content>
<asp:Content ID="Content6" ContentPlaceHolderId="PlaceHolderMain" runat="server">
<SharePoint:FormComponent ID="FormComponent1" TemplateName="WorkflowEditFormToolBar" ControlMode="Edit" runat="server"/>
<table class="ms-informationbar" style="margin-top: 10px;" border="0" cellpadding="2" cellspacing="0"
width="100%"
>
<tr>
<td width="10" valign="center" style="padding: 4px;">
<img IMG SRC="/_layouts/images/Workflows.gif" alt=<%SPHttpUtility.AddQuote(SPHttpUtility.HtmlEncode(GetLocString("WrkTask_PageTitle")),Response.Output);%>/>
</td>
<td>
<% SPHttpUtility.NoEncode(m_pageDescription,Response.Output); %>
</td>
</tr>
</table>
<InfoPath:XmlFormView id="XmlFormControl" runat="server"
style="width:100%;"
/>
<SharePoint:FormDigest ID="FormDigest1" runat=server/>
</asp:Content>
4) Now open the code for your custom task host page and derive the class from “Microsoft.Office.Workflow.WrkTaskIPPage”. Now add the code as shown below into your code behind class. Make sure you still use your original namespace and class name as highlighted.
using System;
using Microsoft.SharePoint;
using Microsoft.SharePoint.WebControls;
using Microsoft.Office.InfoPath;
using Microsoft.Office.InfoPath.Server.Controls;
using Microsoft.Office.Workflow;
namespace WorkflowImportProject5.Layouts.WorkflowImportProject5
{
public partial class MyTaskFormHost : WrkTaskIPPage
{
protected override void OnInit(EventArgs e)
{
XmlFormControl.Initialize += new EventHandler<InitializeEventArgs>(XmlFormControl_Initialize_Custom);
XmlFormControl.SubmitToHost += new EventHandler<SubmitToHostEventArgs>(XmlFormControl_OnSubmitToHost_Custom);
XmlFormControl.Close += new EventHandler(XmlFormControl_OnClose_Custom);
base.OnInit(e);
}
protected void XmlFormControl_Initialize_Custom(object sender, InitializeEventArgs ea)
{
ModifySettings();
}
protected void XmlFormControl_OnSubmitToHost_Custom(object sender, SubmitToHostEventArgs e)
{
ModifySettings();
}
protected void XmlFormControl_OnClose_Custom(object sender, EventArgs e)
{
ModifySettings();
}
private void ModifySettings()
{
m_isCustomXsn = true;
int taskType = (int)m_task[SPBuiltInFieldId.TaskType];
if (taskType == 2)
{
XmlFormControl.DefaultView = "ChangeView";
}
}
}
}
5) Now you need to change your Content Type definition to use the new form for displaying your InfoPath form. So in the content-type related to this form open the elements.xml file and change the form URLs for your Content Type to the deployment paths of the newly created application page. “_layouts/[ProjectName]/[ApplicationPageName].aspx”. The forms are specified under the FormsUrls node using “display” and “edit” node.
<Display>_layouts/[ProjectName]/[ApplicationPageName].aspx</Display>
<Edit>_layouts/[ProjectName]/[ApplicationPageName].aspx </Edit>
6) Now right click the workflow node in solution explorer and select “Workflow Debug Settings”. This will let you set workflow association parameters so that your workflow can be auto-associated at debug time. Complete the wizard to select the settings as you want.
7) Now when you hit F5 your workflow will be deployed and ready to run with your new migrated task from. However there is one extra step: Since you have a custom content type for creating workflow task, you need to modify your task list settings and add your custom content type to the workflow task list before you run your workflow.

