Introducing the new Visual Designer
Introductions:
Hello all, my name is Sam Chung and I am a Program Manager for SharePoint Designer. I’m very proud to introduce everyone to one of our biggest investment for SharePoint Designer 2013, which is the Visual Designer.
Before we begin, I highly recommend you take a look at the MSDN articles we have setup. You can find the relevant articles here:
https://msdn.microsoft.com/en-us/library/sharepoint/jj163272(v=office.15).aspx
https://msdn.microsoft.com/en-us/library/sharepoint/jj164055(v=office.15).aspx
https://msdn.microsoft.com/en-us/library/sharepoint/jj163971(v=office.15).aspx
The Visual Designer is a whole new workflow design surface that’s built right into SharePoint Designer 2013. For those of you who are familiar with SPD 2010, you’ll know that you could create SP 2010 workflows in Visio first, export it, and then import these diagrams into SPD 2010. And although, this did work, there were several limitations:
- No way to parameterize the different actions within Visio.
- You would always have to switch to the Text-Based Designer to set the action parameters.
- When exporting from SPD, you had no idea how your diagram might have been changed
- No way to show/use custom actions within Visio
All of these limitations are now gone, and we’ve added a bunch of new features to really make this feature shine.
How does it work?
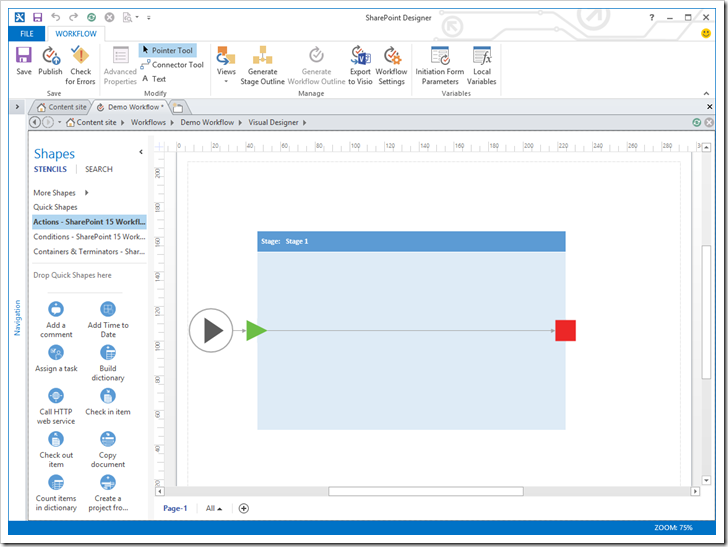
Let’s go now and take a look at what the Visual Designer looks like. Here’s a screen shot of the actual designer:
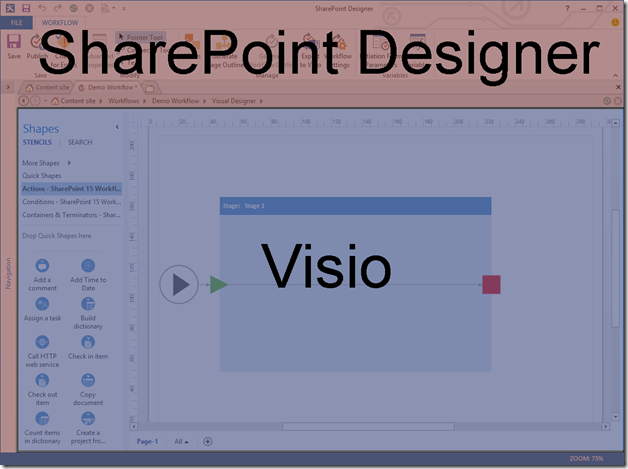
As you can see, the Visual Designer looks like a Visio canvas showing up directly within SharePoint Designer. And in fact, this is exactly what’s going on. When SharePoint Designer 2013 and Visio 2013 Professional are installed side by side on the same machine, we will enable the new Visual Designer.
If we take a look at the screen, you can see the two different apps:
Although there are two separate apps running, we’ve integrated the two together so much, that you shouldn’t even notice that there are two separate apps. Everything should feel like it’s all happening within SPD.
How do I enable the Visual Designer?
Here are the prerequisites for using the Visual Designer
- Install SharePoint Designer 2013 & Visio Professional on the same machine
- The Visual Designer will not work in any previous versions of SPD
- Only Visio Pro will enable the Visual Designer
- Connect SharePoint Designer 2013 up to a SharePoint 2013 site that has the Workflow Manager setup
- The Visual Designer will not work on 2010 sites
- This is because you can’t create SharePoint 2013 workflows on SharePoint 2010 sites
- You can find more info on how to setup the Workflow Manager here: https://msdn.microsoft.com/en-us/library/sharepoint/jj163276(v=office.15)
- Create a new SharePoint 2013 workflow
- The Visual Designer will only work when creating / editing SharePoint 2013 workflows
- You cannot use this feature to create / edit SharePoint 2010 workflows
Once you are certain you have all of the prerequisites you should be able to switch to the Visual Designer
at any time by clicking on the “Views” button found in the ribbon:
So what are the key take aways?
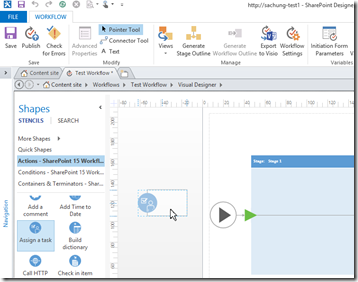
1) Able to create workflows using click and drag just like in Visio
-
- All of your actions are made available in the left stencil pane
- The Stencil pane automatically displays only the list of actions that are appropriate for the type of workflow you are creating.
- Custom actions will also appear in the stencil
- The pane is presorted in alphabetical order
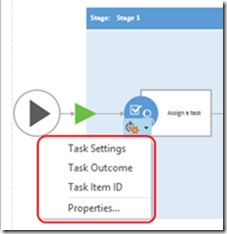
2) Able to use “Action Tags” to set properties of different actions
-
- The action tag shows you the “top level” properties of an action. If you look at the same action in the Text-Based Designer, you’ll notice that some properties are shown as links in the sentence:
-
- These same links are shows as the options in the action tag.
- Selecting on any one of these options will bring up either the appropriate dialog for that option or the “Top Level Property grid” (more on this directly below)
3) Top Level Property grids allow you to set the properties that would only show up at the sentence
level in the Text-Based Designer.
-
- Similar concept to the action tags
4) You can generate Stage Level Diagrams to view the workflow at just the stage level. This is great for understanding the flow of the workflow or reporting.
-
- Note: The stage level diagram and the original diagram are two distinct diagrams. There is no syncing between the two.
- I will create a another blog post purely on the stage level view and it’s capabilities
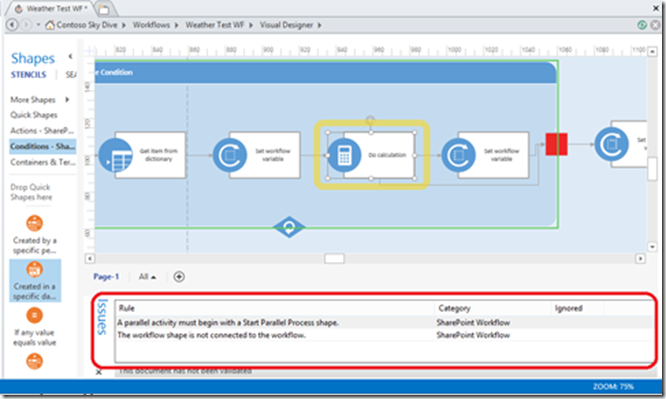
5) Errors in the workflow are shown the Issues Pane:
-
- Notice how errors are listed in the error pane
- Both errors at the shape level and errors in the workflow property are shown here
- When you click on an error message, the associated shape is automatically highlighted
- Error checking is done whenever you try and Publish a workflow, click on the “Check for Errors” ribbon button, and when try and switch from the Visual Designer to the Text-Based Designer
- No error checking is done when you just save workflows
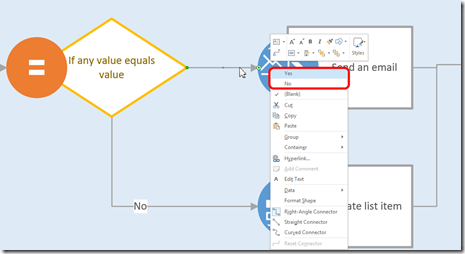
6) Conditional branches need to be set by right clicking on them
-
- Remember that all branches coming out from Conditional shapes need to be set by right clicking on each branch and selecting “Yes” or “No”
There are lots of different features within the Visual Designer which I haven’t gone over. I’ll be covering those features in future posts. For now, feel free to post any questions you may have.
Thanks,
Sam
