Training Site Template - Part 1: Introduction
 Hi folks,
Sean Gabriel here. I'm a Program Manager for the SharePoint Designer team, and I work primarily on our application building experience. I'm definitely looking forward to sharing my knowledge here - so if you have topics in the app building space that you'd like to see covered in this blog, don't hesitate to ask.
You may have heard of the Application Templates for Windows SharePoint Services 3.0, a set of recently released SharePoint site templates that are designed to solve 40 common customer scenarios. I had the pleasure of building one of these templates myself, and I want to show you how to do it using SharePoint Designer 2007 - from start to finish!

The template I'll be discussing is Employee Training Scheduling and Materials. The best way to understand it is to download it and try it out yourself, but here's a quick overview of how it works:
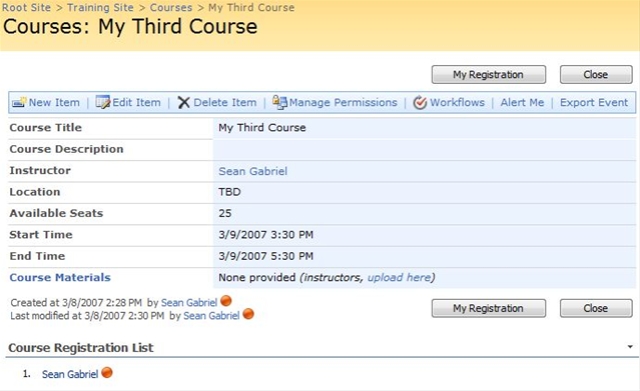
Two types of users can visit the site, instructors and students (learners). When an instructor has a class to teach, he/she adds it to the Courses list, specifying things like the date, location, and number of available seats. Students can then browse through the list of upcoming courses and sign up for anything they are interested in - and the app keeps track of the registration list, reminds users when a class is soon to start, and collects student feedback after the class is over. At a glance, both students and instructors can view a personalized dashboard of their trainings on the site's home page.
These behaviors are achieved through the use of workflow and a few specialized instances of the Data Form Web Part (DFWP). Here's the battle plan for how we'll build out the app:
- Design the key lists - Courses, Registrations, etc.
- Add sign-up and reminder logic with workflow
- Override default list views and forms to control app behavior
- Create dashboard page with aggregate views across multiple lists
For most of these items we will be using SPD, but the first bullet is something we need to do through the browser for now. So today let's walk through the list design to set us up for building the DFWPs next time.
List Schema Design
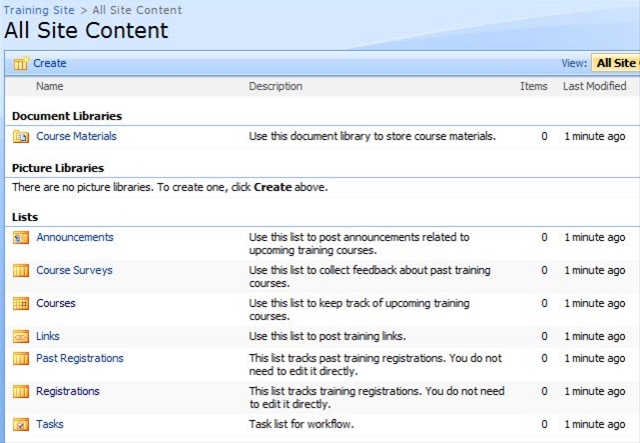
If you browse to "View All Site Content" on the training site, you'll see the following list of lists:
The heart of this app is the Courses list. A course is a lot like an appointment - which has a title, location, start and end time, etc. - so a great place to start is with the built-in Calendar list. On your blank SharePoint site (you're following along, right?) do the following:
- Click on Site Actions > Create
- Choose Calendar under the Tracking column
- Name it "Courses" and supply a description
SharePoint has taken care of providing us the calendar-like view that you see in the training site under "Upcoming courses" (sidenote: and this works because Courses are now using the Calendar content type). But the schema isn't quite right yet. Let's tailor our new list around courses specifically - so, from the calendar view where you are now:
- Click on Settings > List Settings
- Click Create Column for each line item below, and fill in the following info (use defaults unless specified):
- "Instructor" :: Person or Group :: OK
- "Filled Seats" :: Number :: Yes to Required :: Min 0 Decimals 0 Default 0 :: OK
- "Total Seats" :: Number :: Yes to Required :: Min 0 Decimals 0 Default 0 :: OK
- Click on the name of each existing column and modify it as specified:
- Title :: Rename to "Course Title" :: No to Required :: OK
- Description :: Rename to "Course Description" :: OK
Now our Courses list has an instructor associated with it, and placeholders for calculating the number of available seats in the class (which we'll get to later). Don't worry about the views on this list yet, we'll be going over those next time as well.
Since I walked you through the Courses list in detail I'll trust you to be able to follow quickly through the rest of the lists. Next up is Course Materials, which will hold any documents related to the courses. Sounds like a document library works, but each doc will need a pointer back into the Courses list so we know which course it's associated with. Here's how to do it:
- Click Site Actions > Create :: Document Library
- Name it "Course Materials" and suppy a description, we used "Microsoft Office PowerPoint presentation" as the doc template
- Click Settings > Document Library Settings
- Add column "Course" :: Lookup :: Yes to Required :: Get information from Courses :: In this column Course Title :: OK
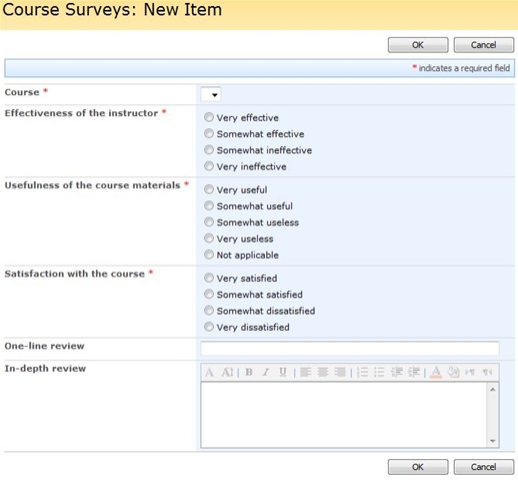
We also want to collect course feedback from students after they've taken the class. Here you can be as broad or specific as you want, but these are the steps for creating the Course Surveys list you see in the training site today:
- Click Site Actions > Create :: Custom List
- Name it "Course Surveys" and supply a description
- Click Settings > List Settings
- Click Title :: Rename to "One-line review" :: No to Required :: OK
- Add column "In-depth review" :: Multiple lines of text :: OK
- Add column "Course" :: Lookup :: Yes to Required :: Get information from Courses :: In this column Course Title :: OK
- Add the following 3 columns as... :: Choice :: Yes to Required :: Supply choices* :: Radio Buttons :: Empty default :: OK
- "Effectiveness of the instructor"
- "Usefulness of the course materials"
- "Satisfaction with the course"
* = fill in the answers to the survey, you can see them in the picture on the right (or try adding a new item to Course Surveys in the template).
Additionally, we need to keep track of registrations for each course, and while there are many ways to do this, the model we used for this template was a separate list that essentially stores (Name, Course) pairs. We'll enforce the seating requirement both in the front-end views and back-end workflow. So for now, lay the foundation with this Registrations list:
- Click Site Actions > Create :: Custom List
- Name it "Registrations" and supply a description
- Click Settings > List Settings
- Click Title :: No to Required :: OK
- Add column "Course ID" :: Lookup :: Yes to Required :: Get information from Courses :: In this column Course ID :: OK
Now do the exact same thing to create the Past Registrations list (but change the name, of course). From here you can create the (optional) Announcements and Links lists, which you'll find in Site Actions > Create under the Communications and Tracking columns, respectively.
Well done! You now have the 7 lists that house all the data in the Employee Training Scheduling and Materials site. The 8th list (Tasks) will be on its way shortly, as next time I'll show you how to create the workflows for registration and reminders I mentioned earlier. That's the key to providing rich application logic behind our SharePoint site here. Until then -
Best,
Sean