Form based Authentication using SQL provider in SharePoint 2013
We know that SharePoint is used to share information internally to users who are part of the organization. When internal users want to access a SharePoint site, they use windows authentication (AD authentication). This is the way most organizations work with SharePoint.
But in some cases we need people who are not a part of your organization to access your SharePoint site. In this case, you need to make sure people accessing your SharePoint sites are legitimate users and are getting authenticated against some authentication source. In this article we will discussing how to make SQL DB as a source of authentication.
To achieve this we need to make changes in 3 web.config files. They are
1. SharePoint Central Admin
2. SharePoint Web Application
3. Security Token Service Application
To start of with, we need to create a web application. In the creating process, under Claims Authentication Types, enable WINDOWS AUTHENTICATION and FORM BASED AUTHENTICATION (FBA).See the below snapshot

I have given values to ASP.NET Membership provider name and Role manager name. These values will be used to in the web.config files.
Rest of the options can be the default options and create a web application. Once a web application is created, create a site collection in it. ( You can choose any template ).
Now that the web application is created, lets create a SQL DB where our external user names and there passwords will be stored. To do this, navigate to C:\Windows\Microsoft.NET\Framework64\v2.0.50727\. Here look for application called aspnet_reqsql and launch it. This will help you created a asp.net aware database. The default database name is aspnetdb.
Lets get on to the web.config file editing now.
Open the web.config file of SharePoint 2013 web application and search for <system.web>. Just above <system.web> and below</sharepoint> put the following code.
<connectionStrings>
<add name="SqlConn"
connectionString="server=sqlserver;database=aspnetdb;Trusted_Connection=true"/>
</connectionStrings>
In the code, the connection name is SqlConn, my aspnet database name is aspnetdb and my SQL Server name is sqlserver. Make sure you enter the correct SQL Server name in your code. ( if its on a named instance, please use <servername>\<instancename> format)
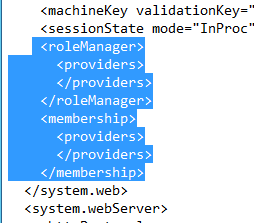
Once I connection string is properly entered, search for the tag <membership>, you will find it like the below picture
Replace the entire tag <roleManager> and <membership> with the below code
<roleManager enabled="true" defaultProvider="AspNetWindowsTokenRoleProvider">
<providers>
<add connectionStringName="SqlConn"
applicationName="/"
name="sqlr"
type="System.Web.Security.SqlRoleProvider, System.Web, Version=2.0.3600.0, Culture=neutral, PublicKeyToken=b03f5f7f11d50a3a"/>
</providers>
</roleManager>
<membership defaultProvider="sqlm">
<providers>
<add connectionStringName="SqlConn"
applicationName="/"
name="sqlm"
type="System.Web.Security.SqlMembershipProvider, System.Web, Version=2.0.3600.0, Culture=neutral, PublicKeyToken=b03f5f7f11d50a3a" />
</providers>
</membership>
Save the changes and you are done making changes in 1 of the 3 web.config files. ( Make sure you have entered the correct values of ASP.NET Membership provider name and Role manager name in the above code. I have RED marked those)
Now lets open web.config file of your newly created web application and find for <system.web> tag. Paste the below connection string code
<connectionStrings>
<add name="SqlConn"
connectionString="server=sqlserver;database=aspnetdb;Trusted_Connection=true"/>
</connectionStrings>
In the code, the connection name is SqlConn, my aspnet database name is aspnetdb and my SQL Server name is sqlserver. Make sure you enter the correct SQL Server name in your code. ( if its on a named instance, please use <servername>\<instancename> format)
Now search for <membership tag and you will its a little different when compared to Central Admin web.config file. Below is something similar to what you will see
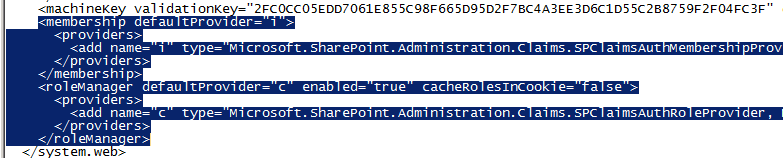
As you see <membership> tab and <rolemanager> tag already have certain values and parameters already present. All we need to do is append the follow piece of code.
Add the following code before </providers> under <membership defaultprovider="i">
<add connectionStringName="SqlConn"
applicationName="/"
name="sqlm"
type="System.Web.Security.SqlMembershipProvider, System.Web, Version=2.0.3600.0, Culture=neutral, PublicKeyToken=b03f5f7f11d50a3a" />
Add the following code before </providers> under <roleManager defaultprovider="c" enabled ="true" CacheRolesInCookie="false">
<add connectionStringName="SqlConn"
applicationName="/"
name="sqlr"
type="System.Web.Security.SqlRoleProvider, System.Web, Version=2.0.3600.0, Culture=neutral, PublicKeyToken=b03f5f7f11d50a3a"/>
Save the web.config file and now 2 of the 3 web.config file changes are done!! :)
The last one of the STS ( Security Token Service Application ) web.config file. To make it simple just paste the below code before </configuration> and just after </system.net>
<connectionStrings>
<add name="SqlConn"
connectionString="server=sql;database=aspnetdb;Trusted_Connection=true"/>
</connectionStrings>
<system.web>
<membership defaultProvider="sqlm">
<providers>
<add connectionStringName="SqlConn"
applicationName="/"
name="sqlm"
type="System.Web.Security.SqlMembershipProvider, System.Web, Version=2.0.3600.0, Culture=neutral, PublicKeyToken=b03f5f7f11d50a3a" />
</providers>
</membership>
<roleManager enabled="true">
<providers>
<add connectionStringName="SqlConn"
applicationName="/"
name="sqlr"
type="System.Web.Security.SqlRoleProvider, System.Web, Version=2.0.3600.0, Culture=neutral, PublicKeyToken=b03f5f7f11d50a3a"/>
</providers>
</roleManager>
</system.web>
(I have highlighted the items that you will need to take care of, such as the membership vales, SQL Server name etc.)
Now all that is left is to create users in the aspnetdb database, give them access to SharePoint.
To create users, I will be using membership seeder code present in www.codeplex.com site. Its a FREE tool and simple to use. Once you have downloaded the tool, open the Bin->Release folder and launch the application. Below is the tool interface that you will see ( values filled in the tool depends on your SharePoint farm). I have installed this tool on my SharePoint 2013 Server.
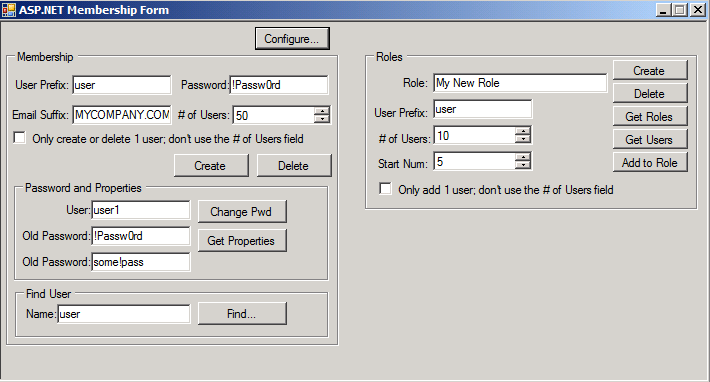
Click on configure, enter your SQL Server name and restart the application.
Enter a dummy user name ( for testing) such as user and for # of Users choose 5. Click create. If the connection between your SP2013 and SQL is proper and if the aspnetdb is created, then the users will also get created. You can verify by going to the table called dbo.aspnet_Users.
Last thing is to give then access to SharePoint Site. This is done using the User Policy tab from SP2013 Central Administration. Follow the below steps
Choose the web application -> Click on User Policy-> Add Users-> All Zones -> Add the user name created in the database. If the user name gets resolved, the most of your code and changes are working fine. If it does not, go through the code changes that you made in the web.config files.
Hope this blog was helpful.