Configuring User Name Mapping
Configuring User Name Mapping
We can now mount the share on the Linux client and can also create files. Next thing we should do is to configure User Name Mapping and see it in action.
So let’s go back to our Windows system. I have created few local users and group on this Windows systems and the Linux client. Some user and group names are same on both the systems and some are not.
Yes, that’s on purpose - you would notice that User Name Mapping parses the passwd and group files and can automatically map the users and groups that have same names. This is called Simple mapping. To allow User Name Mapping to do this for you, you need to enable the Use Simple Mapping option in the User Name Mapping properties using the Microsoft services for Network File System MMC Snap-in.
To start, you need to copy the /etc/passwd and /etc/group file over from your Linux system and filter them for unwanted user and group accounts which you don’t want to map. I am keeping them in C:\etc directory.
Open the MMC snap-in and check that you are pointing your installation to point to the correct user name mapping server- right click on the top of the hierarchy in the MMC snap-in on Microsoft Services for NFS and select Properties. Under the General Settings, type localhost for User Name Mapping Server if it’s not already there.
We are not going to use Active Directory Lookup so you can ignore that option for now.
Save this setting and now right click on User Name Mapping, go to properties and under the UNIX User Source tab, select Use Password and Group file and then browse to the passwd and group files. Move the Simple Mapping tab and enable Use simple maps option. Click on OK and come back to MMC snap-in.
Expand User Name Mapping, select User Maps, right click and click on Show simple maps. Now again right click on User maps and click on Refresh to refresh the mapping information. On my box, I see this –
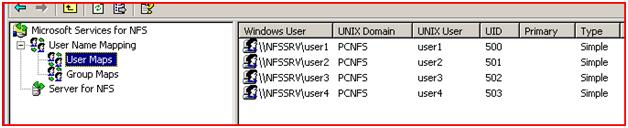
And, the Group Maps looks like this –

The other kind of mapping is called Advanced Mapping where you can map users with different login names on Windows and UNIX systems. You anyway need to do this to map UNIX root user to Windows Administrator user and UNIX root group to Windows Administrators group.
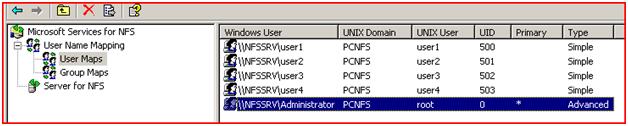
To create an advanced map, right click on User Maps, select Create Map…, Click on List Windows Users and then on List UNIX Users, Select Administrator in the list of Windows users and root in the list of UNIX users and click on Add.
Close this dialog box and now you should see the new mapping –
Ditto for Group Maps –

You may want to add few other advanced mappings for bin and sys/bin groups.
Server for NFS queries the User Name Mapping service when it starts and then keeps polling every 30-miuntes to fetch the mapping information. I have restarted my Server for NFS service so that I can go to the Linux client and do some tests there –
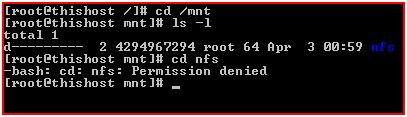
See that the nfs directory is owned by the root group which on the Windows side translates to Administrators group. Thanks to User Name Mapping.
I cannot, however, change to this directory as root user. That’s because I haven’t checked the Allow root access check-box in the NFS sharing properties.
| << Who's 4294967294? | Back to post | Using chown/chgrp from UNIX clients >> |