Tips On Migrating Existing Solutions To Premium Messaging
Now that Premium Messaging is generally available, many of our customers with existing solutions are wondering "how the do we start using it?" First off, let me start by saying that we recognize that migration is a pain point, and we are working on a feature that will handle this for you. Service Bus makes it easy to get started with Messaging, and now especially with our Premium offering, it makes it easy to scale.
This post assumes that you already have an existing solution built on top of Service Bus Messaging. If you don't have a solution and want to start from scratch, just select "Premium" when you create a new namespace.
For the rest of us, we will have to migrate our existing entities as well as our senders and receivers to a new Premium namespace. Also, keep in mind that these hints can be used to migrate any namespace. For example, another place where you may find this information valuable, is if you need to migrate your namespace to another data center.
Some things to keep in mind
- You cannot reuse a namespace name, so all newly created namespaces will need to be unique.
- If you have SAS tokens in place for certain entities, you can specify your own when you create them.
- If you create entities in code, you should check to make sure they don't already exist (example below). However, this should only be done on app startup, as it can be an expensive call and will impact performance.
 // Make sure you only do this on startup, as it can be an
// expensive call and will impact performance
if (!await namespaceManager.TopicExistsAsync(topicName))
{
     await namespaceManager.CreateTopicAsync(topicName);
}
Migrate your entities
Let's get started. For most use cases we can use the legendary tool, Service Bus Explorer, located here: https://github.com/paolosalvatori/ServiceBusExplorer
To begin, you will need to clone/download and build the project using Visual Studio. Once you have SBExplorer up and running, you should be able to right-click on your target namespace and export your entities into an XML file.
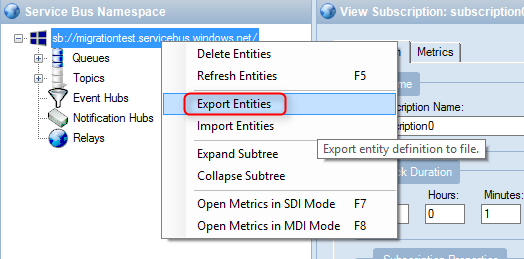
The XML file should contain all of the properties that make up your entity description. Below is what mine looks like. Notice the AuthorizationRules in there... pretty cool. Way to go Paolo!

Now, just as easily as you were able to export those definitions, you can re-import them to a new namespace. Instead of clicking "Export Entities" just click "Import Entities" and provide the XML file output.
But what if I dynamically create my entities from code?
The good news is that this will make migrating the entities easier. Hopefully, your code will do it for you. The bad news: it will definitely take some coordination in order to migrate. You may need to stop all ingress to your messaging solution, make sure all of your messages have all been processed, and then point your solution to the new namespace.
Migrate your senders/receivers
Now here comes the more tricky part. If you have a high volume, live solution, it can be difficult to coordinate a cut-over. The best way to approach this is by using multiple receivers. Ideally speaking, you would point at least one of your receivers to the new namespace, and then point all of your senders to the new location. This will allow you to start processing messages as soon as they come in. All while this is going on, you want to leave at least one of your receivers pointed to the old namespace, so that they can continue processing messages. Another cool feature of Service Bus will allow you to prevent new messages from being sent to the queue, ensuring that you are not missing any new messages. Just go to the old Azure Portal (this will be a part of the new Azure Portal shortly), and navigate to Service Bus -> Your Namespace -> Queues (Topics) - > Configure.

Once you are sure that all messages have been processed, and no future messages will arrive, you can safely delete your old namespace (it might be best to wait a couple of days though).
How to actually do this is completely based upon your solution. For example, if you are able to update your configuration for each instance, this would be pretty straight forward. However, if you have an Azure Website or Cloud Service, you may have to create a second deployment. You could just run that deployment temporarily until you are able to update the original one.
Let us know what you think (either via comments or twitter)! We are really excited about Premium messaging (if you couldn't tell already)!
Hope you have a good week,
John (@jtaubensee)