Scenario based Kerberos setup with Reporting Service in Sharepoint integration mode.
It’s always been a challenge to setup Kerberos in environments where there would be multiple tiers involved for an application. As the number of tiers increase, there is an increase in the number of hops that would take place. It becomes even more difficult when Enterprise level applications like Reporting Services and SharePoint are integrated together. In this blog we are going to look at the various settings that need to be performed to get Kerberos working in a Reporting Services-SharePoint integrated environment.
Environment:
Reporting Services:
Server Name: ReportingServices
Instance Name: Reporting Services is installed as a Default Instance
URL: https://ReportingServices/reportserver
Web identity: xyz\reportingservicessvc
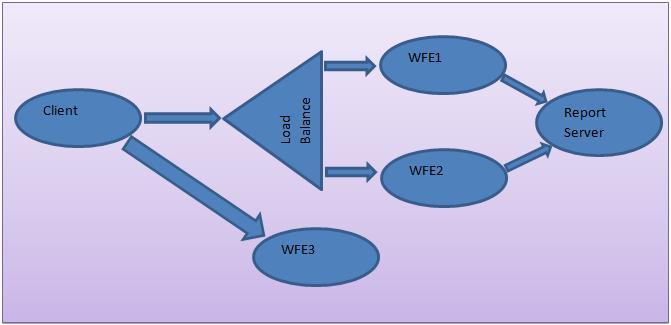
SharePoint:
It had 3 SharePoint Web front ends (WFE):
1. First WFE:
a. Server Name: WFE1
b. Load Balanced
2. Second WFE:
a. Server Name: WFE2
b. Load Balanced
3. Third WFE:
a. Server Name: WFE3
b. Central Administrator Installed
Application Pool Identity: xyz\sharepointsvc
SharePoint site that is to be configured to use Kerberos: https://kerberos.xyz.com
This is a host header for the website. This has been mapped to the IP address of the website in the DNS.
SQL Server:
Server Name: sqlserver
Service Account: xyz\sqlsvc
We need to perform the following steps for configuring Kerberos for the above environment:
1. Set SPNs for the SharePoint Site, central Administrator site, Reporting Services and SQL Server.
The first step to setup Kerberos is to setup the SPNs for the various components that are involved. If we consider the above environment, we will have to set the following SPNs:
SharePoint:
Setspn –a http/kerberos xyz\sharepointsvc
Setspn –a http/Kerberos.xyz.com xyz\sharepointsvc
NOTE: Since there is a host header being used for the website, the SPNs needs to be created for the host header.
Central Administrator:
Setspn –a http/WFE3 xyz\sharepointsvc
Setspn –a http/WFE3.broadcom.com xyz\sharepointsvc
NOTE: Since there is no host header being used for the central administrator site, the SPNs needs to be created for the computer on which the central administrator is being hosted.
Reporting Services:
Setspn –a http/ ReportingServices xyz\reportingservicessvc
Setspn –a http/ ReportingServices.xyz.com xyz\reportingservicessvc
NOTE: Since there is no host header being used for the report server, the SPNs needs to be created for the computer on which the reporting services is being hosted.
SQL Server:
Setspn –a MSSQLSvc/ sqlserver:1433 xyz\sqlsvc
Setspn –a MSSQLSvc/ sqlserver.xyz.com:1433 xyz\sqlsvc
NOTE: The port on which the SQL Server is listening needs to be provided along with the server name. For the default instance the port would be 1433.
2. Setting the Authentication Providers for the Reporting Services website, Central Administrator website and SharePoint website.
We need to change the authentication provider of the websites to “Negotiate, NTLM”. So that the websites would first negotiate with the client on the authentication protocol that needs to be used .i.e. Kerberos or NTLM. To do this we need to open a command Prompt and then we need to go to the path where we have the adminscripts for the websites. By default it would be located at “C:\inetpub\adminscripts”.
We first need to check the authentication provider of the website.
cscript adsutil.vbs get w3svc/<WEB SITE IDENTIFIER>/root/NTAuthenticationProviders
If the above mentioned command does not return any authentication provider, we NEED NOT change the authentication provider. If “NTLM” is returned by the above mentioned command, then we need to execute the below mentioned commands. If “Negotiate, NTLM” is returned, we need not change the authentication provider.
NOTE: We need to check the authentication providers of all the websites before we change them.
The commands that are need to be executed for changing the authentication providers are mentioned below.
Reporting Services:
cscript adsutil.vbs set w3svc/<WEB SITE IDENTIFIER>/root/NTAuthenticationProviders “Negotiate,NTLM”
SharePoint Site: (https://mpgbu-dev.broadcom.com)
cscript adsutil.vbs set w3svc/<WEB SITE IDENTIFIER>/root/NTAuthenticationProviders “Negotiate,NTLM”
Central Administrator:
cscript adsutil.vbs set w3svc/<WEB SITE IDENTIFIER>/root/NTAuthenticationProviders “Negotiate,NTLM”
The Authentication Provider of the SharePoint Site needs to be changed from the Central Administrator. You need to click on Application management -> Security -> Authentication Providers. The Authentication provider needs to be changed to Negotiate, NTLM
3. The SharePoint, Central Administrator and the Reporting Services websites needs to be configured to use “Integrated Authentication”. This can be done from the IIS. You need to go to the IIS manager and then browse to the website. Right click on the website and select properties. In the properties you need to go to the “Directory Security” Tab and then you need to select “Integrated Authentication”.
4. For the reporting services, we need to change the authentication mode. It can be changed by going to the central administrator. In central administrator you can change the “Authentication Mode” under “Application Management” -> “Reporting Services” -> “Manage Integration Settings”. The authentication mode needs to be set to “Windows Authentication” and NOT “Trusted Account”. If set to trusted account, it would cause the Kerberos to fail.
5. Authentication provider of the SharePoint site (https://kerberos.xyz.com) can be changed from the central administrator. You can change the authentication provider from “Authentication Providers” option under “Application Management” -> “Application Security”. Under the “Authentication Providers” Tab, you need to select the “WEB APPLICATION” for which the provider is being changed. In our case, we need to select https://kerberos.xyz.com. Once the web application is selected, we need to click on the “ZONE” for which we are modifying the provider. In our case, it’s the default zone. Once the “Edit Authentication” page opens, we need to select the “Authentication Type” as “Windows”, We need to uncheck “Enable Anonymous access” and we need to check “Integrated Windows Authentication” “Negotiate (Kerberos)”. More details about changing the authentication provider can be found at the following location:
https://support.microsoft.com/kb/832769
6. All the servers on which we have SharePoint, Reporting Services and SQL Server installed needs to be trusted for delegation
7. The service accounts need to be trusted for delegation. So in the above environment we need to make sure that the accounts “xyz\sharepointsvc”, “xyz\reportingservicessvc” and “xyz\sqlsvc” should be trusted for delegation.
8. The service accounts should also be made a part of the following groups:
a. Act as part of operating system.
b. Impersonate a client after authentication.
9. The option “Account is sensitive and not trusted for delegation” should be unchecked for the application pool account and the service account.
10. Last but not the least, the host header for the website should be an “A- Record” in the DNS and not a CANONICAL NAME. If the host header is a canonical name, it would cause the Kerberos to fail. This is due to the reason that the client would create a SPN based on the resolution of the name according to the A-Record. If the A-Record is not set, the resolution would not happen in a proper way and the SPNs with which the client would go to the domain controller might be wrong and since the SPNs would be wrong and would not be set in the active directory, Kerberos would fail.
PS: All the names and environment discussed above are imaginary and does not exist.
HTH!
Gurpreet Singh, SSRS Engineer.