Risk Tracker v1.0 Release
Hi, Vineet Batta here. I’m a senior software developer on the Information Security Tools (IST) team.
I’m excited to share the release of Risk Tracker version 1.0. In this blog post I will give you a quick overview of the features supported by this release (CTP).
Risk Tracker v1.0 is the very first version of a tool that will help organizations manage, track and report on risks and associated activities. Risk Tracker was created using an early version of CISF (Connected Information Security Framework), a software development framework comprises of API’s and reusable components that is designed to ‘create bespoke or custom information security and risk management solutions.’ The core functionality of this release is around risk and task management modules. This system also supports schedule based notifications which tracks tasks automatically. Risk Tracker will be released open source on CodePlex using an MS-PL license, download available here. Get an overview of CISF and Risk Tracker here.
Business values this system offers:
- Consolidate risks into one central repository for tracking and reporting.
- Drive deadlines without human intervention through notifications.
- Drive accountability to risk managers to help ensure risks are addressed in a timely fashion.
- Tracks history of changes made by the user or the system.
- Shows visibility to data that can help organizations prioritize risks based on an organization’s own “risk ratings,” which allows for for prioritization of resources focusing on the high impact risks.
Below I’ll walkthrough the main features of Risk Tracker.
Access to Main Features:
To access the main features of the Risk Tracker application can be accessed from the right menu of the landing page.

Risk Management:
Submit Risk
To submit a new risk a user must belong to the Risk User role or higher. Click the ‘Submit Risk’ from the menu (see above) and the application will present an empty Risk entry form to collect information about the risk. The minimum required information to submit a risk include:
- Title
- Geography Locations
- Description
- Risk Manager
All other fields are either optional or are preset to default values. Once all information has been entered, use the Submit button in the upper right corner of the form to save the information to the system. Once a risk has been submitted, it cannot be deleted for audit purposes. A Risk ID is then automatically generated for the new risk.
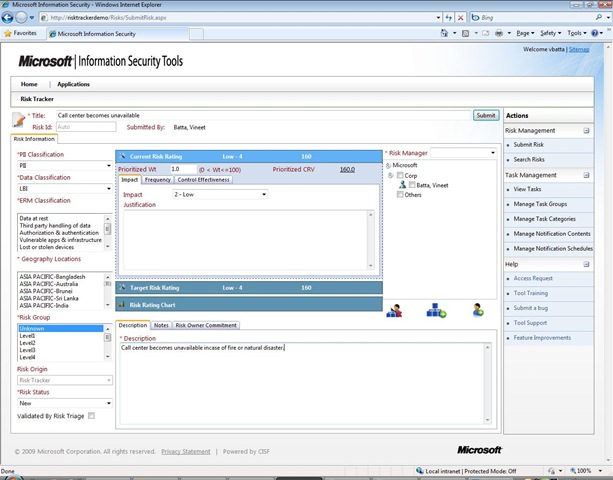
Enter Risk Rating:
In the center of the Risk Details page are 3 panes related to a risk’s rating. By clicking on a colored blade, the user can view the contents stored in each section. Users may document the current risk rating and set a desired target risk rating according to business processes. The system supports 3 different value settings including:
- Impact
- Frequency
- Control Effectiveness
The combination of these actually determine the risk rating and calculated risk value as displayed on the colored panes for example, Low-4 (risk rating) and 160 (calculated risk value).
Enter Organization and Contact Data:
On the right side of the Risk Details page is the risk contact information. The Risk Manager field displays only people who belong to the Risk Manager role defined by the system administrator. Below is a list of business groups and contacts associated with the risk. If the system administrator sets up a feed that maps people to business groups, the system can place users in the contact list under the correct group. If a user does not belong to any of the groups added to the risk, he or she will be listed under ‘Others’.
To add business groups, click 
To add contacts, click 
To remove contacts or business groups, first select the desired items in the list, then click 
Example of Risk Details:

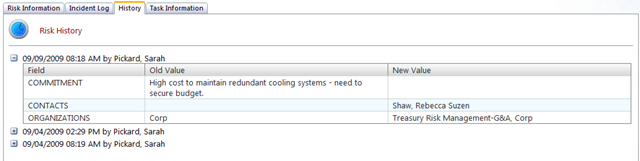
Risk History
After the risk has been submitted, the History tab will be visible. Risk Tracker records all changes made to each risk. It is possible to see who, when, what was changed and the original values that were overwritten by a user.
Example of the History Tab:

Search Function
The search page lets users run simple searches against risks in the system. Only one search term can be used at a time. The search user interface lets users pick which field to search by and lists relevant operators for each field. Users must enter a search value – it is not possible to search for all risks by leaving the value blank.
After a search request is submitted, results will be displayed. Click on a column heading to change the sort order. Clicking on the RiskID will take the user to the Risk Details page.
Search fields (and operators) supported are:
- Risk Title (operator : Contains)
- Risk ID (operator : = )
- Risk CCRV (operator : =,<>,=>,<=,<,> )
- Risk Created Date (operator : = Between )
- Risk Status (operator : =, <> )
- Risk Group (operator : =, <> )
Example of the Search:

Example of the Risk Results:
Paging and sorting features are supported by default.

Incident Log
The Incident Log can be used to record information about each ‘realization’ of a risk. The Incident Log tab will be visible after the risk has been submitted. Additionally, a table will display a summary of the existing incidents. The table can be sorted by clicking on the desired column heading. Clicking on Details will reveal the full description of the incident. To record a new incident for the risk, click the Submit New Incident button. Users must then summarize the incident with a short title and more details can be added to the description.

Stay tuned for more posts on Risk Tracker. Next I’ll discuss more topics around the Task Management module and how to integrate Risk Tracker with internal HR systems for people/organization data.
-Vineet