Maze Simulator for Robotics Studio
In my last post, I described the maze generator I developed in C#. This was trivial to build as to be expected. The larger challenge for me was to learn enough about the simulator in MSRS 1.5 to build a 3D maze and let me virtual robot navigate through it.
After a few more hours of development, I was able to integrate my maze generation library into the Robotics Studio 1.5 Simulator environment. I had to learn some basics around the coordinate system, the physics engine, textures, etc.
Creating the 3D Maze
The core code for generating the maze in the simulator is shown below. It uses the Maze Library I built (discussed earlier). The Start() method is overridden, as is normal, and adds the sky and the ground. It then allocates a new Maze object and creates the maze layout.
protected override void Start()
{
base.Start();
AddSky(); // skydome and sun
AddGround(); // basic ground
float scale = 1.0f;
float floorHeight = 0.03f;
float wallWidth = 0.15f * scale;
float wallHeight = scale;
Maze maze = new Maze(); // Construct a maze object
maze.Create(15, 15); // Initialize a new maze
AddMaze(maze, scale, floorHeight, wallHeight, wallWidth);
float robotX = maze.Finish.X * scale + (scale / 2);
float robotY = 0.5f;
float robotZ = maze.Finish.Y * scale + (scale / 2);
AddModularRobot(new Vector3(robotX, robotY, robotZ)); // geometric Pioneer robot
SetupCamera(robotX, robotY, robotZ, scale * 1.5f, robotZ + scale*3.0f);
}
The AddMaze() method simply adds a base platform for the maze itself and then iterates over every cell and draws each enabled wall.
         private void AddMaze(Maze maze, float scale, float floorHeight, float wallHeight, float wallWidth)
        {
            if (maze == null) return;

            int width = maze.Width;
            int height = maze.Height;

            // Add a floor
            Vector3 dimensions = new Vector3(width * scale, floorHeight, height * scale);
            BoxShapeProperties tBoxShape = new BoxShapeProperties(1000000f, new Pose(), dimensions);
            tBoxShape.Material = new MaterialProperties("tbox", 0f, 0.3f, 0.3f);
            SingleShapeEntity tBoxEntity = new SingleShapeEntity(new BoxShape(tBoxShape), new Vector3(dimensions.X / 2, dimensions.Y / 2, dimensions.Z / 2));
            tBoxEntity.State.Assets.DefaultTexture = "wood_cherry.jpg";
            tBoxEntity.State.Name = "MazeFloor";
            SimulationEngine.GlobalInstancePort.Insert(tBoxEntity);

            // Iterate over the maze and add the object
            for (int x = 0; x < width; x++)
            {
                for (int y = 0; y < height; y++)
                {
                    if (maze.GetWall(x, y, WallFlags.Top)) DrawWall(maze, x, y, WallFlags.Top, floorHeight, wallHeight, wallWidth, scale);
                    if (maze.GetWall(x, y, WallFlags.Left)) DrawWall(maze, x, y, WallFlags.Left, floorHeight, wallHeight, wallWidth, scale);
                    if (maze.GetWall(x, y, WallFlags.Bottom)) DrawWall(maze, x, y, WallFlags.Bottom, floorHeight, wallHeight, wallWidth, scale);
                    if (maze.GetWall(x, y, WallFlags.Right)) DrawWall(maze, x, y, WallFlags.Right, floorHeight, wallHeight, wallWidth, scale);
                }
            }

            // Now we are done with this
            System.Diagnostics.Debug.WriteLine("Done with adding the maze.");
        }
The DrawWall() method calculates the dimensions and position of the wall, constructs a visual model and a physics model, and then adds it to the world. Note that the positions of objects are the position of their center point, not a bounding corner.
         private void DrawWall(Maze maze, int x, int y, WallFlags wall, float elevation, float wallHeight, float wallWidth, float scale)
        {
            float x1 = x;
            float x2 = x;
            float y1 = y;
            float y2 = y;

            bool top = maze.GetWall(x, y, WallFlags.Top);
            bool left = maze.GetWall(x, y, WallFlags.Left);
            bool bottom = maze.GetWall(x, y, WallFlags.Bottom);
            bool right = maze.GetWall(x, y, WallFlags.Right);

            if (wall == WallFlags.Top)
            {
                x1 = x * scale; x2 = (x + 1) * scale; y1 = (y) * scale; y2 = y * scale + wallWidth;
                if (x < (maze.Width - 1))
                {
                    bool topLeftCornerSet = !maze.GetWall(x + 1, y, WallFlags.Top) && !maze.GetWall(x + 1, y, WallFlags.Left);
                    if (topLeftCornerSet) x2 += wallWidth;
                }
            }
            if (wall == WallFlags.Left)
            {
                y1 = y * scale; y2 = (y + 1) * scale; x1 = (x) * scale; x2 = (x) * scale + wallWidth; if (top) y1 += wallWidth;
            }

            // Now create the wall where it goes
            Vector3 dimensions = new Vector3(x2 - x1, wallHeight, y2 - y1);
            Vector3 position = new Vector3(x1 + dimensions.X/2, dimensions.Y/2 + elevation, y1+dimensions.Z/2);
            BoxShapeProperties tBoxShape = new BoxShapeProperties(1000f, new Pose(), dimensions);
            tBoxShape.Material = new MaterialProperties("tbox", 0.4f, 0.4f, 0.6f);
            tBoxShape.DiffuseColor = new Vector4(0.5f, 0.5f, 0.5f, 1.0f);
            SingleShapeEntity tBoxEntity = new SingleShapeEntity(new BoxShape(tBoxShape), position); ;
            tBoxEntity.State.Assets.DefaultTexture = "env2.bmp";
            tBoxEntity.State.Name = string.Format("Wall_{0}_{1}_{2}", x, y, wall);

            // Add the wall to the environment
            SimulationEngine.GlobalInstancePort.Insert(tBoxEntity);
        }
Running the Simulation
The initial loading of the simulation with the auto-generated maze puts the robot at the entrance. The camera is set to look at the robot from behind.
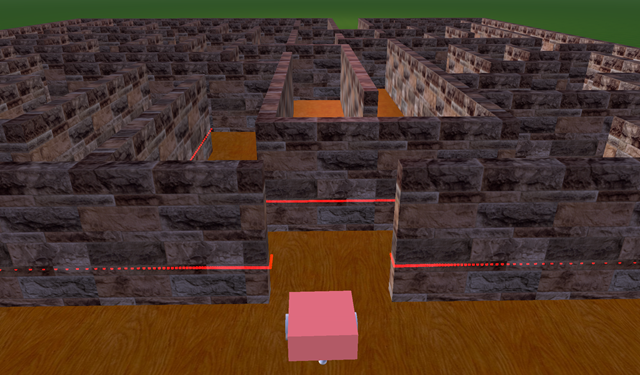
Zooming out you can see the dots from the laser range finder and what they hit.
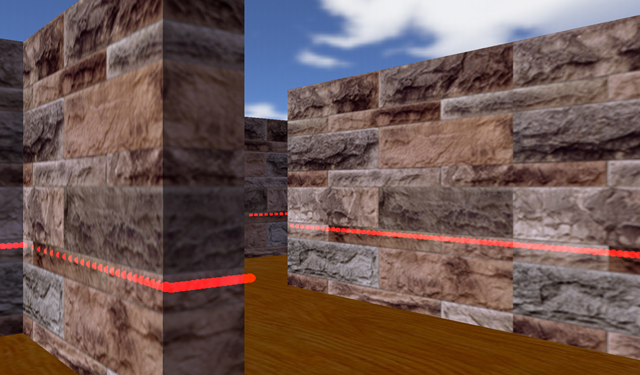
This next view is from a camera mounted on the robot. Notice the laser's reach and the potential for discovering the maze paths that way.
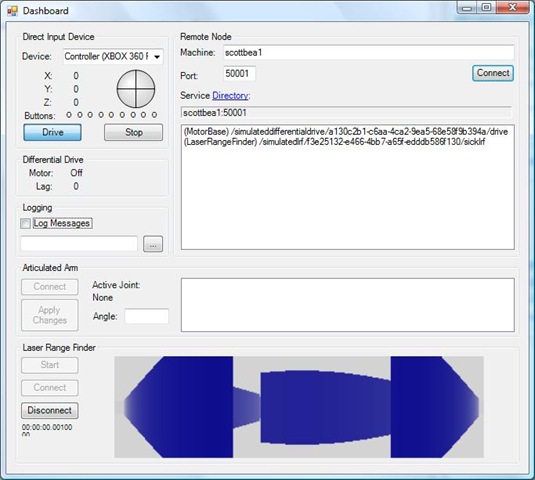
The robotics dashboard used in this simulation allows you to drive the robot with the mouse or an XBOX controller. You can also visualize the results from the laser range finder scans as shown at the bottom (in blue).
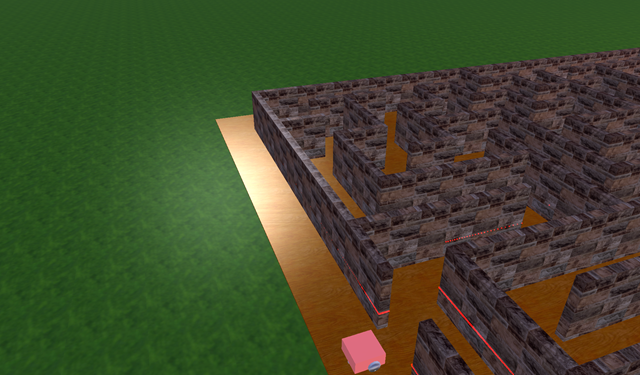
This screen shows a top-down view of the maze with the robot at the entrance. I can generate arbitrarily complex mazes, such as a 100x100 maze, and it would be much larger.
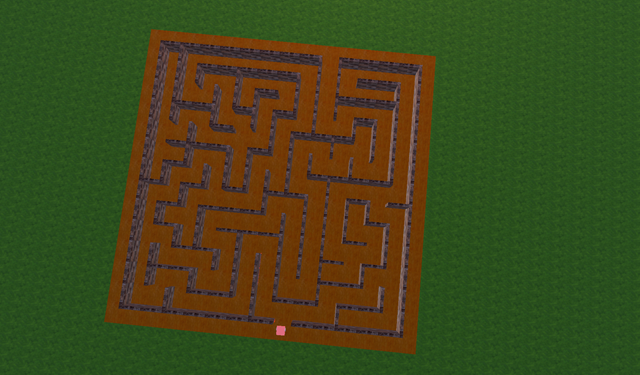
There are performance issues with the rendering and the physics calculations due to the way in which I construct the maze. Each maze wall is a separate model with its own physics and rendering. Rendering larger mazes degrades at an N^2 rate, so it's not too scalable. I could have created one complicated shape from the surfaces of all of the connected walls, making the physics calculations constant. I could also do some optimization of combining walls for cells that are side-by-side. But I opted to make it more flexible for now.
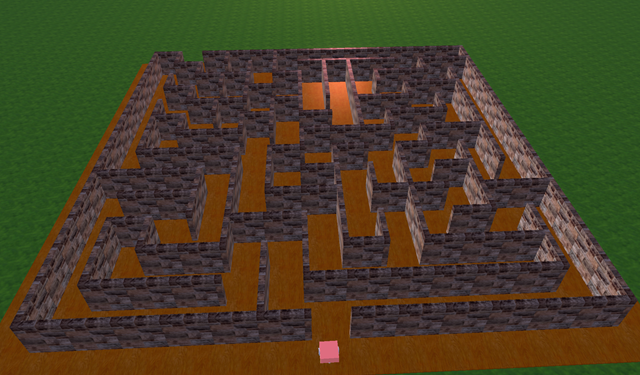
The diagrams below show the maze at a distance with normal gravity.
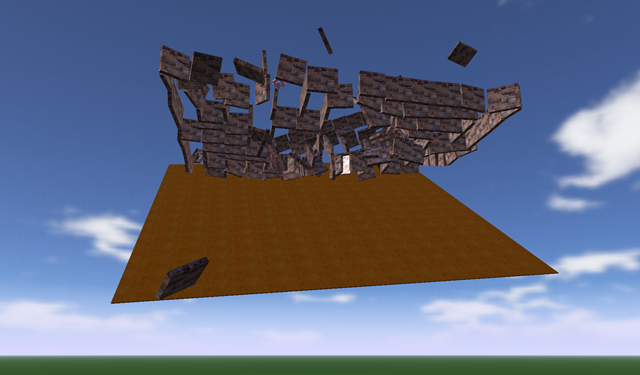
The next picture shows the gravity inverted and the impact to all of the individual maze walls!
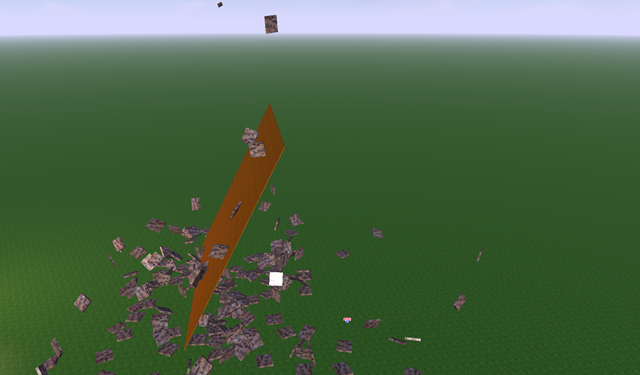
I turned gravity back on and it came crashing to the ground-- the maze walls scattered like dominos on a falling table. I thoroughly enjoyed this destruction for some reason.
Next Steps
This code is not complete. I need to add a service to the robot which uses a wall-following approach to solve the maze. This algorithm is simple but certainly non-optimal. I'll explore more optimal solutions later.
So what about the source? I'm checking with the Microsoft Robotics Team before I release it. I expect to have this ready in less than a week for posting. I'd like to add a Readme and some other stuff.