Monitoring EMC Storage with SCOM using EMC ESI SCOM Management Pack
Monitoring EMC STORAGE with SCOM 2007 R2 & UP using ESI SCOM Management Pack
One of the options to Monitor EMC Storage e.g. VNX, CLARIION is using EMC Storage Integrator v3.0.1151.6309 for Windows Suite that includes ESI Service and ESI SCOM Management Pack.
In this post, I will go through high level steps on monitoring EMC VNX Storage with SCOM 2007 R2/2012
EMC Software Requirements
- EMC Storage integrator setup file
(ESI.3.01151.Setup.X64.exe) aka ESI Service Note: ESI Service is a communication link between ESI and ESI SCOM Management Packs. It supports all EMC Storage systems and its sub components. - SCOM Management pack
(ESI.SCOM.ManagementPscks.3.0.1151.6309.setup.exe)
Hardware & SCOM version Requirements
- At least one dedicated Host/VM with Windows Server 2008R2 and up, on which ESI service will be installed, (Monitoring Station)
- SCOM 2007 SP1/ SCOM 2007 R2, SCOM 2012 SP1 (SCOM Server)
Configuration Steps
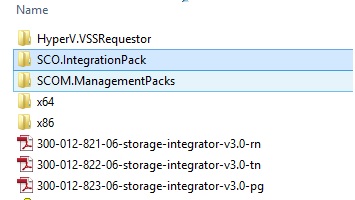
Once you extract the zip file. Folder “x64” contains EMC Storage integration Service aka ESI Service and Folder “SCOM.ManagementPacks” contains EMC management pack for SCOM (see below)
INSTALLATION of ESI SERVICE on EMC Monitoring station
Configure a dedicated server /VM as a Monitoring station with SCOM agent installed on it (The Operating system has to be Windows 2008 or Windows 2008 R2 or Windows 2012 only
- Install EMC Storage Integrator
- Verify “ESI Service” is running and as “Network Service”
- On the monitoring station ,click on “Start” and launch “EMC Storage Integrator”
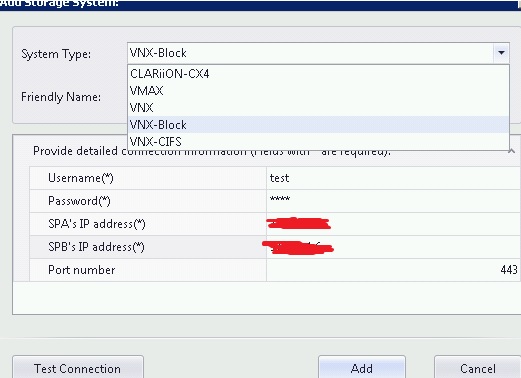
- Go to EMC Storage Integrator->Storage Systems->Add Storage System
- In this scenario, I chose the option VNX-Block as system type from the drop down menu
- For username and password, pass the USERID and PASWORD that was created in VNX
- Specify SPA and SPB IP address ( IP of storage processor)
- Repeat step 5 thru 7 for all type of different storage you have in the environment
- You can leave port number as 443 as default, or change if you want and configure the access accordingly.
- Click on test connection, verify the results and the new Arrays will be added under storage systems.
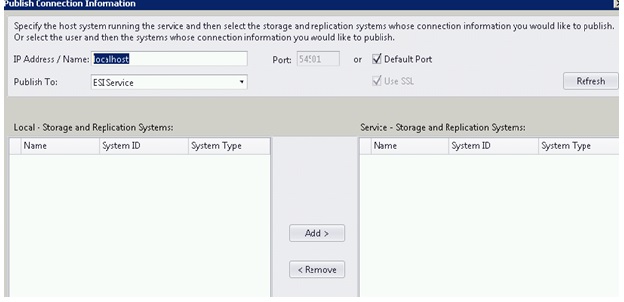
10. Next we need to publish the connection
- Go to “EMC Storage Integration”, -> “Publish Connection”
b. Once you click on Publish Connection following screen will appear
i. Under IP Address /Name you can type “local host or the IP address of this server( EMC Monitoring station)
ii. Publish to should be “ESI Service”
iii. Click on “Refresh”
iv. Under “Local - Storage and Replication Systems”, you will see EMC devices that you added in above step
v. Select the devices and click on “Add”
vi. At this point ESI Service is configured on the EMC Monitoring station
11. To confirm HTTP/HTTPS connectivity(communication) between EMC Monitoring station and EMC Storage(VNX in this example), perform any of the following steps
https://IP_OF_EMC_Monitoring_Station:54500/esi/console or https://IP_OF_EMC_Monitoring_Station:54501/esi/console
If you need to customize ports, implement new certificates, refer to document “EMC Storage Integrator for Windows Suite”
12. On the EMC Monitoring station change the following registry to decimal 5120

Next Step is to Configure EMC Management PACK on SCOM SERVER
- Execute the MSI and import the EMC Management Packs on the SCOM Server
- You will see the new View as "EMC Storage Integrator" in SCOM Console
3. Configure Overrides: In SCOM Console go to: Authoring->Object Discovery, Search for “EMC SI Service Discovery”
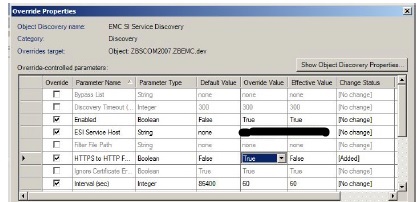
- In the above screen capture on the overrides (in this example)
- Discovery is enabled
- Override value for parameter “ESI Service host” is the IP address of the server on
which ESI Service was installed (EMC Monitoring Station) - If you want ESI Service to connect with an HTTP connection instead of an HTTPS,
you can set the override for the same(a security risk though)
4. Next setup the ESI Monitoring Station as host override
Go to Authoring->object Discoveries- and then Type “EMC SI Service Discovery”
Click on Override and select “For a specific object of class: Windows Computer” and Select the ESI Monitoring Station
5. For additional overrides, custom configurations, refer to the EMC Storage integrator document
DISCLAIMER: This posting is provided "AS IS" with no warranties and confers no rights