Building Your First Node.js App and Publishing to Azure
Hello everybody! In this blog post, I am going to be talking about publishing open source code on Azure, compiled in Node.js, written using a free Microsoft-made text editor program called Visual Studio Code, and stored publicly in GitHub, an open source repository.
Learn how to build your very first Node.js app and publish it online directly from Azure through GitHub by following me on my personal journey from when I first heard about Node.js, to learning what it was, downloading the appropriate tools, building something with it, and finally publishing it to Azure. You’ll leave with some basic knowledge about Node.js, how to get started building your first Node app, and how to share it with the rest of the world.
What is Node.js?
- Web dev using JavaScript
- A runtime environment and library
- Creates real-time web servers easily
Favorite resource: Explain Like I’m Five: What the heck is node.js?
To put it simply, Node.js is a tool for making web applications using JavaScript. JavaScript is extremely popular, and anyone who knows it client-side in the browser can learn to use it in Node quite easily. Node includes a built-in HTTP toolkit for easily creating web servers; you can create a single-page website in less than a dozen lines of code. It also scales exceptionally well. A single Node process can handle tens of thousands of simultaneous requests before experiencing any performance lag.
Node.js was born when Google took its JavaScript engine, V8, written for use in Chrome, and removed all the browser stuff. V8 is a just-in-time compiler (that is, very fast) which converts the JavaScript code into low-level CPU instructions before running it (just like one would for C/C++ code).
Node is a runtime environment and library for running JavaScript applications outside the browser. The JavaScript code executes directly from a .js file. Node essentially lets you use JavaScript just like you would use Ruby, Python or Perl. It provides a set of built-in libraries for performing common IO tasks.
Node’s Package Manager system, NPM, lets developers publish to and install from a single source of open source code. NPM is the final piece of the Node.js puzzle, because it makes it extremely easy to find and use publicly available libraries to accomplish common tasks. Let’s talk about NPM in more detail.
What is NPM?
- Node Package Manager
- Bundled and installed automatically
- Publish to and install from:
- GitHub, Bitbucket, CodePlex, SourceForge, Visual Studio Online, etc.
NPM is the official package manager for Node. It’s the NuGet to ASP.NET; it’s the Gem to Ruby. It is a central repository for all the extensions & 3rd party libraries. It comes bundled & installed automatically with the environment. No reinventing the wheel, just search for a library that does what you want.
Real-time applications are becoming a big deal now; WebSockets have reached a degree of support to where sites can start to take advantage of them, and Node does WebSockets & long poll http connections really well.
Tools
- Node.js, NPM
- Text editor (Visual Studio Code is the new hotness!)
- Online repository (such as GitHub)
- Visual Studio
- Node.js Tools for Visual Studio (NTVS)
- Bootstrap
- NPM Dependencies such as Express, Socket.io
To get started with building your first app, you’ll need:
- A Microsoft Azure account
- Sign up with an email that ends in Hotmail, Live, or Outlook for a free trial, or get a free $100 Azure pass from the Microsoft booth.
- A text editor
- We use Visual Studio Code: it's a free, cross-platform editor ideal for modern web development and great for Node debugging. You can also use Sublime Text, Vim, Notepad++ or any editor of choice.
- Node.js runtime and tools installed.
- If you run into a Python error when you try to follow the steps in this blog, install Python 2.7 and run "npm config set python python 2.7".
- GitHub.com account created.
- Git version control and tools (Git Bash) installed.
- Windows, Mac, or Linux OS.
If you’re not comfortable with typing commands into a tiny black box all day, Node.js Tools for Visual Studio, or NTVS, is a free, open source plugin that turns Visual Studio into a Node.js IDE.
Let me tell you what dependencies I’ll be showing you today.
Dependencies
Favorite resource: A chatroom for all! Part 1 - Introduction to Node.js - Rami Sayar
Express
- A web framework that handles multiple different HTTP requests at one URL
- Implement Express to use templating engines to generate HTML.
Socket.IO
- Simple JavaScript library and Node.js module
- Allows real-time, bidirectional event-based communication apps
- Implement Socket.IO to connect, send, and receive messages.
Express is a web framework that lets you structure your web app to handle multiple different HTTP requests at a specific URL. You also implement Express to use multiple templating engines to generate HTML.
Socket.IO is a simple JavaScript library and node.js module that allows you to create real-time bidirectional event-based communication apps simply and quickly. It simplifies the process of using Web Sockets significantly. I used Socket.IO to make my chat room app. Implement Socket.IO to connect, send, and receive messages.
Continuous Integration
Deploying your web app from GitHub, Bitbucket, or an External Repository results in a continuous deployment process where Azure will pull in the most recent updates from your project. Continuous deployment is useful when you have multiple people working on a project and want to ensure that the latest version is always published regardless of who made the most recent update. Continuous deployment is also useful if you are using an online tool as the central repository for your application.
Code
Favorite resource: Get Started: Chat Application - Socket.io
When you open up the Node.js command prompt, it starts you in a default folder, so you’ll have to use the “cd ..” and “dir” commands to navigate your way through the directory of folders until you get where you want to be. Note: I have personally created a folder in my C:\ drive called "git" where I store all of my GitHub projects. If you go into Node.js Command Prompt's Properties, you can actually change your settings to start in a specified folder, such as one near your C:\ drive, like my "C:\git".
If you have a folder in your C: drive called "git," you can also type >cd c:\git to hop right in to it.
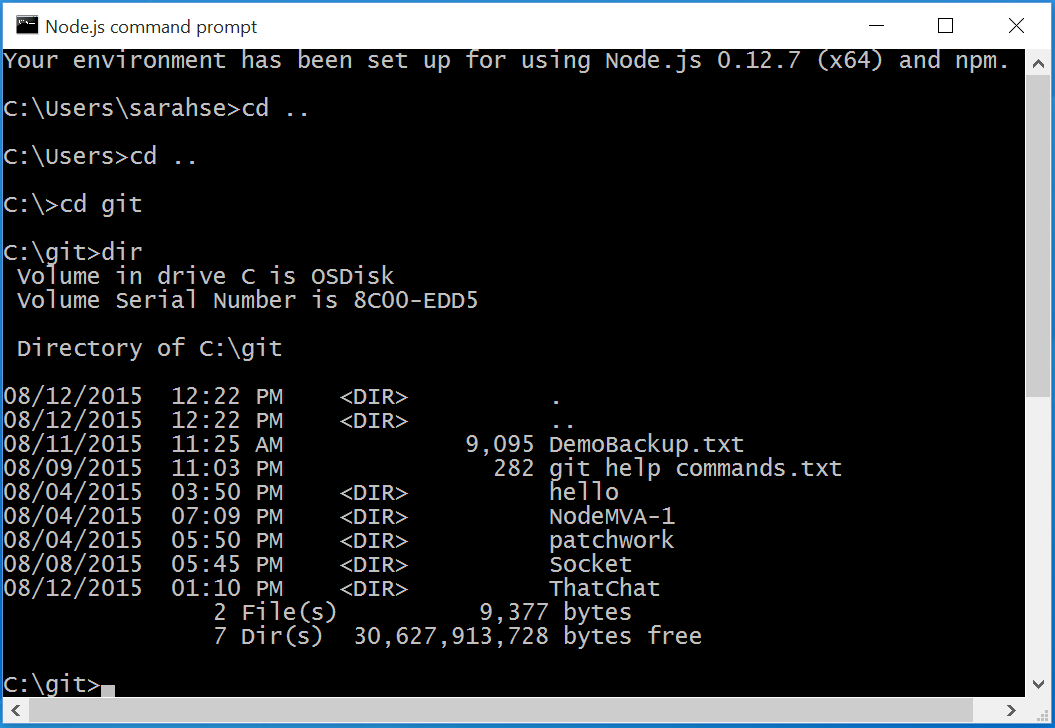
We're going to create a new folder, and later initialize it as a Git repository after we've made some code files. (I’ll call mine SarahSays, to match my blog's title).
>mkdir SarahSays
>cd SarahSays
Let's create a basic chat application using Node.js and Socket.io. The first goal is to setup a simple HTML webpage that serves out a form and a list of messages. We’re going to use the Node.JS web framework 'Express' to accomplish this.
First let’s create a package.json manifest file that describes our project. All npm packages contain a file called package.json. This file holds metadata for the project, such as the project’s name, version, a description, and its dependencies.
>code package.json
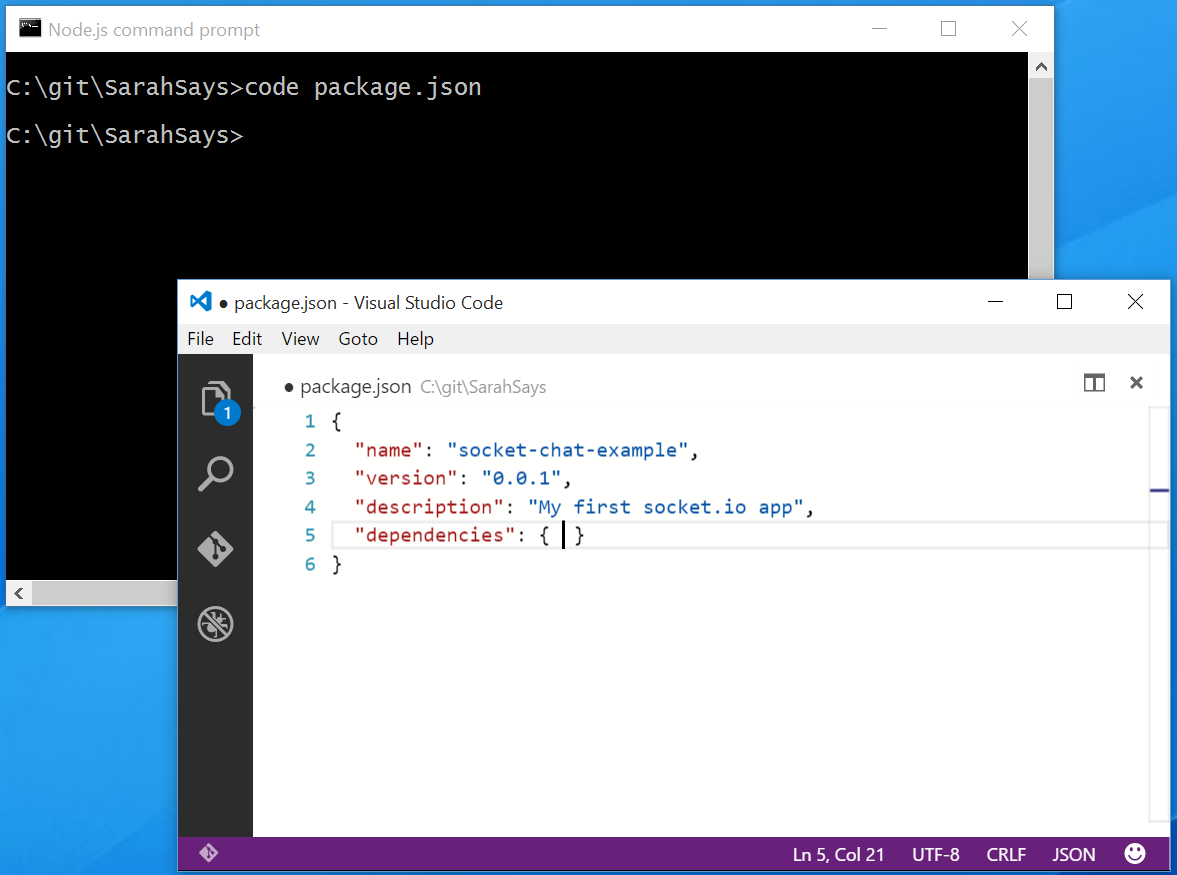
{
"name": "socket-chat-example",
"version": "1.0.0",
"description": "my first socket.io app",
"dependencies": { }
}
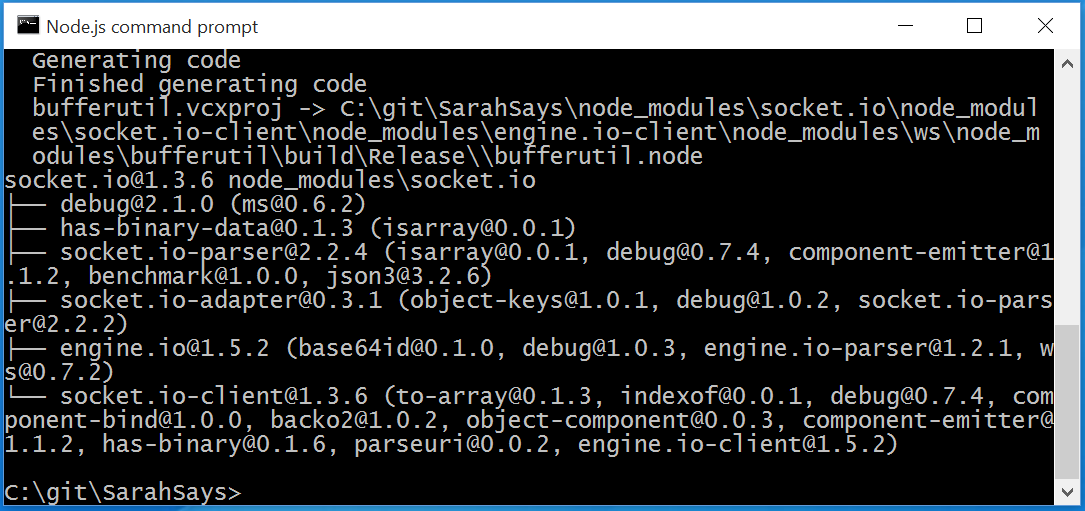
Then we use npm install to install each module your app needs to function. Express and Socket.io were a few of the things that the Node Chatroom application needed to function properly. Now, in order to easily populate the dependencies space with the things we need, we’ll use npm install --save:
>npm install --save express@4.10.2
>npm install --save socket.io
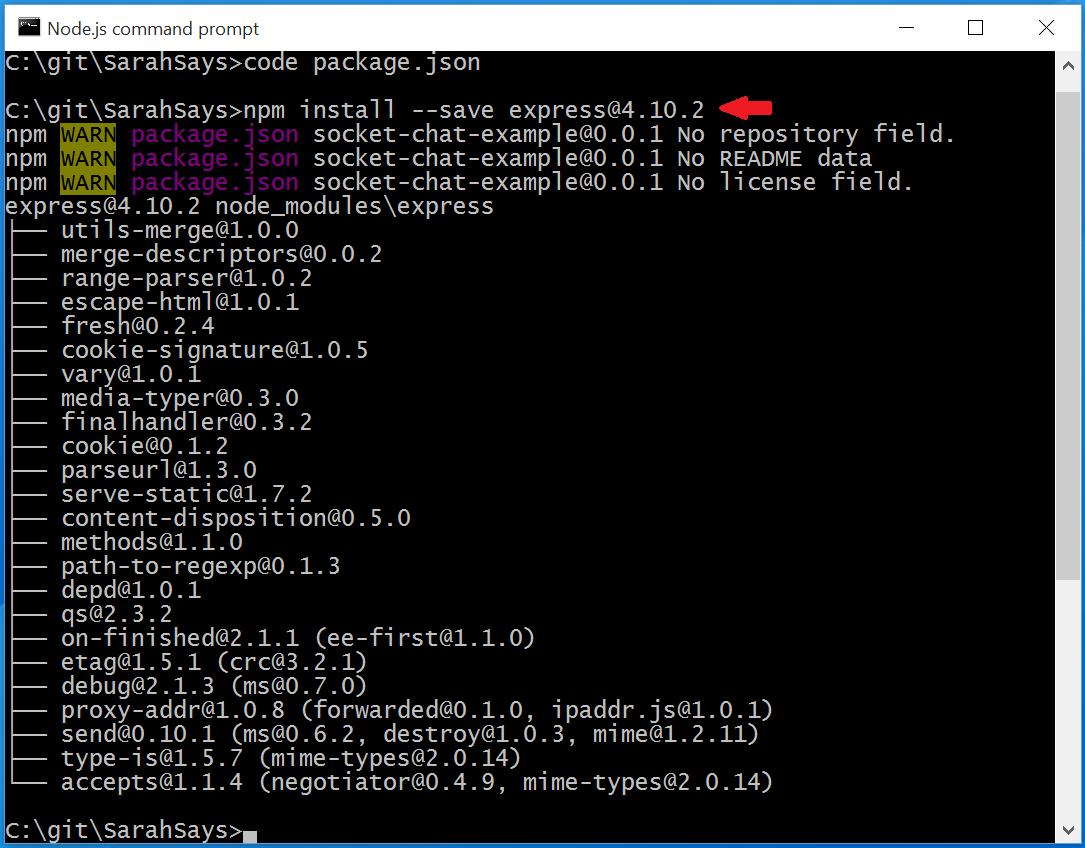
Now that those are installed, when we go back to our package.json file, we see that the following changes have automatically been made:
  "dependencies": {
 "express": "^4.10.2",
 "socket.io": "^1.3.6"
 }
There also exists a shortcut for creating files like this one. Running the command >npm init introduces a utility that will walk you through creating a package.json file. It only covers the most common items, and tries to guess sensible defaults. When using this tool, hit Enter to leave a field blank if you don't know what it means. Don't hit Ctrl+C unless you want to start over. Set your Entry point to app.js. Type 'yes' to confirm your settings at the end. When using this utility, it shortcuts the need to type in "dependencies": { } in your file. NPM will automatically populate it.
Let's now create an app.js file that will setup our application.
>code app.js
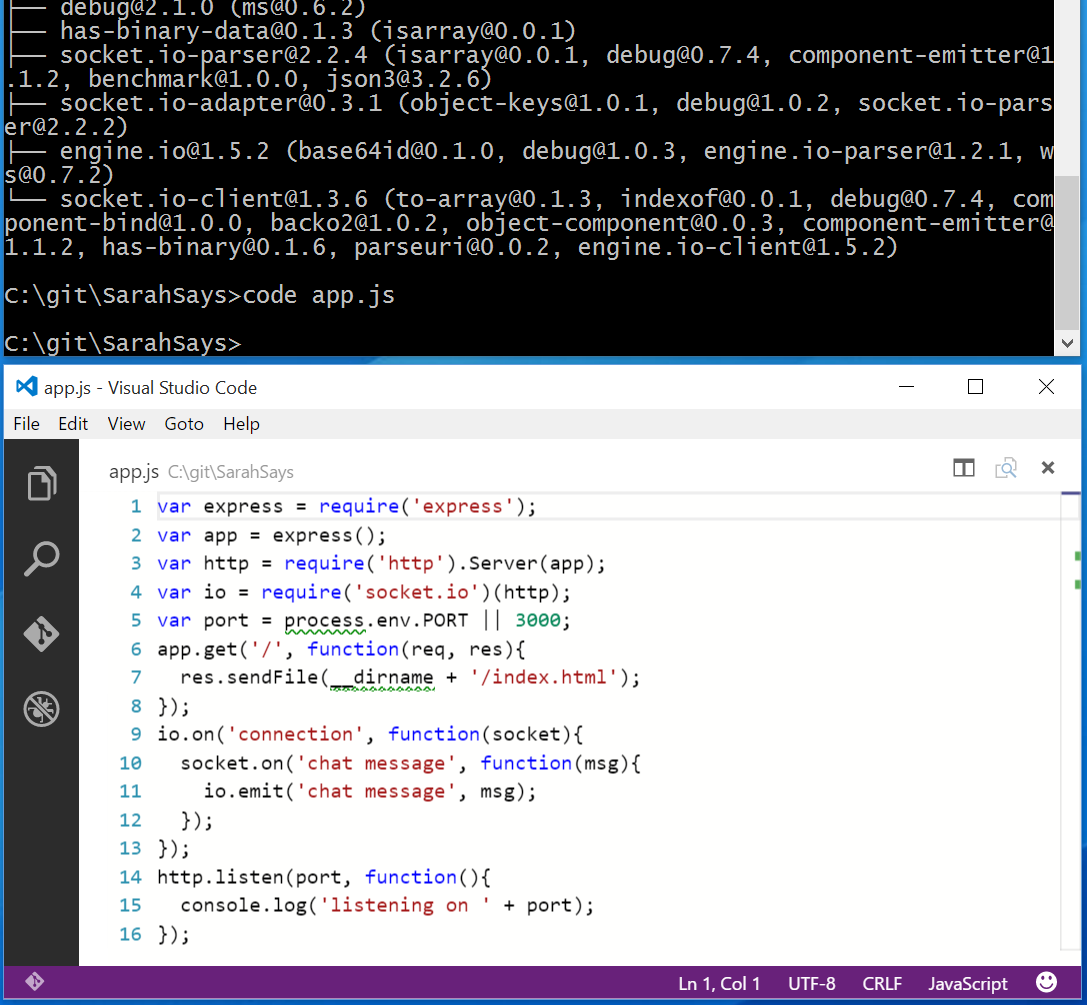
 var express = require('express');
var app = express();
var http = require('http').Server(app);
var io = require('socket.io')(http);
var port = process.env.PORT || 3000;
app.get('/', function(req, res){
 res.sendFile(__dirname + '/index.html');
});
io.on('connection', function(socket){
 socket.on('chat message', function(msg){
 io.emit('chat message', msg);
 });
});
http.listen(port, function(){
 console.log('listening on ' + port);
});
In the first line, we're requiring a module called 'Express.' Then we create a variable that's instantiated to 'Express.'
In line 2, Express initializes 'app' to be a function handler that you can supply to an HTTP server (as seen in line 3).
In line 4, I initialize a new instance of 'socket.io' by passing the 'http' (the HTTP server) object. Then I listen on the 'connection' event in line 9 for incoming sockets, and at the end I log it to the console.
On line 5, we make the http server listen on port 3000 -OR- use the process environment port for hosting it on Azure online.
We define a route handler '/' that gets called when we hit our website home. We’re also calling 'res.sendFile' to pass it an HTML file, which we will now create.
>code index.html
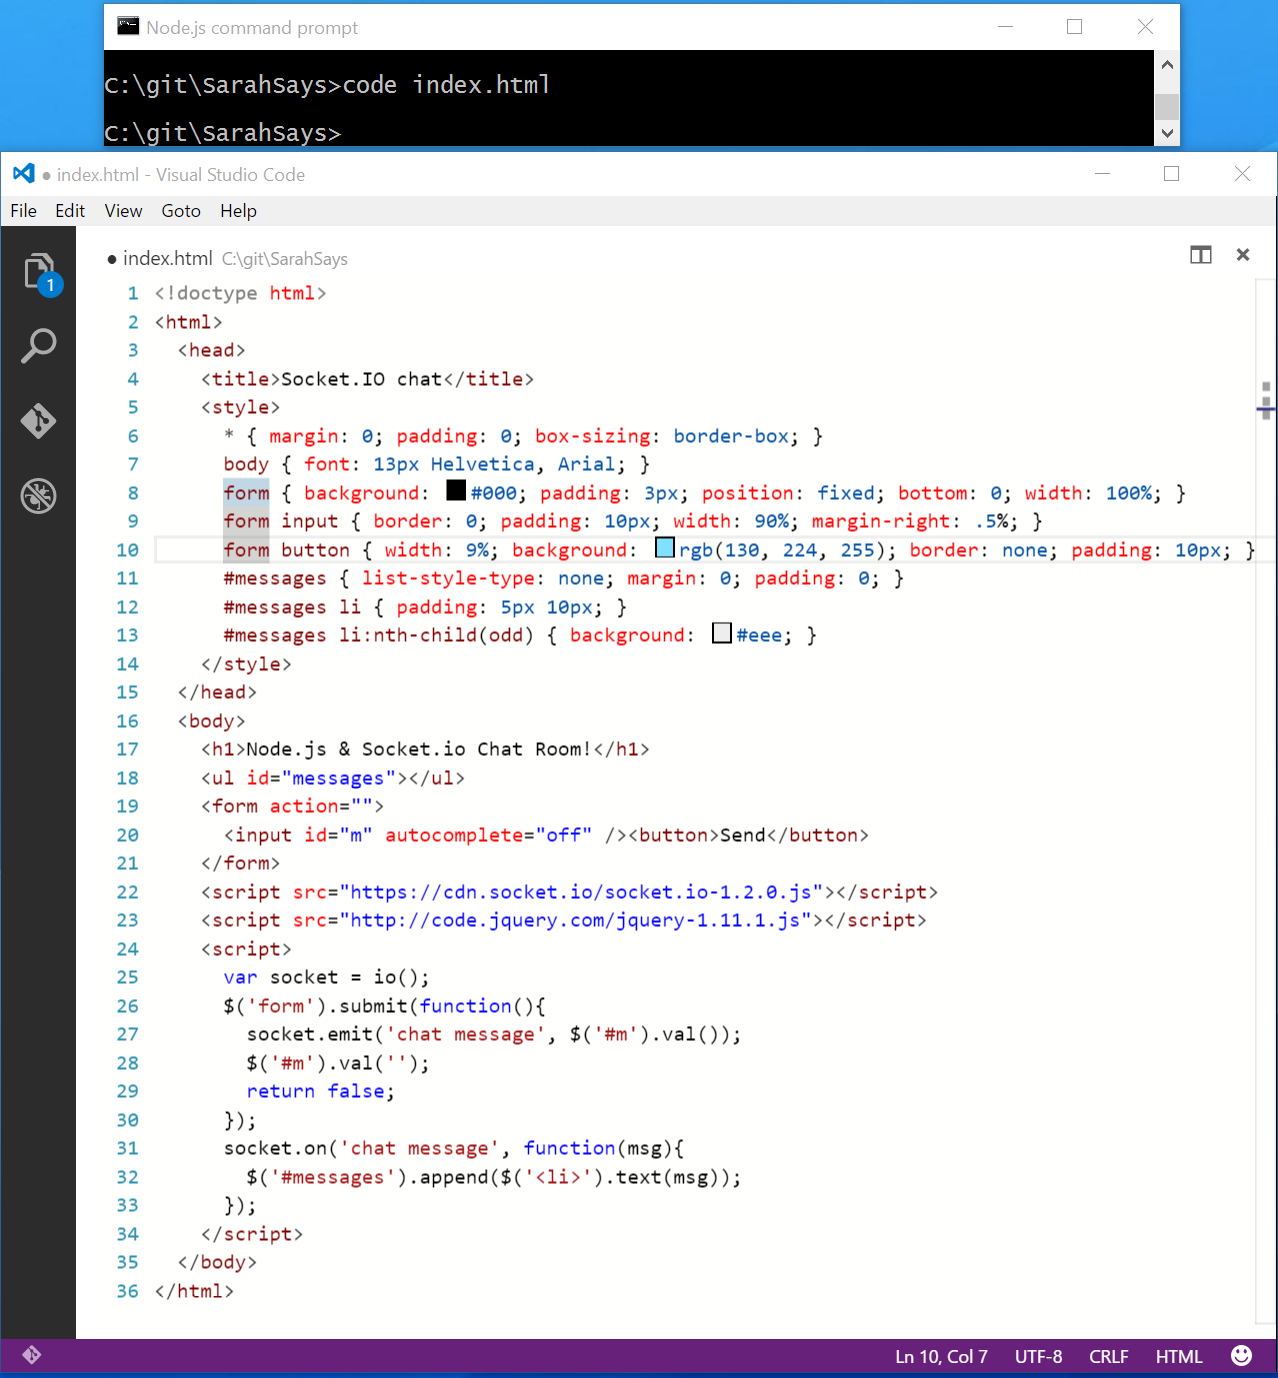
 <!doctype html>
<html>
 <head>
 <title>Socket.IO chat</title>
 <style>
 * { margin: 0; padding: 0; box-sizing: border-box; }
 body { font: 13px Helvetica, Arial; }
 form { background: #000; padding: 3px; position: fixed; bottom: 0; width: 100%; }
 form input { border: 0; padding: 10px; width: 90%; margin-right: .5%; }
 form button { width: 9%; background: rgb(130, 224, 255); border: none; padding: 10px; }
 #messages { list-style-type: none; margin: 0; padding: 0; }
 #messages li { padding: 5px 10px; }
 #messages li:nth-child(odd) { background: #eee; }
 </style>
 </head>
 <body>
 <h1>Node.js & Socket.io Chat Room!</h1>
 <ul id="messages"></ul>
 <form action="">
 <input id="m" autocomplete="off" /><button>Send</button>
 </form>
 <script src="https://cdn.socket.io/socket.io-1.2.0.js"></script>
 <script src="https://code.jquery.com/jquery-1.11.1.js"></script>
 <script>
 var socket = io();
 $('form').submit(function(){
 socket.emit('chat message', $('#m').val());
 $('#m').val('');
 return false;
 });
 socket.on('chat message', function(msg){
 $('#messages').append($('<li>').text(msg));
 });
 </script>
 </body>
</html>
All it takes to load the socket.io-client, which exposes an io global, and then to connect, is this script that says var socket = io();. I’m not specifying any URL when I call io(), since it defaults to trying to connect to the host that serves the page. The main idea behind Socket.IO is to send and receive any events you want, with any data you want.
When the user types in a message, the server gets it as a chat message event. The scripts section in index.html contains socket.emit. So when the program captures a chat message event, it's included in the page.
Now if we navigate back to node and run app.js, we should see the following:
C:\git\SarahSays>node app.js
listening on 3000
Git
Favorite resource: “Git-it” – Learn Git and GitHub basics. - Jessica Lord
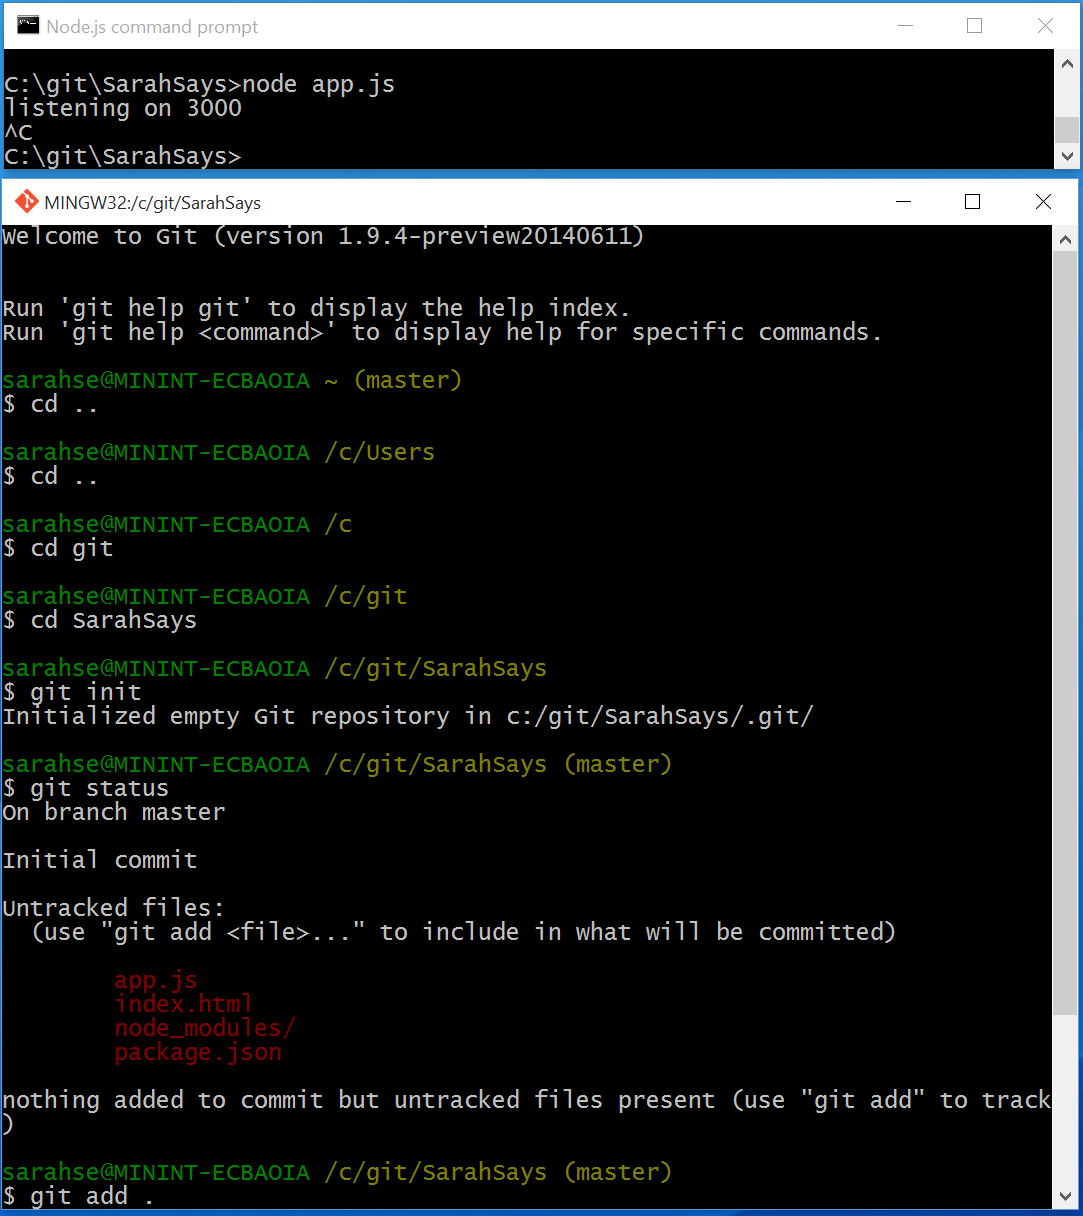
Now we would like to initialize our SarahSays folder as a Git repository. (To stop app.js from running in the Node command prompt window, type Ctrl+C.) Depending on how you installed your Node.js command prompt or a Git Bash, your start directory could be your home directory, or it could be somewhere else. Personally, I've changed my startup location to automatically start where I put my git repos. If your Node.js command prompt does not recognize "git" commands, then you'll have to open a new instance of your local Git Bash command prompt.
In Git Bash, navigate to the same folder we created in Node. In my case, my files are in C:\git\SarahSays. Therefore, my command would be:
>cd /c/git/SarahSays
To create a new Git instance for a project:
>git init
That's it! It will just return us to a new line. If we want to be extra-sure that it's a Git repository, type:
>git status
Now that we've got a repository started, let's add our local files to it.
>git add .
Next, commit those changes to the repository's history with a short description of the updates.
>git commit -m "Initial Commit"
GitHub
Favorite resource: "Git-it" Guide: Remote Control - Jessica Lord
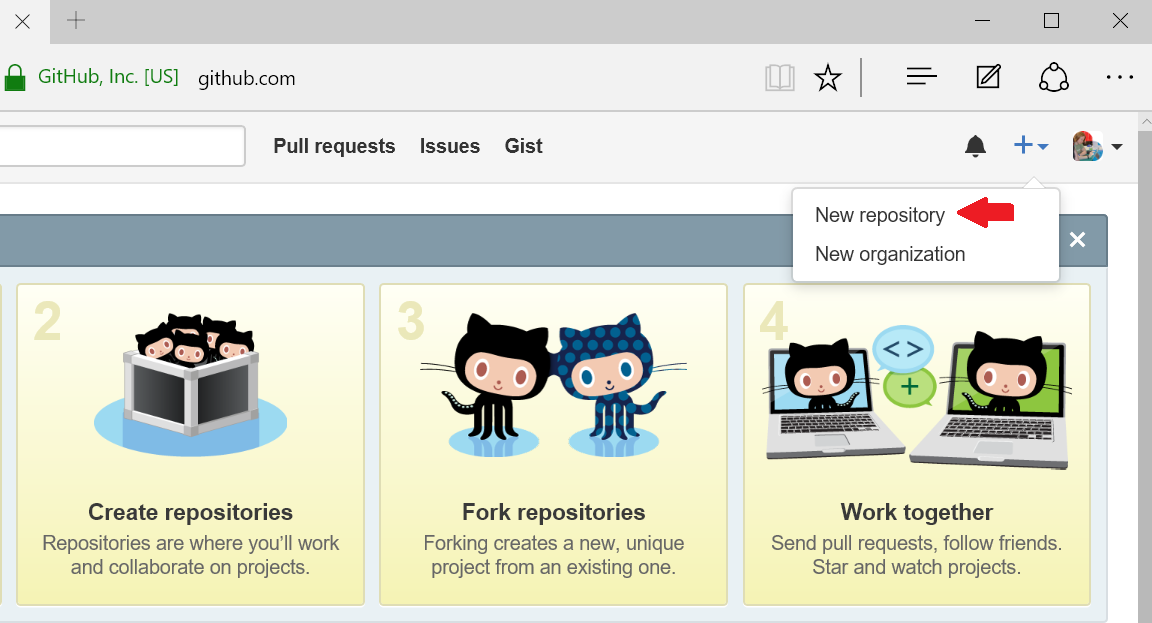
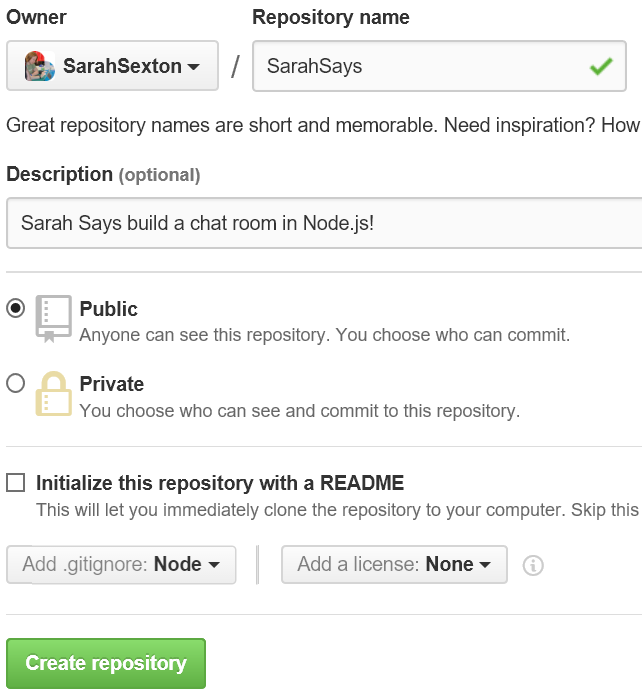
At this point, it's time to go to GitHub.com, log in, and click the '+' in the top right to create a new repository.
Give it a name that matches your local repository's name, 'SarahSays', and a short description.
Make it public. Don't Initialize with a README.
Set .gitignore to add "Node," and leave license on 'none'.
Click Create repository!
Readmes, .gitignores and Licenses are common files in open source projects. A readme explains what the project is, how to use it, and often times, how to contribute (though sometimes there is an extra file, CONTRIBUTING.md, for those details). A .gitignore is a list of files that Git should not track, for instance, files with passwords! In our case, we want Git to ignore all the Node modules, because there are thousands of them, and we are only using two. A license file is the type of license you put on your project; more information at www.choosealicense.com. We don't need a license for this example.
Now you've got an empty repository started on GitHub.com. Copy to your clipboard the URL from GitHub — this is the location (address) of your repository on GitHub's servers.
Back in your Git Bash terminal, and inside of the 'SarahSays' folder that we initialized as a Git repository earlier, we want to tell Git the location of the remote version on GitHub's servers. You can have multiple remotes so each requires a name. For the main one, this is commonly named origin.
git remote add origin https://github.com/SarahSexton/SarahSays.git
Your local repository now knows where your remote one named 'origin' lives on GitHub's servers. Think of it as adding a name and address on speed dial — now when you need to send something there, you can.
Now, to sync our local repo, you’ll need to do a pull request: “git pull origin master” prior to the push. The pull will get your repos in sync by copying down the .gitingore file. Once the local repo matches the GitHub repo, then you can do a push.
>git pull origin master
>git push origin master 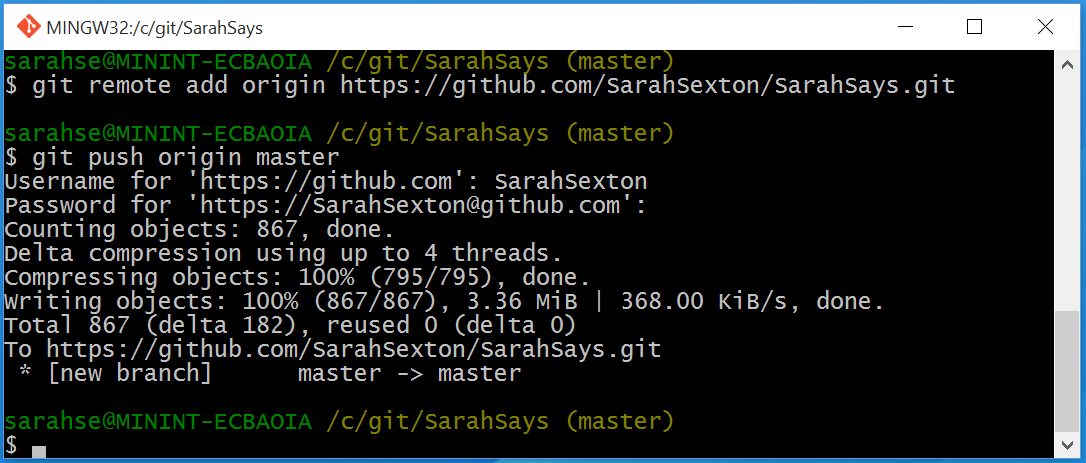
Git has a branching system so that you can work on different parts of a project at different times. By default, the first branch is named 'master'. When you push (and later pull) from a project, you tell Git the branch name you want and the name of the remote that it lives on. In this case, we'll send our branch named 'master' to our remote on GitHub named 'origin'.
Now go to GitHub and refresh the page of your repository. Ta-da! Everything is the same locally and remotely. 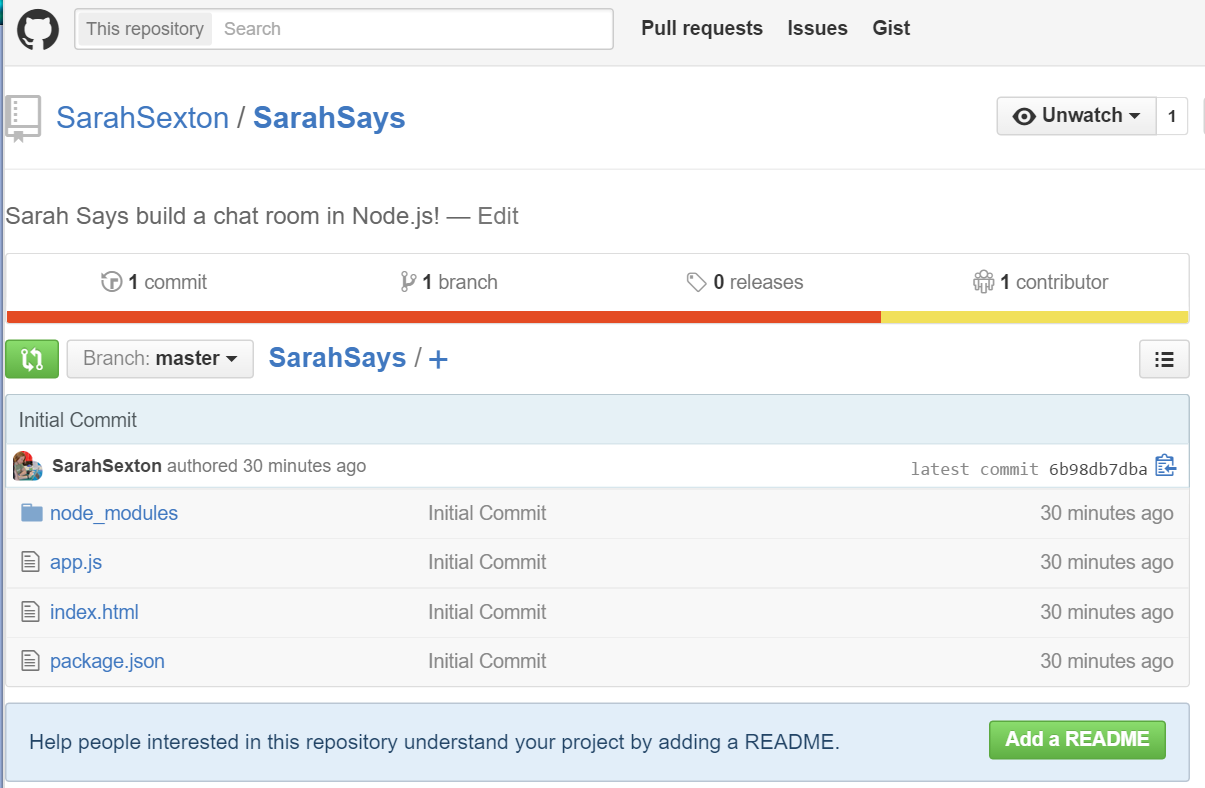
Azure
Favorite resource: Deploying from local git repository to Azure websites (with video) - Iris Classon
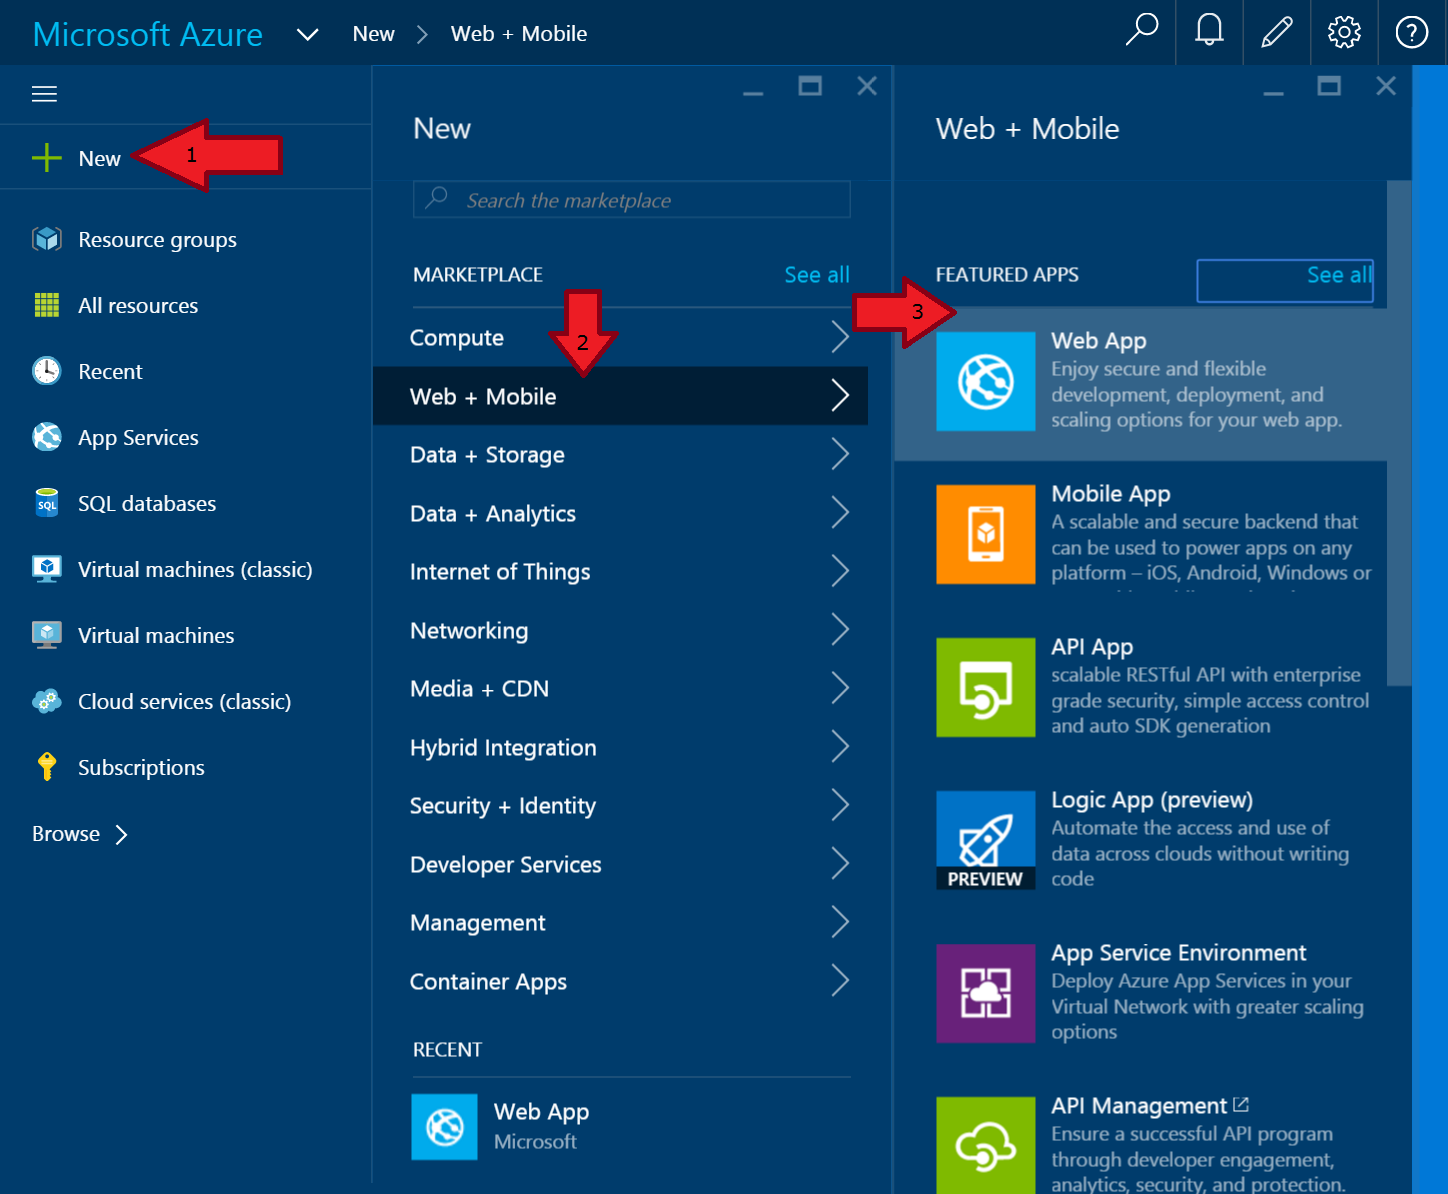
Now we're ready to publish our chat room to Azure to share it with the rest of the world. Go to https://azure.com, click "Portal" in the upper right*, and once the page loads**, click "+New". In the next blade, click "Web + Mobile," then "Web App." In the next dialogue window, find a unique URL at which to host your new chat room. After you've found one, click "Create"!
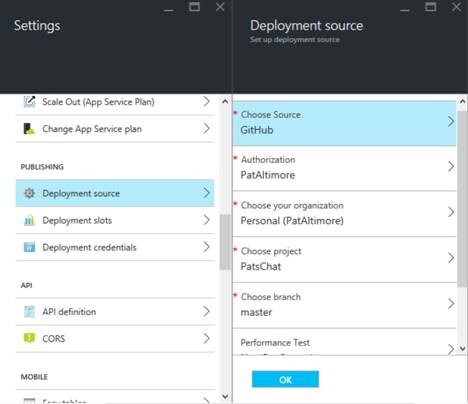
Once on your web app's new page, underneath the "Settings" blade, look for "Publishing," and the words "Deployment source."
- Choose GitHub when the option to select a source appears.
- Authenticate with your GitHub credentials and choose your Node project repository to deploy.
- Notice that you can select branch configuration, if you wanted to use this for dev staging. Azure will listen for changed on this repo and kick off a deployment any time a commit is pushed.
- You'll see that Azure figured out that this is a Node project, detected which Node runtime to use, and installed a virtual environment. The Node Package Manager installed Express and Socket.io from package.json, and collected static files.
- Click "OK" and wait for at least 30 seconds.
Linking GitHub repository... Deploying... Fetching changes... Preparing deployment for commit... Running deployment command... Active deployment!
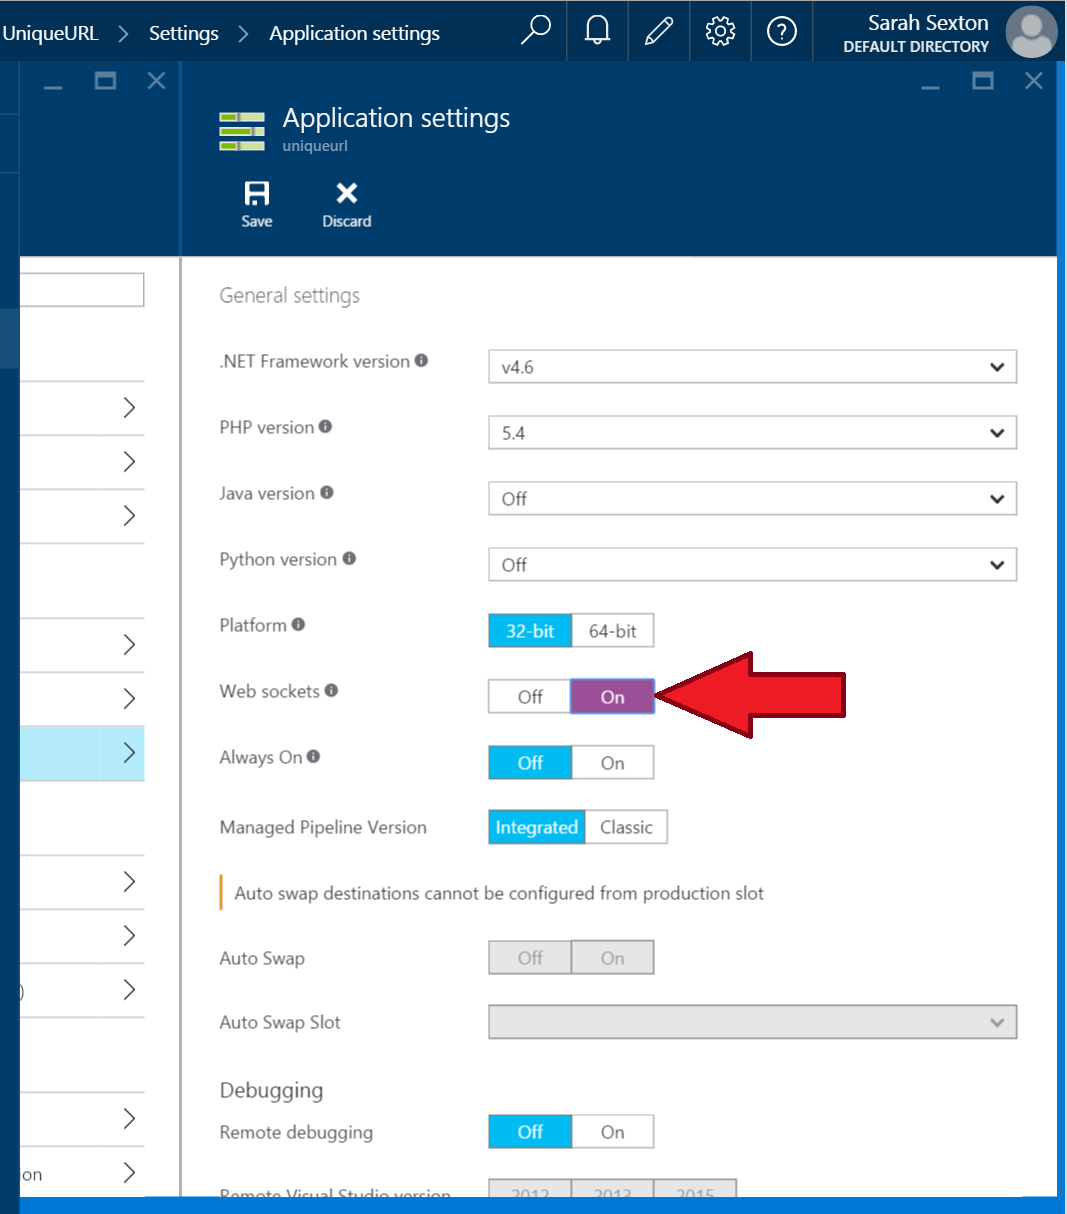
You will need to enable WebSockets from the "General" section's "Application settings" tab.
Now, to see the chat room website we just made, all we have to do is scroll to the left of the SarahSays blade in Azure again, look for "URL" on the right side, and click on that link to navigate to the page sarahsays.azurewebsites.net ! 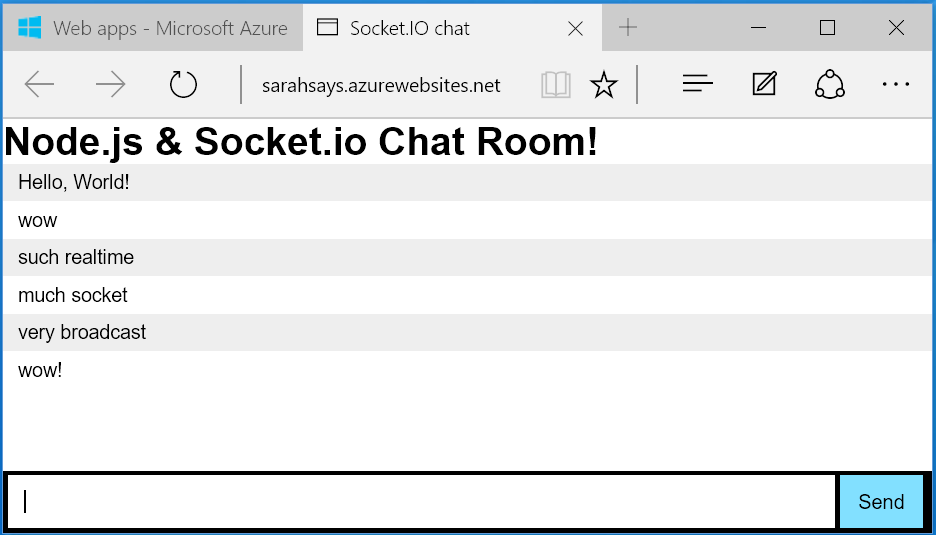
Conclusion
In this blog post, we learned how to build a very first Node.js app on open source software and publish it online directly from Azure through GitHub. We followed my personal journey from when I first heard about Node.js, to learning what it was, downloading the appropriate tools, building something, and finally publishing it to Azure. Hopefully you’ve gained some basic knowledge about Node.js, how to get started building your first Node app, and how to share it with the rest of the world. Thanks for reading!
*If you don't see the word "Portal" written in the upper right, try zooming out.
**If the Azure portal tells you "No subscriptions found," you can sign up for a free trial of Microsoft Azure here. You will get $220 to spend on all Azure services. For the service we are using, Azure Websites, you can run 10 websites without spending a cent!
More Node.js Learning Tools
To do more research into creating a first Node app, I went to Node.js’s website in search of official documentation and tutorials. There, I found something called NodeSchool, which they describe as being “a fantastic resource for learning about Node.js and the related ecosystem around Node. There are a series of curricula which are designed with a choose-your-own-adventure style.” So I visited NodeSchool.io, clicked Tutorials, and was introduced to a workshop called LearnYouNode.
Resources
Download Node.js - NodeJS.org
A chatroom for all! Part 1 - Introduction to Node.js - Rami Sayar
Create a Node.js chat application with Socket.IO in Azure App Service - Mike Wasson
How to add environment variables to your Path in Windows 8 or Windows 8.1 - Chris Hawkes
Open source workshops that teach web software skills - NodeSchool.io
“Git-it” – Learn Git and GitHub basics. - Jessica Lord
Deploying from local git repository to Azure websites (with video) - Iris Classon
Project Repository for Building Apps with Node.js Microsoft Virtual Academy - Rami Sayar
MVA: Building Apps with Node.js Jump Start - Rami Sayar & Stacey Mulcahy
Install and Configure the Azure Command-Line Interface (CLI) - Ralph Squillace
Explain Like I’m Five: What the heck is node.js? - Reddit Web Dev