Getting Up and Running with MongoDB on Azure
This tutorial will help you quickly build a database backend on Azure for your apps.
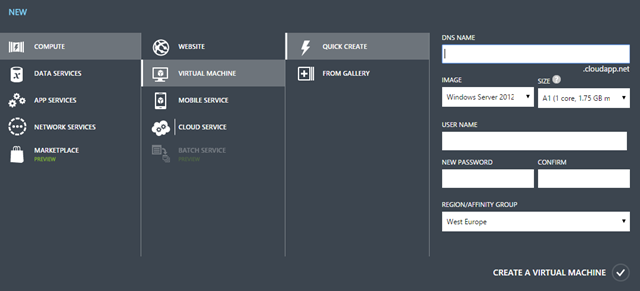
1. Creating a VM:
Pick a subdomain for cloudapp.net (remember this, for example: yoursubdomain.cloudapp.net), an username, and password for the new VM – I have chosen a Windows Server 2012 R2 Data center edition image here:
2. Creating an endpoint so that MongoDB can be exposed:
3. Connecting to the VM via Remote Desktop:
Click on the Connect to get a .rdp file downloaded which will help you to login to the newly created Windows environment hosted on Azure using the previously set password as above:
4. Installing and configuring MongoDB:
Go ahead and download MongoDB on your server and install at any location you want, however for this post I have used the default location, for example: C:\Program Files\MongoDB 2.6 Standard\. Once you’re done, create the following directories:
- c:\data\db
- c:\data\log
Also create a file called mongo.config at c:\data with the following contents:
 dbpath=C:\data\db
logpath=C:\data\log\mongo.log
Now run PowerShell with administrative privilege and type the following command:
 cd “C:\Program Files\MongoDB 2.6 Standard\bin”
.\mongod --config c:\data\mongo.config --install
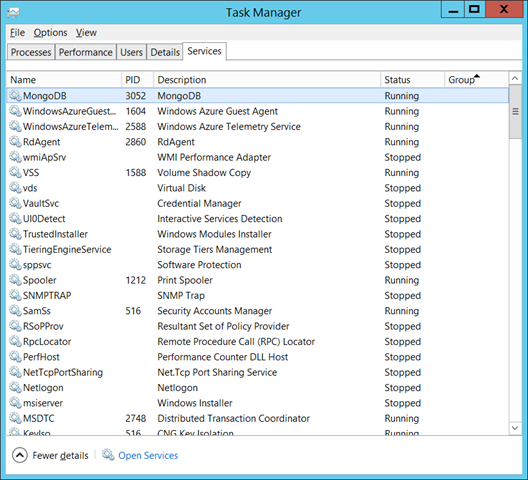
This will install Mongo DB as a service into the Windows as can be seen below:
Now go ahead and right click on the MongoDB service and click “Run.” Even if your restart your VM, this MongoDB service will startup automatically. In order to verify MongoDB service is properly running, you may want to execute the following command:
.\mongotop
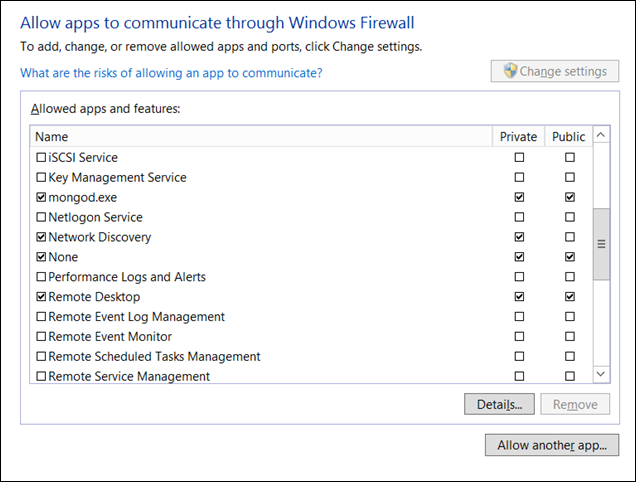
If it tells you that it has connected to 127.0.0.1, you may become confident that the service is running perfectly. Now that it’s running locally, we need to access it from our local machine in order to start using this backend by our apps. Lets go to the Control Panel of the VM and add an exception rule for mongod.exe as show below:
5. Accessing from local machine
Download and install MongoDB onto the local machine. Open up a PowerShell instance with administrative privilege and execute the following command:
 cd “C:\Program Files\MongoDB 2.6 Standard\bin”
.\mongo yoursubdomain.cloudapp.net:27017
Here are a list of sample interactions that were made from local machine to the Azure-hosted MongoDB – more on the commands, inserting/retrieving documents would be in later posts:
 > db  // finding which db we are using
test
> use mydb   // explicitly mention that we want to use mydb
switched to db mydb
> c = { fruit: "coconut" }    // lets create a document
{ "fruit" : "coconut" }
> f = { name: "fox" }  // lets create another document with diff. prop.
{ "name" : "fox" }
> serial = { serial: 5 }   // lets create with int value
{ "serial" : 5 }
> db.sampleData.insert(c) // inserting the document into a collection
WriteResult({ "nInserted" : 1 })
> db.sampleData.insert(c)  // inserting deliberately again the same doc
WriteResult({ "nInserted" : 1 })
> db.sampleData.insert(serial)
WriteResult({ "nInserted" : 1 })
> db.sampleData.insert(f)
WriteResult({ "nInserted" : 1 })
> show collections   / show all the collections inside this db
sampleData
system.indexes
> db.sampleData.find()  // show all documents in the sampleData collection
{ "_id" : ObjectId("54be33e87ef640148c2b9014"), "fruit" : "coconut" }
{ "_id" : ObjectId("54be34127ef640148c2b9015"), "fruit" : "coconut" }    // twice
{ "_id" : ObjectId("54be34167ef640148c2b9016"), "serial" : 5 }
{ "_id" : ObjectId("54be341d7ef640148c2b9017"), "name" : "fox" }


