Windows Phone: MVVM powered Maps
The Model-View-ViewModel architectural pattern is quite popular among the developers who use Microsoft tools day in and day out. MVVM was built on top of the principles of Model-View-Controller, yet heavily charged with the ability to do event driven programming which makes it more suitable for UI part of the solution. In this blog post, I would like to explain how you can use MVVM pattern with the Maps control in your Windows Phone apps. Similar blog posts, along with many primer of MVVM and data-binding topics can be found in this nice starter. The concepts described here were also used for building Crimes Map Dhaka and Bus Map Dhaka. Let us walk you through baby-steps on how you can get started with a mapping app:
1. The Model part
Start by creating a new Windows Phone 8 blank app.
Before the MVVM pattern can bind any data with the UI, of course the data model should be defined. Let us go ahead and start creating data classes. Begin with a simple data unit class called Placemark, which will be responsible for providing coordinate data along with the relevant data to the respective Pushpin on the map.
 internal class Placemark : INotifyPropertyChanged
{
    private string _Name;
    private string _Description;
    private GeoCoordinate _GeoCoordinate;
    public event PropertyChangedEventHandler PropertyChanged;

    public string Name
    {
        get
        {
            return this._Name;
        }

        set
        {
            if (this._Name != value)
            {
                this._Name = value;
                this.NotifyPropertyChanged();
            }
        }
    }

    public string Description
    {
        get
        {
            return this._Description;
        }

        set
        {
            if (this._Description != value)
            {
                this._Description = value;
                this.NotifyPropertyChanged();
            }
        }
    }

    [TypeConverter(typeof(GeoCoordinateConverter))]
    public GeoCoordinate GeoCoordinate
    {
        get
        {
            return this._GeoCoordinate;
        }

        set
        {
            if (this._GeoCoordinate != value)
            {
                this._GeoCoordinate = value;
                this.NotifyPropertyChanged();
            }
        }
    }

    private void NotifyPropertyChanged([CallerMemberName] string propertyName = "")
    {
        if (this.PropertyChanged != null)
        {
            this.PropertyChanged(this, new PropertyChangedEventArgs(propertyName));
        }
    }
}
As you notice from the code, whenever any instance of this class is modified, it will update the customer of the class with the changed property name. Let us now make sure to make a list of Placemark, so that it can be used as a Data Source to the map.
 internal class Placemarks : ObservableCollection<Placemark>
{
    public Placemarks()
    {
        this.LoadData();
    }

    private void LoadData()
    {
        this.Add(new Placemark() { Name = "Location 1",
Description = "Description 1", GeoCoordinate = new GeoCoordinate(47.6050338745117, -122.334243774414) });
        this.Add(new Placemark() { Name = "Location 2",
Description = "Description 2", GeoCoordinate = new GeoCoordinate(47.6045697927475, -122.329885661602) });
        this.Add(new Placemark() { Name = "Location 3",
Description = "Description 3", GeoCoordinate = new GeoCoordinate(47.605712890625, -122.330268859863) });
    }
}
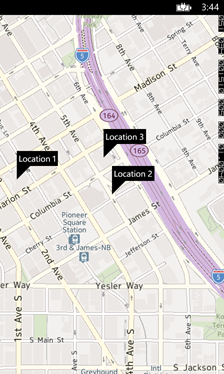
Here, we could load this data from a web service or Local Storage. Note that we have instantiated this class from an ObservableCollection<Placemark> meaning that whenever this collection is changed, the customer (here, the UI) will be notified of the respective changes and will make sure the UI renders consistently according to the changes made.
2. The ViewModel
The ViewModel is essentially responsible for delivering data to the UI in however fashion that’s necessary. For the sake of this example, we are very much allowed to leave it simple here:
 internal class PlacemarkViewModel
{
    public PlacemarkViewModel()
    {
        this.Placemarks = new Placemarks();
    }

    /// <summary>
    /// Gets or sets the list of stores
    /// </summary>
    public Placemarks Placemarks { get; set; }
}
The ViewModel here works as the container of the list of Placemarks.
3. The View
- Go to Tools –> Library Package Manager –> Package Manager Console –> and type: Install-Package WPToolkit which will install Windows Phone toolkit for us to help with adding the Pushpins.
- Open WMAppManifest.xml –> Capabilities from the Solution Explorer and check on ID_CAP_MAP in order for us to use Map control in our app
- Drop a Map control from the toolbox onto the MainPage.xaml designer view.
- In the XAML view, make sure the code looks like the following:
 <maps:Map x:Name="maps" Grid.Row="1">
    <toolkit:MapExtensions.Children>
        <toolkit:MapItemsControl Name="mapItems">
            <toolkit:MapItemsControl.ItemTemplate>
                <DataTemplate>
                    <toolkit:Pushpin GeoCoordinate="{Binding GeoCoordinate}"
Content="{Binding Name}" />
                </DataTemplate>
            </toolkit:MapItemsControl.ItemTemplate>
        </toolkit:MapItemsControl>
    </toolkit:MapExtensions.Children>
</maps:Map>
What we have done here is fairly self-explanatory. We used data templating capability of Windows Phone toolkit in order for us to bind pushpin data to the Pushpins on the map. Now let’s take a look at the Code-view of the MainPage.xaml file:
 public partial class MainPage : PhoneApplicationPage
{
    private readonly PlacemarkViewModel _ViewModel = new PlacemarkViewModel();

    // Constructor
    public MainPage()
    {
        InitializeComponent();
        this.DataContext = this._ViewModel;
    }

    private void PhoneApplicationPage_Loaded(object sender, System.Windows.RoutedEventArgs e)
    {
        maps.SetView(new GeoCoordinate(47.6045697927475, -122.329885661602), 16);
        MapExtensions.GetChildren(maps)
        .OfType<MapItemsControl>().First()
        .ItemsSource = this._ViewModel.Placemarks;
    }
// more code to follow if need be...
}
We have created an instance of the ViewModel and assigned it to the DataContext of the page, so that the dependent properties such as Latitude and Longitude data can be fed to the UI. The SetView method essentially positions the map onto specified coordinates with a zoom level. The last line of the code does a hack with MapItemsControl found inside Windows Phone Toolkit which is responsible here for rendering Pushpins. It couldn’t be made available with an identifier, eg. the Name property was set from the toolkit code, hence no matter which identifier you assign to the control, it’s not accessible by that. That’s why we have searched through controls inside the Map control and retrieved and fed the Placemarks model as its ItemsSource.
The result is a data-bound Map control. Now any changes that you code will make to the Model, it will automatically be adjusted onto the Map control.
