Creating a Bootable USB Disk on Windows 8 for deploying Windows
As an introduction to some of the major improvements in managing your storage via PowerShell in the Windows 8, I wanted to give a comparison of how you would go through the process of creating a bootable USB disk such as would be done for deploying Windows 8 to multiple computers.
Historically, this could have been achieved via Diskpart.exe, as long as I knew the correct disk number, as it was not easy to script this operation with DiskPart.
My scenario for this post is the following;
I have 2 USB disks connected to my machine, and I want to erase only one of these, make it bootable, and copy the Consumer Preview image to this disk for fast deployment on several machines.
Prior method using DiskPart.exe
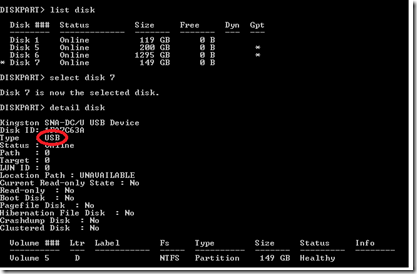
First, I would need to do some research using Diskpart.exe or DiskMgmt and would need to figure out which of the disks I have was the one that mapped to my USB disk..
Using the Select Disk X, Detail disk commands in Diskpart against every disk, I could eventually determine which of the disks I have connected is the USB disk, which would have allowed me to prepare the disk.
The issue here is this is not really scriptable via DiskPart without building scripts to parse the output of DiskPart to find the correct disk.
Followed by all of the appropriate commands to prepare this disk from diskpart.
This method is painful, and I don’t like painful ![]()
Using Windows PowerShell to achieve this scenario using Windows 8:
Warning: The Clear-Disk command does erase the disk(s) specified. Running these commands with multiple USB disks connected would erase all of the USB disks unless the results are filtered further.
List all of the Disks that are connected
Get-Disk
Since I wanted to specifically use a specific USB disk for this process, I need to list only the USB-connected disks:
List all the disks that are connected via USB
Get-Disk | where-object BusType -eq "USB"
Since I have 2 USB disks connected (as seen above), and I only want clear and prepare the first one, I would need to either filter the list above further, or to specify the exact disk to manage, using one of the following approaches:
Get-Disk 7
or
Get-Disk | where-object Bustype –eq “USB” | where-object FriendlyName –like Kingston*
Now that I know how to query for the disk I wanted to erase and prepare, how would I go about scripting this?
$Disk = Get-Disk | where-object Bustype –eq “USB” | where-object FriendlyName –like Kingston*
$Disk | Clear-Disk –RemoveData –Passthru `
| Initialize-Disk -PartitionStyle MBR –Passthru `
| New-Partition -IsActive -UseMaximumSize -DriveLetter U `
| Format-Volume -NewFileSystemLabel "Bootable USB" -FileSystem NTFS
Now that the USB disk is prepared, how do I go about mounting the ISO image that I downloaded so that I can copy the files to the USB disk I just prepared?
$ISOPath = "C:\Windows8-ConsumerPreview\Windows8-ConsumerPreview-64bit-English.iso"
Mount-DiskImage $IsoPath
Get-DiskImage $IsoPath | Get-Volume
By going a little further with this example, I could even automate the process of copying the installation files to the new disk, by using the following method to get the source and destination paths for use with Robocopy
$SourcePath = ((Get-Volume `
| where-object Filesystem -eq "UDF").DriveLetter + ':\')$DestinationPath = (($Disk `
| Get-Partition).DriveLetter +':\')robocopy $SourcePath $DestinationPath /s
Thanks,
Bruce Langworthy
Senior Program Manager – Windows Storage and FileSystems


