Setup Hybrid SharePoint Online + On-Premise Search Federation – A Quick Guide
In a hybrid SharePoint world a nice trick you can do is to merge search results from your on-premises SharePoint setup with your SharePoint Online sites – i.e. you search in one place (on-premise SharePoint for example) and see results for both places in the same search results list. It’s a little known fact that SharePoint 2013 can do this and it’s another nice tool in bridging the gap between the cloud and on-premises that’s worth knowing about if you have this hybrid setup.
This subject has been covered before by my excellent colleague Manas Bizwas and also some pretty lengthy TechNet articles. But given how complex the setup is even for the establishing the farm trusts (and in 2013 it isn’t for the faint-hearted) I figured a much shorter version was needed; especially on the core part which is setting up the farm trusts between your SharePoint farm and SharePoint Online.
You can have SharePoint Online also search your on-premise SharePoint installation too but that’s for another day, albeit with many of the same pre-requisites. This guide is just so your on-premises applications also show results from SharePoint Online in the same query, in short. It’s not particularly easy so I’m attempted to simplify the process here.
Hybrid SharePoint Setup Requirements
To set this up you’ll need:
- Your own domain, added and verified in Office 365 (E3 plan and above if I’m not mistaken). None of the default Office 365 domains or lesser tenant accounts will work.
- A self-signed certificate for syncing SharePoint Security Token Service communications. You can use a CA generated one but actually it’s preferable for it to be self-signed.
- PowerShell add-ons for SharePoint Online, Azure Active Directory, and the Sign-in Assistant setup (links below).
- To be able to risk downing your farm at a certain point at least; some of these setup steps will require a complete outage to implement.
- Not to be scared of scripts, certificates, and generally trying scary configuration. Alright, that’s always a bit scary so just don’t be too scared then.
The complexity revolves around the fact there’s a lot of technology pieces involved here; SharePoint Server and SharePoint Online, Azure AD and your own AD. If you want SharePoint Online to be able to return results from your on-premise SharePoint farm that’s also possible but you’ll need a way of publically exposing your search application to the internet (via reverse-proxy I’d highly recommend). That’s for another day though.
Setup Hybrid Trust to Office 365
There are various steps needed to get this party rolling if nothing else because security is a huge factor here; we’d hate it to be easy to get access to your data after all. This is the meat of the hybrid challenge because we have to:
- Sync users between Office 365 and on-premise Active Directory so users are replicated between the two sites.
- You might also want to implement single-sign-on so users only login once for Office 365 and your on-premise setup.
- Establish trust between your SharePoint farm and SharePoint Online.
- Run some other scripts to complete the link between on-premises/cloud.
- Setup a SharePoint Online search source.
- Make sure you can test it successfully before you continue.
- Configure the search application to include results from your SPO source.
Synchronise Your Active Directory to Office 365
This step is fairly easy in principal – the objective is that your on-premise users need to have an identifier exactly the same as the way they login to Office 365. That’s to say in my example, I’ll have bob@awesomespaceships.com in the cloud (that’s how he logins in there), and a user with than UPN in my on-premise Active Directory. All the users that are going to want this hybrid functionality will need this exact match or SharePoint Online will deny access. This is key; without the ability to pair-up user identifiers either by changing the UPNs or adding new ones there is no hybrid setup, the end, amen.
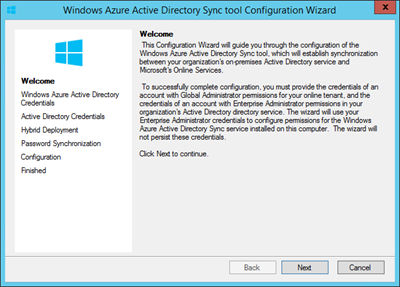
The first thing is to do once the users are ready is to enable user syncing in your Office 365 administration. It’s off by default as a security precaution but takes 2 seconds to turn on. Then you can start syncing your users from your on-premise domain to Office 365 using the sync tool.

This need activating. Then you’ll be able to run this tool (there’s a download link on the Office 365 admin control panel):
This tool doesn’t have to be run on a separate machine but good practises dictate it’s probably not a bad idea if you can.
Optional: Configure Single-Sign-On
An optional (but I’d say recommended) stage once users are perfectly syncing is to activate single-sign-on for your two SharePoint sites. That way users only login once and the authentication ticket is valid for both sites and is therefore much nicer than logging in twice with the same credentials. I did already a guide about this here.
Establish Trust Between SharePoint On-Premise and SharePoint Online
Next up is the really fun bit, and by “fun” I mean “scary and slightly odd”. For it to work you’ll need:
-
- SharePoint Online Management Shell (64 bit version) (https://go.microsoft.com/fwlink/?LinkId=392323)
- Microsoft Online Services Sign-In Assistant for IT Professionals BETA (64 bit version) (https://go.microsoft.com/fwlink/?LinkId=391943)
- Azure Active Directory Module for Windows PowerShell (64 bit version) (https://go.microsoft.com/fwlink/p/?linkid=236297)
Make sure you have your new STS certificate with private-keys (.pbx file) and the public key export too (.cer file) – these are references in the setup script so you need to put your own values in.
If you’re having problems getting a self-signed certificate, it’s pretty easy – just use IIS manager to generate one. Follow “Replace the STS Certificate” down to the bottom in https://technet.microsoft.com/en-us/library/dn197169(v=office.15).aspx
In my case, the domain I’m establishing a trust with is called “awesomespaceships.com” but to run the stuff the stuff where admin credentials are needed in the cloud we need to use a user from another domain, hence you’ll see “admin@awesomespaceships.onmicrosoft.com” (admin from the default domain) referenced below.
My Trust Setup Script
Add-PSSnapin Microsoft.SharePoint.PowerShell
Import-Module Microsoft.PowerShell.Utility
Import-Module MSOnline -force
Import-Module MSOnlineExtended -force
Import-Module Microsoft.Online.SharePoint.PowerShell -force
new-pssession
$cred=Get-Credential -UserName "admin@awesomespaceships.onmicrosoft.com" -Message "Admin"
Connect-MsolService -Credential $cred
$spcn="*.awesomespaceships.com"
$spsite=Get-Spsite https://sfb-sp15-wfe1/
$site=Get-Spsite $spsite
$spoappid="00000003-0000-0ff1-ce00-000000000000"
$spocontextID = (Get-MsolCompanyInformation).ObjectID
$metadataEndpoint = "https://accounts.accesscontrol.windows.net/" + $spocontextID + "/metadata/json/1"
# Register STS with Office 365
$pfxPass = "eTH4e1L4aP2Y9Ng1RCmfQjvXp5fkQTfcMrVZcHoj2+I="
$pfxPath = "C:\Users\root\Desktop\sts.pfx"
$cerPath = "C:\Users\root\Desktop\sts.cer"
$cer = New-Object System.Security.Cryptography.X509Certificates.X509Certificate2 -ArgumentList $pfxPath, $pfxPass
$cer.Import($cerPath)
$binCert = $cer.GetRawCertData()
$credValue = [System.Convert]::ToBase64String($binCert);
New-MsolServicePrincipalCredential -AppPrincipalId $spoappid -Type asymmetric -Usage Verify -Value $credValue
Set-MsolServicePrincipal -AppPrincipalId $spoappid -ServicePrincipalNames $spns
# Configure Local STS
$pfxCertificate=New-Object System.Security.Cryptography.X509Certificates.X509Certificate2 $pfxPath, $pfxPass, 20
Set-SPSecurityTokenServiceConfig -ImportSigningCertificate $pfxCertificate
# Now you’ll need to restart SharePoint services on all servers!!
# Next, add a service principal name (SPN) to your Azure AD tenant
$msp = Get-MsolServicePrincipal -AppPrincipalId $spoappid
$spns = $msp.ServicePrincipalNames
$spns.Add("$spoappid/$spcn")
Set-MsolServicePrincipal -AppPrincipalId $spoappid -ServicePrincipalNames $spns
$msp = Get-MsolServicePrincipal -AppPrincipalId $spoappid
$spns = $msp.ServicePrincipalNames
$spns
# registers the SharePoint Online application principal object ID with the on-premises SharePoint Application Management Service
$spoappprincipalID = (Get-MsolServicePrincipal -ServicePrincipalName $spoappid).ObjectID
$sponameidentifier = "$spoappprincipalID@$spocontextID"
$appPrincipal = Register-SPAppPrincipal -site $site.rootweb -nameIdentifier $sponameidentifier -displayName "SharePoint Online"
Set-SPAuthenticationRealm -realm $spocontextID
# Create an Azure Active Directory proxy service in SharePoint on-premise
New-SPAzureAccessControlServiceApplicationProxy -Name "ACS" -MetadataServiceEndpointUri $metadataEndpoint -DefaultProxyGroup
New-SPTrustedSecurityTokenIssuer -MetadataEndpoint $metadataEndpoint -IsTrustBroker:$true -Name "ACS"
Script Notes
The bits you really need to change are in bold as they were specific for my setup. If you have any problems with loading the PowerShell extension (Azure AD for example) then this script will not work.
As mentioned in the script, once your STS certificates have been synchronised you’ll need to restart IIS and the SharePoint Timer service on all machines. Until you do this, errors most terrible will ensue.
Create Search Source
Once you’ve synced the trusts successfully & run everything else above without errors the next step is to add your SharePoint Online sites as a search source. This will only work of course if everything has been configured correctly, of which there’s quite a bit, so this is a nice check-point to verify that we’re ready to proceed.
In your on-premise search administration, click on “result sources” and then “New Result Source”. It’s a “remote SharePoint” protocol; add your root SharePoint URL in the service URL (“https://awesomespaceships.sharepoint.com/” in my case).
The authentication leave as default – users should magically just have access now we’ve exchanged trust and said our vows with SPO.
Test Search Source to Verify SharePoint On-Premise/Online Trust is Working
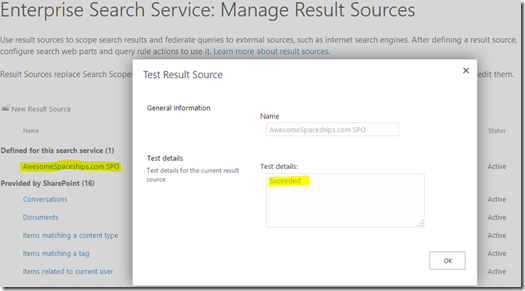
Once created, test the source from the drop-down menu:
If you see “succeeded” here then well done! If not, you might need to play with some extra configuration.
Does the Search Source Test Work?
This is important. If you don’t see “succeeded” as above, go no further; there is no point.
Why isn’t it working? It depends on the type of error; let’s see if it’s one of the reasons below.
Timeout Error
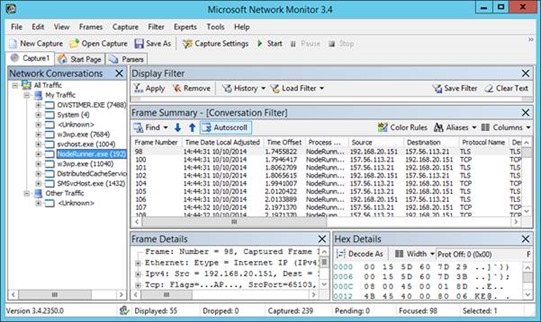
This could be a networking issue but also a genuine warm-up issue. Try a few times before concluding the test has definitely timed-out; I’ve seen cases where the first one or two tests have timed out but subsequent tests have worked fine. If you’re seeing timeout errors for real then you likely have a networking issues.
Resolution: troubleshoot the HTTPS call from the server with the search “index” component.
Here you see the noderunner instance connecting just fine to SharePoint Online. We can’t see what’s being said because it’s all SSL but we can see a nice & healthy TCP exchange at least meaning the firewall seems to be configured well enough to allow this through.
Access Denied Error
You might not be testing the source with the right user.
Just as when you search online & on-premise, the user UPN has to match on both servers for it to work. If the user logged in doesn’t have an equivalent user in Office 365 then the ACL (Access Control Lists) won’t match up because Office 365 wouldn’t know about “userwhatever@super-awesome-industries.local” or whatever.
The same applies for testing the search source; if the user logged into Central Administration that’s running the “test source” doesn’t match up to a synced user in Office 365 then SharePoint Online will fail the test with a HTTP 401.
In other words, log into Central Administration with a user with a matching UPN in Office 365 and re-test. This one caught me out the 1st time too, don’t worry.
Resolution: make sure your user logged into Central Admin exists in the cloud too.
Next Steps to Enabling Hybrid Search
Now you have the trust all setup you’ll be ready to configure query rules that combine both on-premise results with SharePoint Online results. Start here - https://technet.microsoft.com/en-us/library/dn197173(v=office.15).aspx#section2
Well done though; you’ve done the hard part.
Wrap-up
This is just a relatively short guide to getting the basic trust in place to enable hybrid search scenarios. If there’s interest in covering the rest I’d consider writing more.
Cheers,
Sam Betts


