Installing SharePoint 2013 Offline on Windows Server 2012 RTM
SharePoint 2013 won’t install on a Windows 2012 machine that has no connection to the internet by default. This is actually documented @ https://support.microsoft.com/kb/2765260 already and numerous other sites to some extent but I wanted to do a step-by-step guide on the steps in the above article.
There are two workarounds – install via PowerShell or install a patch on the SharePoint-machine-to-be. The patch is this one - https://support.microsoft.com/kb/2771431 and this will allow the pre-requisites installer to finish (apparently, I’ve not tested it). If installing this patch is not possible, continue reading.
Setup SharePoint 2013 Prerequisites
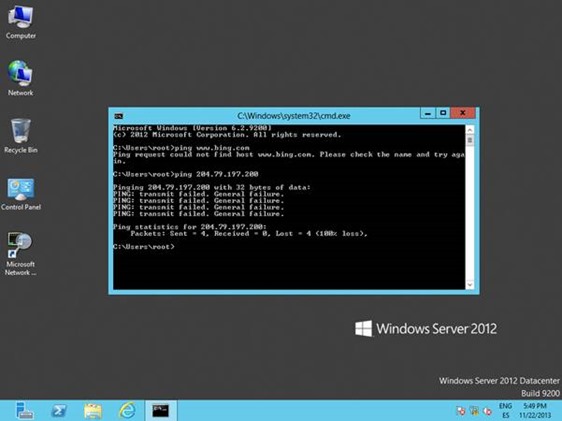
As is quite common for production environments, our servers are held in a virtual bunker – far aware from the evils of the internet & public at large. Here we have an RTM Win2012 machine, with no access outside of 192.168.100.0/24 – its’ local subnet. Just to prove it we do a ping test to bing which fails, but also to prove it’s not just DNS that’s dying we’ll do the IP too (www.bing.com -> 204.79.197.200).
Everything ready to go – no internet at all. That ping error is basically saying “I have no route to where you want to go” – a sure sign we’re isolated indeed.
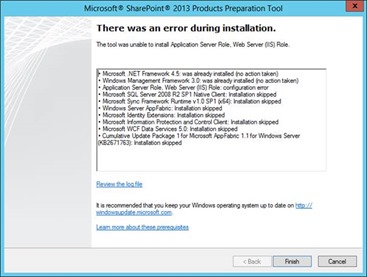
If you check a network trace you’ll see the wizard tried to connect to Windows Update and failed.
Installing SharePoint Required Roles Offline
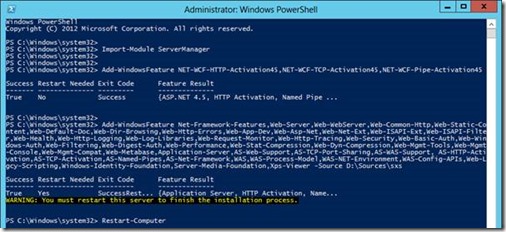
The workaround is to supply the source for the side-by-side assemblies on the Windows 2012 DVD. In my case, the DVD ISO is mounted on drive D so the commands to run (on an UAC elevated PowerShell console) are as follows:
- Import-Module ServerManager
- Add-WindowsFeature NET-WCF-HTTP-Activation45,NET-WCF-TCP-Activation45,NET-WCF-Pipe-Activation45 -Source D:\Sources\sxs
- Add-WindowsFeature Net-Framework-Features,Web-Server,Web-WebServer,Web-Common-Http,Web-Static-Content,Web-Default-Doc,Web-Dir-Browsing,Web-Http-Errors,Web-App-Dev,Web-Asp-Net,Web-Net-Ext,Web-ISAPI-Ext,Web-ISAPI-Filter,Web-Health,Web-Http-Logging,Web-Log-Libraries,Web-Request-Monitor,Web-Http-Tracing,Web-Security,Web-Basic-Auth,Web-Windows-Auth,Web-Filtering,Web-Digest-Auth,Web-Performance,Web-Stat-Compression,Web-Dyn-Compression,Web-Mgmt-Tools,Web-Mgmt-Console,Web-Mgmt-Compat,Web-Metabase,Application-Server,AS-Web-Support,AS-TCP-Port-Sharing,AS-WAS-Support, AS-HTTP-Activation,AS-TCP-Activation,AS-Named-Pipes,AS-Net-Framework,WAS,WAS-Process-Model,WAS-NET-Environment,WAS-Config-APIs,Web-Lgcy-Scripting,Windows-Identity-Foundation,Server-Media-Foundation,Xps-Viewer -Source D:\Sources\sxs
The above only works if the original Windows DVD content is available at drive “D” of course.
It worked! In the same window, restart with “Restart-Computer” (whoever said PowerShell was hard?!).
On restarting, Windows will configure itself.
Install Requisite Software Packages
Now it’s just a case of downloading the rest of the packages for offline installation. There’s lots of useful info on that here if you have to do it in batch - Install prerequisites for SharePoint 2013 from a network share.
In short, the list of packages that need to be installed for Windows 2012 are as so:
- Microsoft SQL Server 2008 R2 SP1 Native Client – click “download” and select “1033\x64\sqlncli.msi” – the client install only.
- Windows Identity Foundation (KB974405) – direct file link.
- Microsoft Sync Framework Runtime v1.0 SP1 (x64) – direct file link.
- Microsoft AppFabric 1.1 for Windows Server – pick x64 version.
- Windows Identity Extensions – direct file link.
- Microsoft Information Protection and Control Client (MSIPC) – direct file link.
- Microsoft WCF Data Services 5.0 for OData V3(https://www.microsoft.com/en-us/download/details.aspx?id=29306) - only one download.
- Cumulative Update Package 1 for Microsoft AppFabric 1.1 for Windows Server (KB 2671763) – pick x64 for your language (ENU probably).
Run Installer Using Local Files
Setup needs to be done by the pre-requisite installer still except we’re going to run it passing in the names of the pre-downloaded packages. Copy your SharePoint DVD contents to a writeable disc and then copy all the above downloaded packages into the “prerequisiteinstallerfiles” directory.
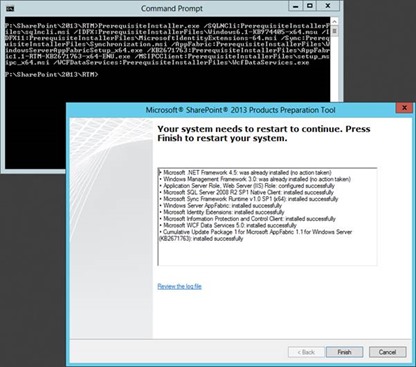
Next, run this command to launch the pre-requisite installer so it uses local files:
- PrerequisiteInstaller.exe /SQLNCli:PrerequisiteInstallerFiles\sqlncli.msi /IDFX:PrerequisiteInstallerFiles\Windows6.1-KB974405-x64.msu /IDFX11:PrerequisiteInstallerFiles\MicrosoftIdentityExtensions-64.msi /Sync:PrerequisiteInstallerFiles\Synchronization.msi /AppFabric:PrerequisiteInstallerFiles\WindowsServerAppFabricSetup_x64.exe /KB2671763:PrerequisiteInstallerFiles\AppFabric1.1-RTM-KB2671763-x64-ENU.exe /MSIPCClient:PrerequisiteInstallerFiles\setup_msipc_x64.msi /WCFDataServices:PrerequisiteInstallerFiles\WcfDataServices.exe
That’s all one line by the way. For Windows 2008 R2 you need extra packages but this guide is strictly for Windows 2012 RTM so we’re just installing components necessary for 2012.
Once that’s launched you may be prompted for confirmation to open one or two setup packages (WCF Data Services randomly seemed to need confirmation) but basically the installer should have everything it needs now.
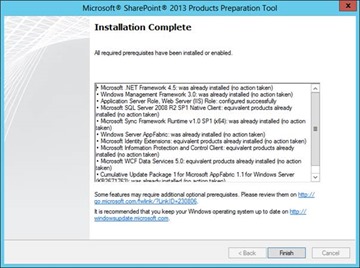
Restart once done – setup will continue after a reboot but will give an error. That’s because the program was launched from the context “P:\SharePoint\2013\RTM” originally whereas on reboot the context is “C:\windows\system32” so the relative package paths don’t work anymore. No matter, we’ve installed it all anyway – the wizard continuing just checks it’s all OK and in reality can be run from Windows Explorer instead. Run again normally if you want to double-check nothing’s been missed.
Now you can run the setup and it will pass all the pre-requisite checks. You’re ready to install SharePoint 2013!
Well done – your production environment that’s isolated from the internet will now be able to setup SharePoint. Happy SharePointing!
// Sam Betts
