Create a Multi-NIC VM with a Public IP in Azure
We recently announced support for virtual machines (VMs) with multiple network interface controllers (NICs). I’m still trying to understand all the new scenarios this functionality enables, but first I just wanted to test it out myself.
My scenario is to use PowerShell to build out a VM with two NICs, one for a backend subnet and another for a frontend subnet with an instance-level public IP address (PIP). *Update (2/3/2015): The documentation on PIP was recently updated stating that they are not supported on multi-NIC VMs.
The PIP gives the VM its own public IP address that is different from the Virtual IP Address (VIP) assigned to the cloud service that the VM resides in. The big difference between the two is that the PIP is wide open, where the with VIP you need to essentially setup port forwarding rules for everything you want to access on the VMs within that cloud service. This also means that you should run some sort of firewall on your VM if you’re using a PIP.
Scenario diagram
Summarized Steps
- Choose a unique name, something unique within azure, to use for the steps below
- Create a Virtual Network (VNET)
- Update Azure PowerShell
- Save your Azure Subscription Settings File
- Run the PowerShell script
- Validate configuration
Detailed Steps
- First we need to choose a name that is unique within Azure. We will use this name for the VNET, Cloud service, VM, storage, and PIP. The name needs to be in all lower case. For this example I will use rslatendemo.
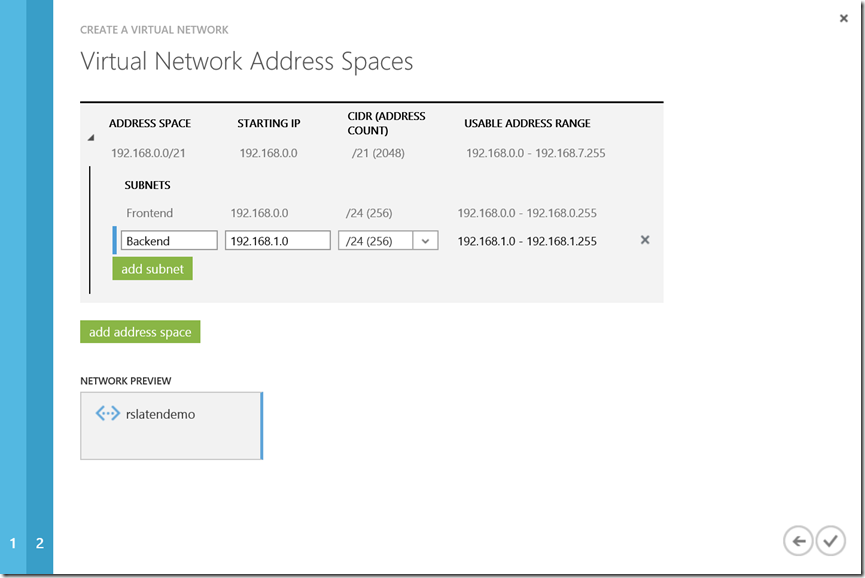
- Next we need to logon to the Azure Portal and create a new VNET. Use these same parameters as the script requires them to complete.
- Go to Networks and click New
- Click Custom Create
- Type in the unique name you chose for Name, choose South Central US for Location, and click Next twice
- Configure a address space: 192.168.0.0/21
- Configure two new Subnets:
- Frontend: 192.168.0.0/24
- Backend: 192.168.1.0/24
- Click OK
- Update Azure PowerShell on your PC so you can use the new Azure cmdlets: https://azure.microsoft.com/en-us/documentation/articles/install-configure-powershell/
- Save your Azure Subscription file locally. You can download your Azure Subscription File here: https://manage.windowsazure.com/publishsettings/
- Run the CreateMultiNICPIPVM.ps1 script.
Script Actions
- Logs on using your azure settings file
- Creates a new storage account
- Creates a new storage container
- Creates a new cloud service
- Creates a new VM with two NICs and a public IP in the VNET you created earlier. The VM will be run Windows Server 2012 R2, be a large size (A3) so it supports multiple NICs, be located in the South Central US region, and will use the subnets you created earlier in the VNET.
Script Parameters
Name Description Example azureSettingsFile Path to settings file c:\temp\rslatendemo.publishsettings azureName Unique name you picked earlier rslatendemo adminUserName Admin user name rslatendemo adminPassword Admin user password P@SSw0rd1
Script Example
.\CreateMultiNICPIPVM.ps1 –azureSettingsFile c:\temp\rslatendemo.publishsettings –azureName rslatendemo –adminUserName rslatendemo –adminPassword P@SSw0rd1
Validate Configuration
The script should run and show an OperationStatus: Succeeded for the New-AzureVM cmdlet towards the bottom of the script. After 10 minutes or so the VM should be spun up, you may need to refresh your browser to see the objects we created with the script.
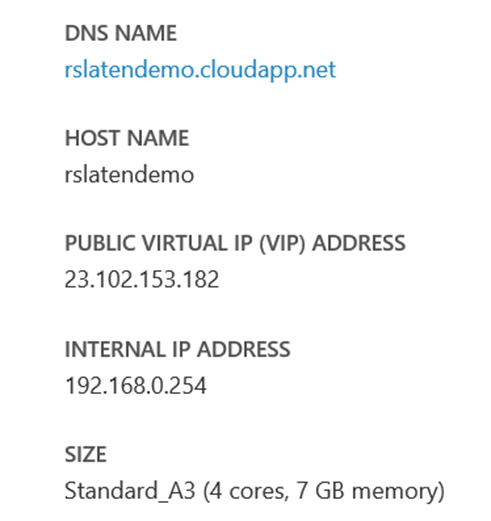
- Logon to the portal, find the VM that was created, click on it, and go to the Dashboard. Take note of the IP Address for the VIP. In this case mine is 23.102.153.182.
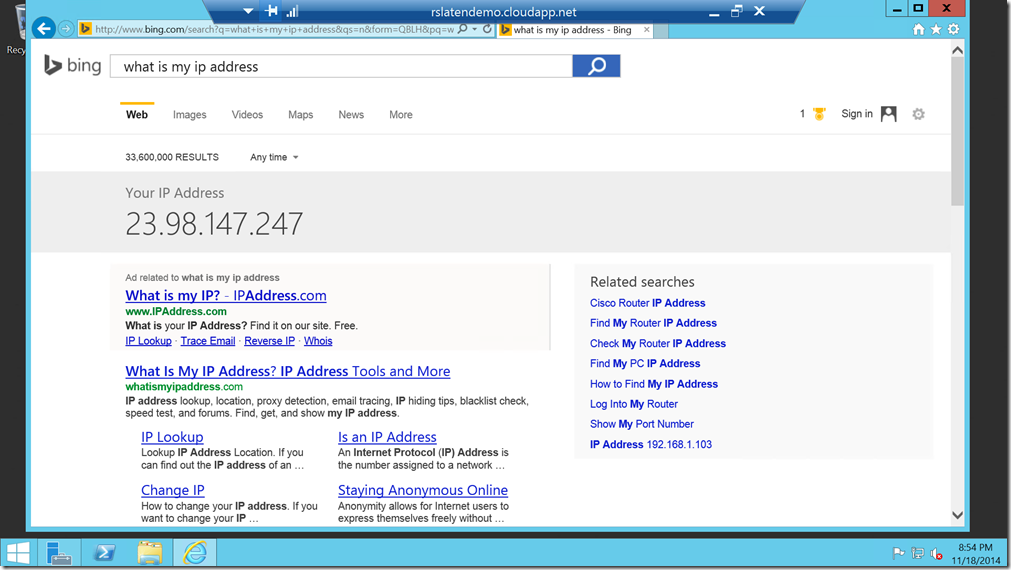
- Click Connect and logon to the VM over RDP. Open IE and ask Bing “What is my IP Address”. You may need to add bing to the trusted sites. Take note of the IP, in this case mine is 23.98.147.247. This is my PIP.
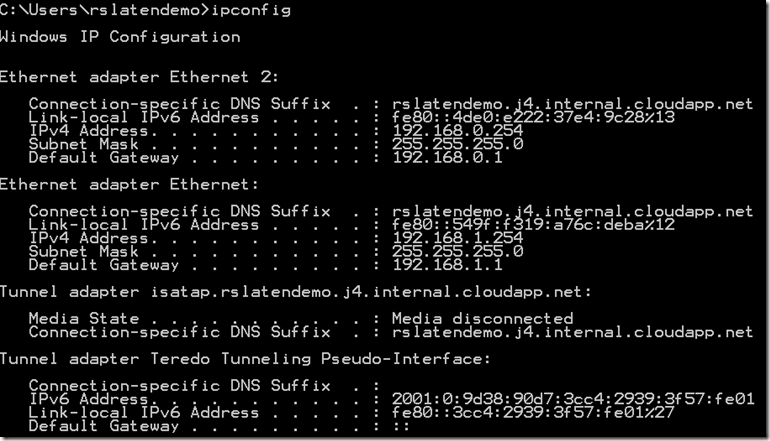
- Take note of the two NICs in the VM
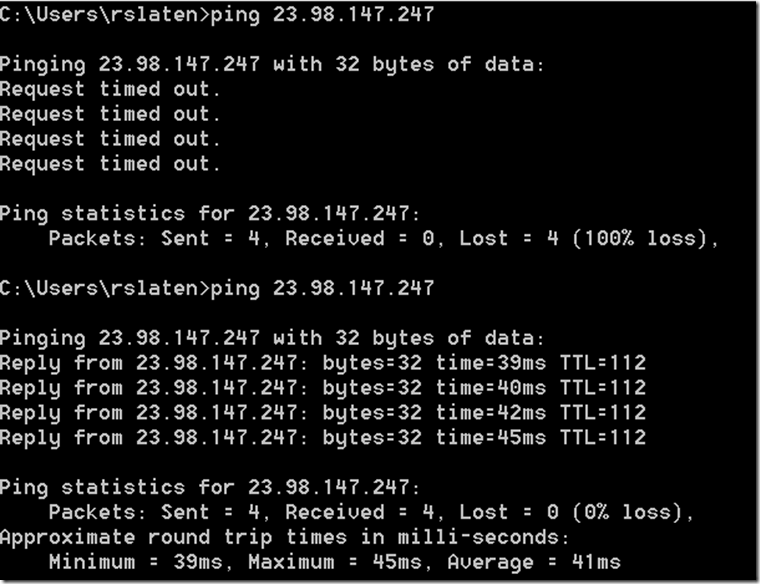
- From your own PC, ping the PIP, notice you get request timed out
- Now turn off the Windows Firewall in the VM (temporarily), or allow ICMP, and ping the PIP again
Script
 param(
  [Parameter(Mandatory=$true)]
  $azureSettingsFile,
  [Parameter(Mandatory=$true)]
  $azureName,
  [Parameter(Mandatory=$true)]
  $adminUserName,
  [Parameter(Mandatory=$true)]
  $adminPassword
)

#Optional Parameters
$azureLocation = "South Central US"
$azureImageName = "a699494373c04fc0bc8f2bb1389d6106__Windows-Server-2012-R2-201410.01-en.us-127GB.vhd"
$azureInstanceSize = "Large"
$azureFESubnetName = "Frontend"
$azureFEStaticIP = "192.168.0.254"
$azureBESubnetName = "Backend"
$azureBEStaticIP = "192.168.1.254"

#Functions
function NewAzureStorageAccount
{
  param($account, $location)

  #Check to see if it already exists
  $blob = Get-AzureStorageAccount -StorageAccountName $account -ErrorAction SilentlyContinue -WarningAction SilentlyContinue -Verbose:$false

  #Create if it doesn't exist
  if(!($blob))
  {
    Write-Host "Creating Storage Account..."
    New-AzureStorageAccount -StorageAccountName $account -Location $location -Verbose:$false -WarningAction SilentlyContinue | Out-Null

    #Ensure it gets created before moving on
    while ((Get-AzureStorageAccount -StorageAccountName $account -WarningAction SilentlyContinue).StorageAccountStatus -ne "Created")
    {
      Start-Sleep 5
    }
    Write-Host "Storage Account Created"
  }
  else
  {
    Write-Host "Storage account already exists, skipping"
  }
}

function NewAzureStorageContainer
{
  param($name)

  #Check to see if the container already exists
  $container = Get-AzureStorageContainer -Name $name -ErrorAction SilentlyContinue

  #Create if it doesn't exist
  if(!($container))
  {
    Write-Host "Creating Storage Container..."
    New-AzureStorageContainer -Name $name -Verbose:$false | Out-Null
    Write-Host "Storage Container Created"
  }
  else
  {
    Write-Host "Storage container already exists, skipping"
  }
}

function NewAzureService
{
  param($name, $location)

  #Check to see if it already exists
  $service = Get-AzureService -ServiceName $name -ErrorAction SilentlyContinue -WarningAction SilentlyContinue -Verbose:$false

  #Create if it doesn't exist
  if(!($service))
  {
    Write-Host "Creating Cloud Service..."
    New-AzureService -ServiceName $name -Location $location -Verbose:$false -WarningAction SilentlyContinue | Out-Null
    Write-Host "Cloud Service Created"
  }
  else
  {
    Write-Host "cloud service already exists, skipping"
  }
}


#Import Azure PowerShell Module
Import-Module Azure

#Import Azure Settings File
Import-AzurePublishSettingsFile -PublishSettingsFile $azureSettingsFile | Out-Null

#Create Storage
NewAzureStorageAccount -account $azureName -location $azureLocation

#Set Azure Subscription with Storage
Set-AzureSubscription -CurrentStorageAccountName $azureName -SubscriptionName ((Get-AzureSubscription).SubscriptionName)

#Create Storage Container
NewAzureStorageContainer -name vhds

#Create Cloud Service
NewAzureService -name $azureName -location $azureLocation

#Set VM Size and Image
$vm = New-AzureVMConfig -Name $azureName -InstanceSize $azureInstanceSize -ImageName $azureImageName

#Set VM Credentials
Add-AzureProvisioningConfig -VM $vm -Windows -AdminUsername $adminUserName -Password $adminPassword

#Set VM Frontend Network Subnet, Static IP, and Public IP
Set-AzureSubnet -SubnetNames $azureFESubnetName -VM $vm
Set-AzureStaticVNetIP -IPAddress $azureFEStaticIP -VM $vm
Set-AzurePublicIP -PublicIPName $azureName -VM $vm

#Set VM Backend Network Subnet and Static IP
Add-AzureNetworkInterfaceConfig -Name $azureBESubnetName -SubnetName $azureBESubnetName -StaticVNetIPAddress $azureBEStaticIP -VM $vm

#Create the VM
New-AzureVM -ServiceName $azureName -VNetName $azureName -VM $vm
Hopefully this script can serve as an example to help automate the creation of such VMs in your environment.

