Showing SkyDrive storage in Windows Explorer
I got this tip from a colleague (David Weeks) and I thought I would share with you all on how to see your Windows Live SkyDrive storage in Windows Explorer, something I have tried and failed to do in the past.
1. Visit SkyDrive (https://www.skydrive.com) and login with your Live ID.
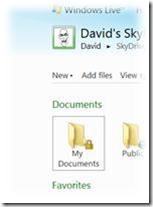
2. If you have not used SkyDrive before click on the My Documents folder.
3. Now look at the address bar. You should find your unique ID there in the URL (https://cid-xxxxxxxxxxxxxxx.skydrive.live.com - see the screenshot below; it’s in the greyed out area and is unique to you). Copy this ID to the clipboard, as we’ll need it shortly. Use the back button in IE if you don’t see the ID right away.

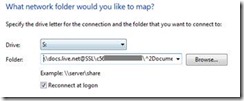
4. Now, open your Computer in Windows Explorer (either go Start menu / Computer, or just press WindowsKey +E to go straight there), and you’ll see “Map Network Drive”in the menu. Click that.
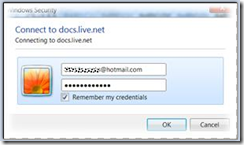
5.  In the new dialog box that choose your drive letter using the dropdown. I will be choosing S: for mine (Sky Drive). Now in the Folder field (just below the Drive dropdown) type, \\docs.live.net@SSL\your_skydrive_id\^2Documents (replacing “your_skydrive_id” with the ID you copied in Step 1). Press Finish and wait a little while, and you’ll get a logon box… enter your Windows Live ID and press OK. You won’t see all folders in your SkyDrive storage – you could try changing ^2Documents to the name of another folder name which you can see in the web view, if you want to upload to that too.
Hint: it’s also possible to browse straight to your SkyDrive storage without having to map a drive – if you simply paste \\docs.live.net@SSL\your_skydrive_id\^2Documents into the dialog at Start / Run (or WindowsKey+R), you can jump straight to the folder.
6.  You’ll now have mapped your Network Drive, and might notice that you have your Unique ID included in the name. So for security, just right mouse click on the name within Windows Explorer, choose rename from the drop down and call it anything you want.
Now that your Skydrive account is configured, you can copy all the documents you wish to upload to your Skydrive account to this newly created network drive. You can also create folders here, too, all of which will be Private by default. To change their sharing option log in to your Windows Live account using your browser and change it from there.
Of course, there are other ways to put stuff on SkyDrive. Windows Live Mesh can sync up to 5Gb of data from elsewhere, it is possible to drag & drop multiple files into the browser view, and it’s possible to save straight from within an Office 2010 app (eg in Word, go to Save & Send on the File menu, and choose Save to Web – see here ).
All of which proves, there are many ways to do the same thing. Choose whatever one works for you best…
Rob
Technorati Tags: Skydrive,Windows Live