Using Both Remote and Local Data in a LightSwitch Application
Hi. I’m Robert Green. You may remember me from such past careers as Developer Tools Product Manager/Visual Basic Program Manager at Microsoft and Sr. Consultant at MCW Technologies. After five and half years on “the other side” at MCW, I have returned to Microsoft. I am now a Technical Evangelist in the Developer Platform and Evangelism (DPE) group. I am focused on Visual Studio, including LightSwitch and the next version of Visual Studio. I am very happy to be back and very excited to be working with LightSwitch. This product is cooler and more powerful than many people realize and over the coming months, I will do my best to prove that assertion. Starting right now.
March 23, 2011: The original version of this was posted on January 5, 2011 and was based on Beta 1. I have updated this for Beta 2. I reshot all the screens and have made some changes to both the text and the narrative. I also added a section on the code you need to write to enable saving data in two different data sources.
In LightSwitch, you can work with remote data and with local data. To use remote data, you can connect to a SQL Server or SQL Azure database, to a SharePoint site, and to a WCF RIA service. If you use local data, LightSwitch creates tables in a SQL Server Express database. When you deploy the application, you can choose to keep this local data in a SQL Server Express database or use SQL Server and SQL Azure.
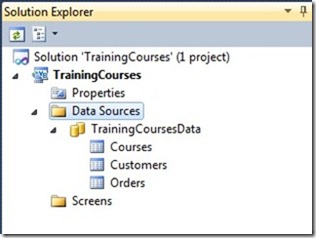
In an application, you can use data from one or all of these data sources. I’m currently building a demo that uses local and remote data. A sales rep for a training company wants an application to manage customers and the courses they order. This data already exists in a SQL Server database. So I attached to the Courses, Customers and Orders tables in the TrainingCourses database.
If you are new to LightSwitch, you can learn more about how I got to this point by checking out the How to: Connect to Data help topic.
Creating Relationships Between Local and Attached Data
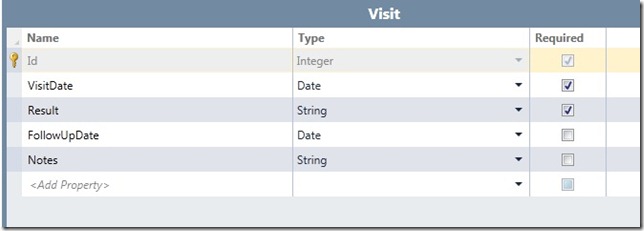
In addition to managing this information, I want to keep track of customer visits. I also want to keep notes on customers. If I owned the SQL Server database, I could just add a Visits table and then add a Note column to the Customers table. But I don’t own the database, so I will use local tables in my LightSwitch application. I right-click on Data Sources in the Solution Explorer and select Add Table. I then create the Visits table.
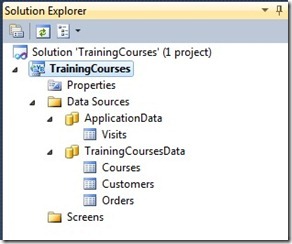
Notice that the remote data is in the TrainingCoursesData node and the local data is in the ApplicationData node.
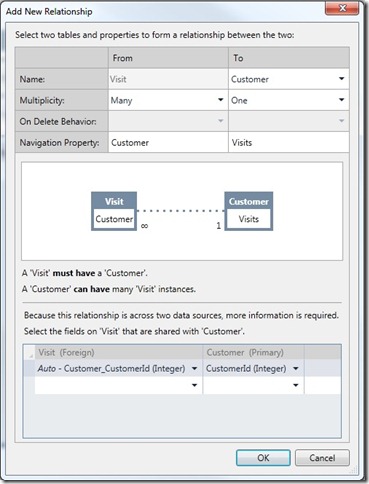
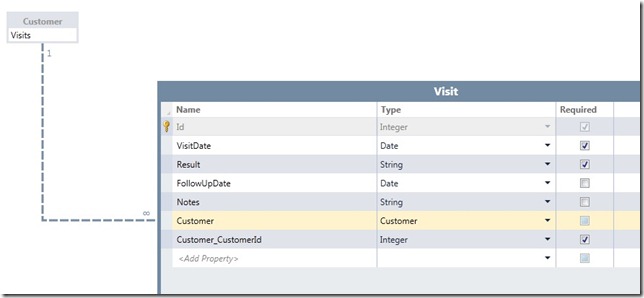
I need a one-to-many relationship between customers and visits, so I create that.
Notice that LightSwitch adds a Customer property to my Visits table. This represents the customer. It also adds the customer id (the Customer_CustomerId property),as a foreign key. I don’t want this property to show up on screens so I uncheck Is Visible On Screen in the Properties window.
Stop for a minute and consider the complete coolness of this. I just created a cross-data source relationship. I have a one to many relationship between customers in the remote SQL Server database and visits in my local SQL Server Express database. You can tell this is a cross-data source relationship because the line between the entities is dashed. In a future post, I will add SharePoint data to this application and have a relationship between SQL data and SharePoint data. Federating multiple data sources is a unique and compelling feature of LightSwitch.
I can now create a master-detail screen with Customers and Visits. I won’t discuss that here because Beth Massi covers that in episode 6 of her most excellent How Do I Video series.
What I want to talk about next is adding customer notes. I want the ability to add a note for each customer. My first thought is I will just add a Note property to the Customer entity. However, LightSwitch does not allow changing the schema of attached data sources, so the only thing I can do is add computed properties. I don’t want Note to be a computed property. I want it to be editable by the user. So I’ll create a local CustomerNotes table with a Note property.
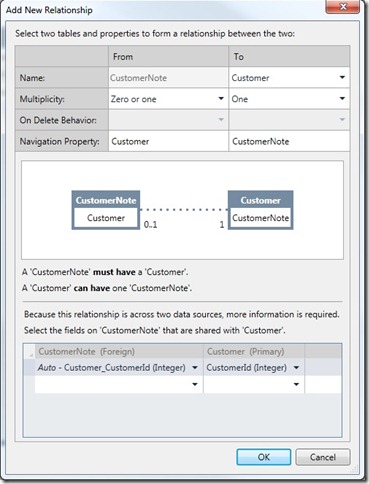
I will next create a relationship between Customers and CustomerNotes. I want this to be a one to one relationship. Each customer has one note. However, LightSwitch doesn’t support one to one relationships. So I will make this relationship Zero or one to one. Every note has a customer and each customer can have a note.
LightSwitch adds the foreign key, Customer_CustomerId to the CustomerNote entity. I don’t want to see that so I uncheck the Is Visible On Screen property.
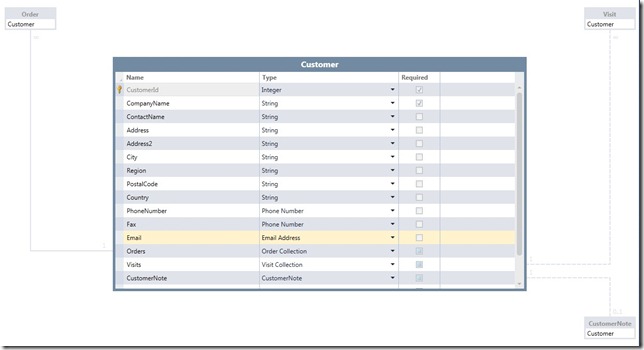
To review (and once again marvel at how easy it is to create federated relationships in LightSwitch, if I open the Customer entity, I see that it has a one to many relationship to Order in the same data source (indicated by a solid line), a one to many relationship to Visit in a different data source (dashed line) and a zero or one relationship to Note in a different data source (dashed line).
Adding Customer Notes for Both New and Existing Customers
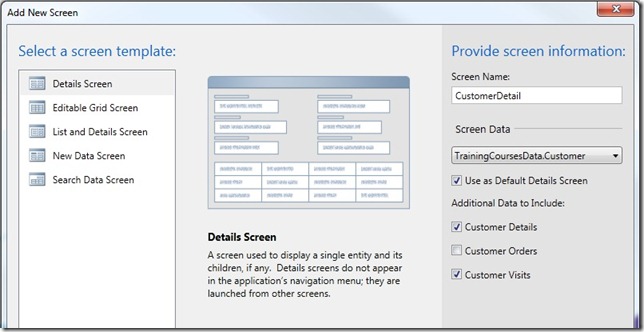
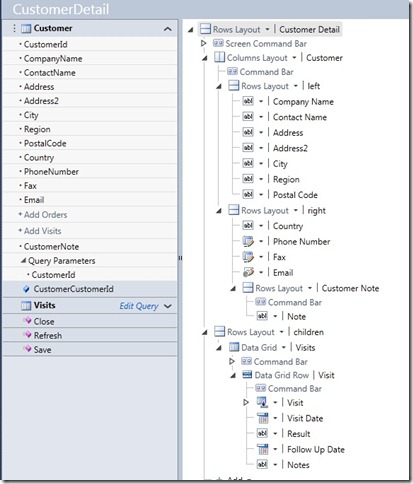
I have two screens in this application. CustomerList is a search screen that shows customers. CustomerDetail is my default detail screen for customers and it includes visits.
I have already created my relationships, so when I create this screen, all the information I want is there: customer detail, notes and visits.
Note that I am using CustomerDetail both for adding and editing customers. See episode 9 of the How Do I Video series to see how to do this.
The relationship between Customer and CustomerNote is One to Zero or One. I am going to effectively make this a One to One relationship by ensuring in code that customers always have a note. I will do this by automatically adding a note record for any customer that doesn’t already have one.
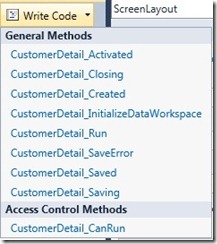
To make this happen for new customers, I add code to the Customer_Created method of the Customer entity:
 ' VB
Private Sub Customer_Created()
  Me.CustomerNote = New CustomerNote()
  Me.CustomerNote.Customer = Me
End Sub
// C#
partial void Customer_Created()
{
  this.CustomerNote = new CustomerNote();
  this.CustomerNote.Customer = this;
}
Me/this represents the customer. Since I added the relationship between customers and notes, the Customer class has a CustomerNote property, which represents the customer’s note. In this code, I set that to a new instance of the CustomerNote class. The Customer property of the CustomerNote class represents the customer to which each note belongs. I set that to Me/this and the new customer now has a related note.
I want this code to run for existing customers, but only if they don’t currently have a note. When the screen loads, I can check if an existing customer has a note. If not, I will create one. In the Beta 1 version of this post, I added code to the CustomerDetail_Loaded method. In Beta 2, this method no longer exists. Instead I will use the CustomerDetail_InitiallizeDataWorkspace method, which runs just before the screen data is retrieved.
 ' VB
Private Sub CustomerDetail_InitializeDataWorkspace(
            saveChangesTo As System.Collections.Generic.List(Of Microsoft.LightSwitch.IDataService))

  If Me.CustomerId <> 0 Then
    Me.Customer = Me.CustomerQuery
    If Me.Customer.CustomerNote Is Nothing Then<br>      Me.Customer.CustomerNote = New CustomerNote()      Me.Customer.CustomerNote.Customer = Me.Customer      Me.Customer.CustomerNote.Note =

 "Empty note"
End If
  Else
    Me.Customer = New Customer
  End If
End Sub
 // C#
partial void CustomerDetail_InitializeDataWorkspace(List<IDataService> saveChangesTo)
{
  if (this.CustomerId != 0)
  {
    this.Customer = this.CustomerQuery;
    if (this.Customer.CustomerNote == null)<br>    {      this.Customer.CustomerNote = new CustomerNote();      this.Customer.CustomerNote.Customer = this.Customer;      this.Customer.CustomerNote.Note = "Empty note";<br>    }


    else
    {
      this.Customer = new Customer();
    }
  }
}
In this code, Me/this represents the screen. Me/this.CustomerId represents a screen level property. If it has a value, then this is an existing customer. If it has no value, this is a new customer. Again, see episode 9 of the How Do I Video series for the full details behind this. The code in bold adds the customer note if necessary.
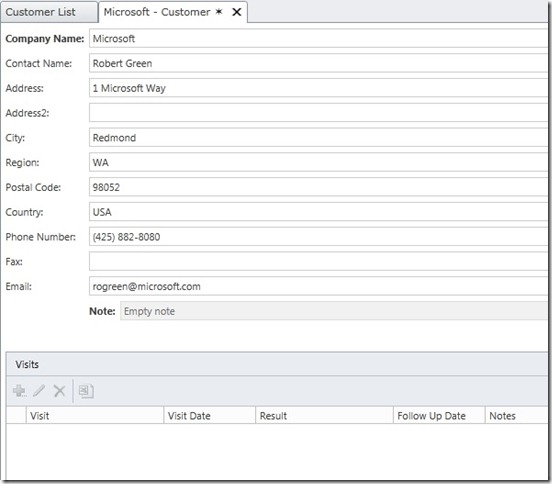
When I run this and look at the detail for a customer, I see that the customer has an empty note if one didn’t exist before. I also see a grid for visits. However, notes and visits are read-only. I can’t edit the note and I can’t add, edit or delete visits. This is new behavior in Beta 2. In Beta 1 this data was read/write.
In the Beta 1 version of this post, I noted the following comment from The Anatomy of a LightSwitch Application Series Part 2 – The Presentation Tier:
In Beta 1, the screen's Save command operations over N data sources in an arbitrary order. This is not the final design. LightSwitch does not enforce correct ordering or updates for multiple data sources, nor do we handle compensating transactions for update failures. We are leaning toward selecting a single updatable data source per screen, where all other data sources represent non-updatable reference data. You can expect to see changes in after Beta 1.
Well, this change did indeed happen. Starting with Beta 2, the default is now one editable data source per screen. In my example, customer data is editable, while notes and visits are not, since they are in a different data source. LightSwitch has no knowledge of which order to save in, so rather than risk “breaking” your data, the default is to prohibit you from saving to multiple data sources. I can override this by telling LightSwitch to enable editing from multiple data sources. To do that, I will add the following code to the CustomerDetail_InitializeDataWorkspace method:
 ' VB
saveChangesTo.Add(Me.DataWorkspace.ApplicationData)
saveChangesTo.Add(Me.DataWorkspace.TrainingCoursesData)
 // C#
saveChangesTo.Add(this.DataWorkspace.ApplicationData);
saveChangesTo.Add(this.DataWorkspace.TrainingCoursesData);
I then need to tell LightSwitch to save the changes to both data sources. To do that, I add the following code to the CustomerDetail_Saving method:
 ' VB
Private Sub CustomerDetail_Saving(ByRef handled As Boolean)
  Me.DataWorkspace.TrainingCoursesData.SaveChanges()
  Me.DataWorkspace.ApplicationData.SaveChanges()
  handled = True
End Sub

// C#
partial void CustomerDetail_Saving(ref bool handled)
{
  this.DataWorkspace.TrainingCoursesData.SaveChanges();
  this.DataWorkspace.ApplicationData.SaveChanges();
  handled = true;
}

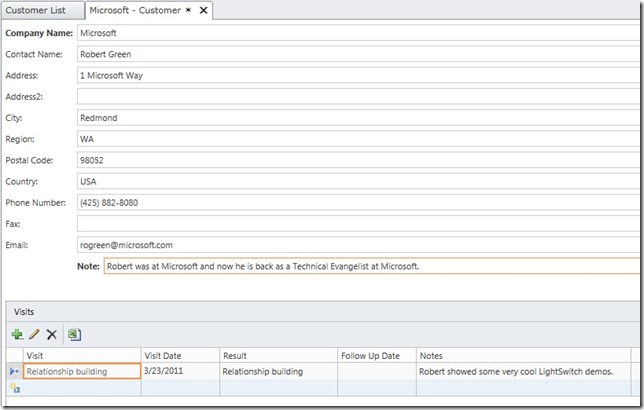
Now when I run this application, I can edit all of the customer’s data and I can save it as well.
It is important to realize that this scenario has risk. The saving of data to the remote SQL Server database and to the local SQL Server Express database is not transacted. So there is the risk of you adding a new customer, a note and a visit all at the same time, pressing Save and then saving only the notes and the visit, but not the customer.
Summary
With two new tables and a little bit of code, I have essentially added a table and a table column to a remote database. Nice! I can work with additional data even without the ability to add it to the main database.
Of course, I do need to remember that right now, the notes and visits data only lives on my computer. Nobody else can see the customer notes and visits I add and I can’t see the notes and visits others add. And my notes and visits aren’t backed up when the SQL Server database is backed up. And I don’t have transactional edits either.
But I have added a very cool feature to my application, so I am happy!
