OData Apps in Update 2–Querying data from Stack Overflow
OData Services
I want a way to keep track of questions that people have about LightSwitch. And I want it to primarily use it on my mobile devices.
Here’s what we got to work with to make this happen:
- LightSwitch can attach to OData Services and use them just like it would any other Data Source
- Nothing new here, we’ve been doing this since Visual Studio 2012 was released last year.
- Stack Overflow has plenty of posts about Visual Studio LightSwitch and they have an OData Service for us to attach to
- We have an HTML Client now in LightSwitch Update 2 that’s going to make all of this into an awesome user experience
Let’s make this
So at the end of the day, we are going to have an LightSwitch HTML Client that will display posts from Stack Overflow about LightSwitch.
Let’s get started with the basics here of attaching to the Data Source:
Launch Visual Studio 2012 Update 2. Create a new project, and select the LightSwitch HTML Application (I’m using C#, but you can use VB.NET if you want).
Name your project “StackOverflow”.
Now it’s time to attach to our Stack Overflow OData Data Source. Click the “Attach to external Data Source” link on the Designer (you can also right-click on the Server Folder in the Solution explorer and select “Add Data Source”).
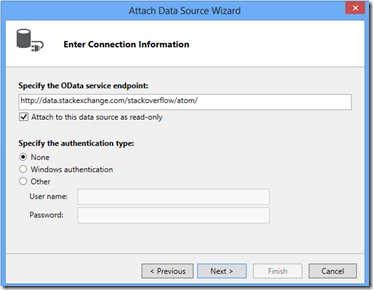
Select the OData Service icon and hit Next. Specify the OData service endpoint as: https://data.stackexchange.com/stackoverflow/atom/.
We’ll attach to this data source as read only, since we don’t need to do any updates against this data source, just reads.
The authentication type can be set to “None”.
-Your attach data source wizard should look like this:
Hit Next and select the Posts and the Comments entity.
That’s it, hit Finish and LightSwitch will import the entities into our application so that we can interact with the entities
Make a basic query for our Post entity:
I’d like for us to be able to search through all of the Posts to find ones that are related to LightSwitch. Also I’d like to do some basic sorting of the Posts so that they are sorted by date, and that only posts that are “Questions” will be displayed.
In the Solution Explorer - Right click on our Posts entity and select “Add Query”. Change the name of our Query to be “PostQuery”.
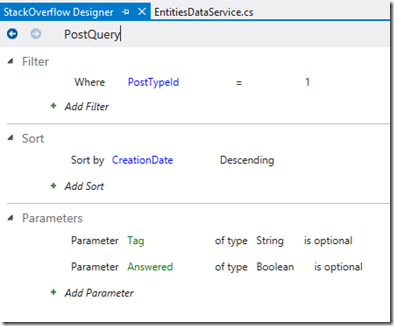
We’ll add a couple Parameters to our query first:
1) First parameter is “Tag” and is of type “String”
2) The second parameter is “Answered” and is of type “Boolean”
For both parameters: edit their properties so that the “Is Optional” field is checked
Now add a Sort to the query, sort on “CreationDate – Descending”. This way we’ll see all the newest posts listed first.
One last thing to do to our query - create a Filter. Add a filter for “Where PostTypeId = 1”. This will only show posts that are “Questions”.
FYI - I figured this out by looking through the data on the Stack Overflow OData Service until I was convinced that “Questions” (NOT answers) were marked as PostTypeId=1
When we are all done, we should have a query that looks like:
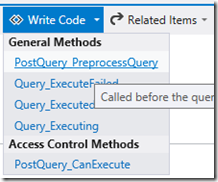
Last thing to do here, we need to write a very small amount of code for our Query. Select the “Write Code” dropdown and pick the “PostQuery_PreprocessQuery” method.
This method is called before our query executes, and we’ll want to use this method to filter on Posts that have been “Answered” or not depending upon what our user wants to see (we’ll give the user to ability to toggle on this behavior when we make our screen later).
We also use this method to search on the Tag that was entered by the user of our app. If a user enters a Tag, we will convert it to lowercase (since all Stack Overflow tags appear to be lowercase), and then search on all posts containing that Tag.
Your code should look like this:
 /// <summary>
/// Called right before the query is processed
/// </summary>
partial void PostQuery_PreprocessQuery(string Tag,
    bool? Answered,
    ref IQueryable<Post> query)
{
    // Convert our to TAG parameter to lowercase.
    //It seems all Stack Overflow tags are lowercase
    if (!String.IsNullOrEmpty(Tag))
    {
        Tag = Tag.ToLower();
    }

    // Check to see if the user only wants to see "Answered" Posts,
    // or posts that are still "Unanswered"
    if (Answered == true)
    {
        // Check to see if a TAG was specified
        if (!String.IsNullOrEmpty(Tag))
        {
            // Select all posts that have been answered
            // and contain the specified post TAG
            query = query.Where(x => x.Tags.Contains(Tag)
                && x.AcceptedAnswerId > 0);
        }
        else
        {
            // Select all posts that have been answered
            query = from x in query where x.AcceptedAnswerId > 0 select x;
        }
    }
    else
    {
        // Check to see if a TAG was specified
        if (!String.IsNullOrEmpty(Tag))
        {
            // Select all posts that have NO accepted answer
            // and contain the specified post TAG
            query = query.Where(x => x.Tags.Contains(Tag)
                && x.AcceptedAnswerId == null);
        }
        else
        {
            // Select all posts that have NO accepted answer
            query = from x in query where x.AcceptedAnswerId == null select x;
        }
    }
}
One more step to go - Make a couple of HTML Screens:
The last thing we need to do is make a simple “Browse” HTML screen that will show us all the posts, and let our users search on the posts. And to make a simple “View” screen so that a user can get additional detail.
Let’s make our browse screen first:
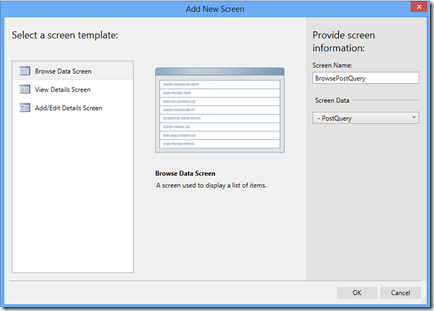
In the Solution Explorer – right click the HTMLClient folder and select “Add New Screen”.
Make a “Browse Data Screen” around the PostQuery we just created above, like so:
Click OK to have our screen generated.
You should notice that our 2 Parameters from our “PostQuery” have already been added to the top of our screen, we’ll need to change the control type on both of these so that they are editable. Right now they are just Text.
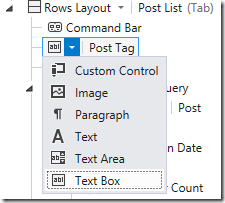
In the Post Tag control in the screen designer – change the control type to “Text Box” like this:
By changing this to a text box, we’ll allow our users to type a Tag in here which LightSwitch will then search on.
Now in the Post Answered control – change the control type to “Flip Switch”. This is basically a “Boolean” control that will allow the user to toggle whether or not we want “Answered/Unanswered” Posts.
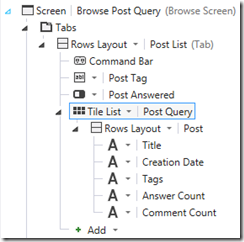
I also changed my “List” layout to a “Tile List”, and then removed fields I didn’t care about, you don’t have to do this but this is what mine looks like:
A control’s label won’t show up by default for our HTML Screen, but I felt like adding labels for a few of my controls (but, again, you don’t have to).
The way that you do this is select the control, and go to it’s Properties. Change the “Label Position” value from “None” to “Top”, like this:
You can F5 at this point if you’d like, and verify the basic work we’ve done so far.
Last thing - let’s make our View screen:
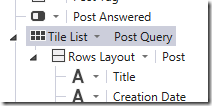
We’ll make a pretty cool View screen now that will allow our users to dig deeper into the post data. In our Browse Post Query screen designer, select the “Tile List” control like this:
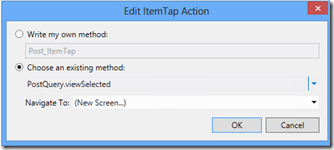
Now let’s edit a property on this control, I want to add an Item Tap action that will open up our View Screen, so in the Properties window click on the “Item Tap - None” link:
“But we don’t even have our View screen made yet!” Not to worry, this brings up a nice dialog which gives us the ability to make our View Screen on the fly.
We do this by selecting “Choose an existing method: PostQuery.viewSelected”, like this:
Hit OK, and the Add New Screen dialog pops up (very cool, IMO).
Select the defaults, but also check the “Post Comments” checkbox and the “Post Children”, because we’ll pull in this data as well into our screen. The Comments data is obviously comments about the Post. And the Children data are responses or answers to the Post.
Click OK
We now have the View Screen up in our Designer. We’re going to make a few superficial changes here to make stuff look nice before we are done.
Change the “Rows Layout – Children (Tab)” control’s display name to “Answers”.
Under the Details (Tab) - I deleted my Rows Layout –right control completely and all the controls under it.
Under both the Comments (Tab) and the Answers (Tab), I switched my “Summary” control over to a “Rows Layout” control and then removed controls I didn’t care about from that list.
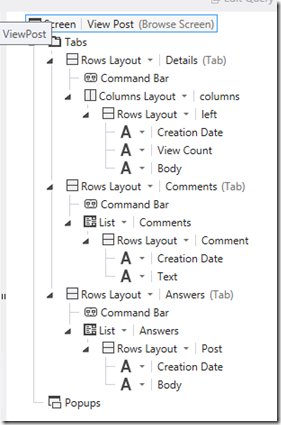
This is what my View screen currently looks like:
F5 it and check out both our screens.
At this point, there are 2 things I’d like to fix up:
1) I’d like the Body of the post not to just be some HTML, but to be actually rendered into our HTML page so that it’s easier to read.
2) I’d like to have a hyperlink back to the original Post on Stack Overflow, so let’s do that now.
Delete the “Body” control from both the Details (Tab) and the Answers (Tab).
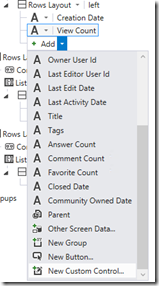
Under the Details (Tab), let’s Add a “New Custom Control” like this:
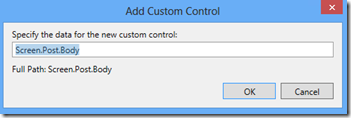
Select the Body data for the control - Screen.Post.Body:
The control is added now to our screen, but we need to populate it with data correctly, so click on the “Edit Render Code” link in the Properties pane of our new control.
Paste in this JavaScript code:
-
-
-
 var myBody = contentItem.data.Body;
var myBodyHtml = $(myBody);
myBodyHtml.appendTo($(element));
-
-
All this code does, is take the “Body” data from the post, which is just raw HTML, and append it to our custom control. So it literally get’s embedded into our HTML Page, and should render very nicely.
Do the same thing under the Answers (Tab) – add a New Custom Control right below the “Creation Date” control.
This time, for the screen data however we want – “Screen.Children.SelectedItem.Body” – this will give us the “Body” data for the Children posts.
Click the “Edit Render Code” link for this control, and paste the same code into this method. The last thing we need – add a hyperlink back to the Stack Overflow website’s original post link.
Under the Details (Tab), add a New Custom Control. When specifying the data – just use the default “Screen” value for the data.
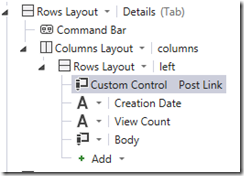
Rename the control to “Post Link”, you should have something like this:
Click the Edit Render Code link for this control, and paste in the below code:
-
-
 var postId = contentItem.data.Id;
var postUrl = "https://stackoverflow.com/questions/" + postId;
var postUrlElement = $('<a href=\"' + postUrl + '\">Post Link</a>');
postUrlElement.appendTo($(element));
-
All we are doing here with this JavaScript, is creating an HTML url link that points us back to the original post on Stack Overflow, and then we add that HTML to our screen.
DONE!
Just for good measure, I’ve published the project up into Azure, and you can view it here:
That’s it. I’ll get the code posted up on MSDN Code Gallery and will share that out.
I hope this was cool and helpful. Let me know your thoughts!
Thanks all – Matt Sampson


