Ask Learn
Preview
Ask Learn is an AI assistant that can answer questions, clarify concepts, and define terms using trusted Microsoft documentation.
Please sign in to use Ask Learn.
Sign inThis browser is no longer supported.
Upgrade to Microsoft Edge to take advantage of the latest features, security updates, and technical support.
Note
Access to this page requires authorization. You can try signing in or changing directories.
Access to this page requires authorization. You can try changing directories.
IMPORTANT UPDATES.
July 18, 2016, Ionic 2 (Beta 10) Visual Studio 2015 Templates
July 1, 2016 Ionic 2 Beta 10.
Although Ionic 2 is still in beta, the team working on Tools for Apache Cordova is so excited that we want you to be able to start building Ionic 2 apps in Visual Studio today. In this post I will walk through some tips and tricks you can use to avoid common problems working with Ionic 2 in Visual Studio.
This article targets Ionic 2 Beta 6, based on Angular 2 Beta 15. Using Ionic 2 CLI Beta 25
Please note that this post may be outdated once Ionic releases a new version
The first step will be to obtain the latest Ionic 2 beta version:
npm install -g ionic@beta
Then you will need to create the project.
ionic start MyIonic2App --v2 --ts --template sidemenu --skip-npm
There are some parameters you will want to use:
--v2 specifies that you want an Ionic 2 project--ts specifies that you want to use TypeScript (if you do not specify --ts the project will be created with ES6, and this is not supported by VS yet)--template sidemenu specifies the template you want to use, in this case we will be using the sidemenu template--skip-npm disabled the npm package restoreAs you can see in your console, ionic is not only creating all the project files, but it's also Installing all the npm packages specified in package.json. You need to understand that ionic will reuse the same npm version you have installed globally (see below a note about node versions in Visual Studio).
Ionic 2 comes with a set of predefined Gulp tasks that will help you to process the .ts and .sass files from the app folder and generate the output in the www/build folder. So, we need to customize the Visual Studio build process to set your project up with Visual Studio’s building and debugging functionalities.
gulpfile.js file within Visual Studio by adding as the first line in the file: var Promise = require('es6-shim').Promise;--skip-npm you will need to delete the node_modules folder. In the command line, navigate to the root of your project and delete your current node_modules using the command rd /s /q node_modules Since Visual Studio uses its own version on npm, we want to remove the ones generated during Ionic2 project creation.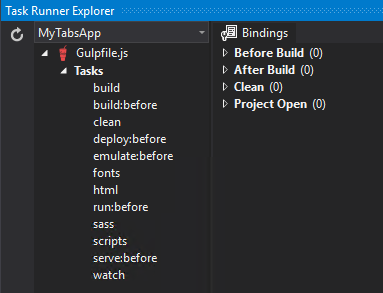
Note that only the most recent versions of Ripple will support Angular2. If you have used Ripple before you should delete the cordova cache and build again. More info in the TACO Developer blog
There are some cases where the Task Runner Explorer can't list the gulp tasks, and fail.
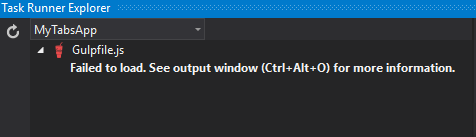
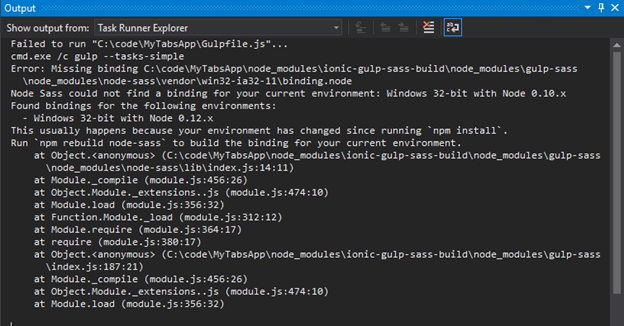
To see the error details you need to go to the Output Window and select the Task Runner Explorer Log.
To solve this issue, delete the node_modules folder and try to restore it again from Visual Studio
Unfortunately, you can’t use Ionic Serve to debug in the Browser at the same time as Visual Studio. Ionic serve uses a build process that creates files in node_modules\ that is incompatible in Visual Studio.
So, if you want to use Visual Studio Intellisense, but not to build and deploy, here is how you build your project from the command line:
node_modules\.bin\gulp build to get your output in your www foldernode_modules\.bin\gulp watch to get your output in your www folder with live reloadionic serve will build, monitor for changes, and also launch your default browserFrom here you can import the project in Visual Studio using the File->New->Project from existing code (or my tool ocpief), and can start editing your project.
As any other JavaScript tooling Node and NPM becomes the de-facto standard to get your JavaScript dependencies, however there are some limitations based on the version of NPM you are running.
If you installed TACO (Tools for Apache Cordova), you will have a globally installed version of node 0.12.2 and NPM 2.7.4. However the NPM Dependency Manager and the Task Runner Explorer will use node 0.10.31 and NPM 1.4.9. You can find these versions here:
C:\Program Files (x86)\Microsoft Visual Studio 14.0\Common7\IDE\Extensions\Microsoft\Web Tools\External\
UPDATE. If you installed the new Web Tools version (as described here), your node version will be 5.4.1 and npm 3.3.4, both located here:
C:\Program Files (x86)\Microsoft Visual Studio 14.0\Web\External
You can configure the npm package restore and task runner explorer to use a custom version of node, as described here. In this case you won't need to configure the ES6-Promises, but if you go this route, remember that you should delete and restore your node_modules folder every time you change your node version.
Ask Learn is an AI assistant that can answer questions, clarify concepts, and define terms using trusted Microsoft documentation.
Please sign in to use Ask Learn.
Sign in