Taxonomy Picker in SharePoint Provider-Hosted App
One of the exciting announcements at the 2014 SharePoint Conference, was the general availability the Office App Model Samples (OfficeAMS) on Codeplex. OfficeAMS is grass-roots effort by volunteer Microsoft developers to provide code samples using the Office/SharePoint app model that address common customization scenarios. The samples in OfficeAMS include many scenarios that the SharePoint community felt was impossible or challenging to deliver without full-trust code. It includes almost 30 complex scenarios such as site provisioning, branding, templating, profile sync, UX controls, and many more. Vesa Juvonen has a more comprehensive write-up of OfficeAMS on his blog (Vesa was also a significant contributor to the effort).
One of the scenarios that I contributed in OfficeAMS is a Taxonomy Picker control for provider-hosted apps. I used this control in several SPC sessions and was surprised by the number of people interested in using it in their apps. In this post, I will detail this Taxonomy Picker control and how to use it in your apps. I’ve also included a video that outlines the use of the control.
[View:https://www.youtube.com/watch?v=sgTEAVBcrK0]
Setup
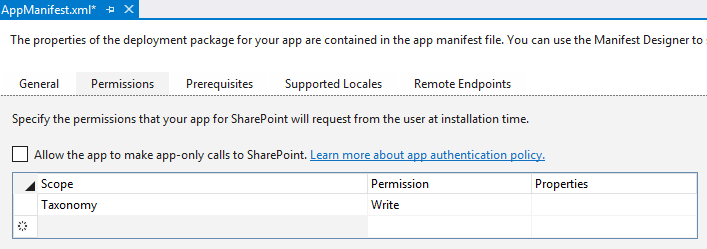
The taxonomy picker connects to TermSets in the Managed Metadata Service in SharePoint. To do this from an app, the app needs a minimum of Read permissions to the Taxonomy scope. The app needs Write permissions to the Taxonomy scope if you plan to use “Open” TermSets that users can create Terms in (aka – “Folksonomies”).
Taxonomy scoped Permissions in AppManifest.xml
The app project also needs to include several script and style files from the OfficeAMS download. These are available in the Contoso.Components.TaxonomyPicker project. The important files are as follows:
- Scripts\taxonomypickercontrol.js
- Scripts\taxonomypickercontrol_resources.en.js
- Styles\taxonomypickercontrol.css
- Styles\Images (entire folder of images)
| OPTIONAL STEPS: If you plan to use the taxonomy picker in conjunction with ListItems in SharePoint (ex: read/write items from lists with managed metadata columns), you should also add a reference to the Microsoft.SharePoint.Client.Taxonomy.dll assembly, which makes it easy to work with TaxonomyFieldValue and TaxonomyFieldValueCollection values. The OfficeAMS project also has a TaxonomyPickerExtensions.cs file with extension methods for working with these values and the taxonomy picker. Again, the assembly reference and extension class are optional steps for working with ListItems that have managed metadata columns and are explained below. |
The taxonomy picker is a client-side control, which uses the client-side object model (CSOM) to query the Managed Metadata Service. To do this, the app needs to reference a number of JavaScript files from SharePoint, such as sp.runtime.js, sp.js, sp.requestexecutor.js, init.js, and sp.taxonomy.js. The sp.taxonomy.js file allows the app to make calls into the Managed Metadata Service. I like to use Microsoft’s AJAX library to load these scripts dynamically using the getScript extension. This library is automatically added to ASP.NET pages with a ScriptManager control. Below is the complete block of script I use to load the appropriate files for both the taxonomy picker and the SharePoint client chrome control:
Dynamically Loading Scripts
//Wait for the page to load$(document).ready(function () { //Get the URI decoded SharePoint site url from the SPHostUrl parameter. var spHostUrl = decodeURIComponent(getQueryStringParameter('SPHostUrl')); var appWebUrl = decodeURIComponent(getQueryStringParameter('SPAppWebUrl')); var spLanguage = decodeURIComponent(getQueryStringParameter('SPLanguage')); //Build absolute path to the layouts root with the spHostUrl var layoutsRoot = spHostUrl + '/_layouts/15/'; //load all appropriate scripts for the page to function $.getScript(layoutsRoot + 'SP.Runtime.js', function () { $.getScript(layoutsRoot + 'SP.js', function () { //Load the SP.UI.Controls.js file to render the App Chrome $.getScript(layoutsRoot + 'SP.UI.Controls.js', renderSPChrome); //load scripts for cross site calls (needed to use the people picker control in an IFrame) $.getScript(layoutsRoot + 'SP.RequestExecutor.js', function () { context = new SP.ClientContext(appWebUrl); var factory = new SP.ProxyWebRequestExecutorFactory(appWebUrl); context.set_webRequestExecutorFactory(factory); }); //load scripts for calling taxonomy APIs $.getScript(layoutsRoot + 'init.js', function () { $.getScript(layoutsRoot + 'sp.taxonomy.js', function () { //TAXONOMY PICKERS READY TO BIND }); }); }); });}); |
Binding the Taxonomy Picker
After the setup steps, the taxonomy picker is extremely easy to implement. All you need is a hidden input control in html and one line of JavaScript to convert the input into a taxonomy picker:
Binding the Taxonomy Picker
<input type="hidden" id="taxPickerKeywords" /> //bind the taxonomy picker to the default keywords termset$('#taxPickerKeywords').taxpicker({ isMulti: true, allowFillIn: true, useKeywords: true }, context); |
The taxpicker extension takes two required parameters...the options for the taxonomy picker and the SharePoint client context object (SP.ClientContext). The taxonomypicker.js version I’ve attached also has a third optional parameter for a value changed callback (not in OfficeAMS yet). Below is a table that details the options you can pass into the taxpicker extension and some examples of bindings:
Parameters
| options | The first parameter of the TaxonomyPicker sets the options for the control. The properties that can be set include:
|
| context | The second parameter is an initialized SP.ClientContext object |
| changed callback | The third parameter is an optional value changed callback delegate to provide events when the value of the taxonomy picker changes |
Examples of Taxonomy Picker Bindings
//bind the taxonomy picker to the default keywords termset$('#taxPickerKeywords').taxpicker({ isMulti: true, allowFillIn: true, useKeywords: true }, context); //Single-select open termset field (TODO: change the GUID to a termset id from your deployment)$('#taxPickerOpenSingle').taxpicker({ isMulti: false, allowFillIn: true, termSetId: 'ac8b3d2f-37e9-4f75-8f67-6fb8f8bfb39b' }, context); //Multi-select closed termset field (TODO: change the GUID to a termset id from your deployment)$('#taxPickerClosedMulti').taxpicker({ isMulti: true, allowFillIn: false, termSetId: '1c4da890-60c8-4b91-ad3a-cf79ebe1281a' }, context); //Use default Hashtags termset and limit the suggestions to 5 and value changed callback$('#taxPickerHashtags').taxpicker({ isMulti: true, allowFillIn: true, useHashtags: true, maxSuggestions: 5 }, context, function() { alert('My value changed'); }); |
You can find the ID of a TermSet by selecting the TermSet in the Term Store Manager. The Term Store Manager is exposed to site collection administrators within s site collection or from Tenant/Central Administration.
Getting TermSet ID from Term Store Manager

Reading and Writing Values
If you want to work with the taxonomy picker in .NET, you need to follow the optional steps in the setup section above to include the Microsoft.SharePoint.Client.Taxonomy reference and extension class. You should also change the hidden fields to include the attribute runat=”server”. The taxonomy picker control can be set by initializing the value of the hidden field with JSON in the following format [{"Id":TermID, "Name": TermLabel}] (ex: [{"Id":"a8ff0f61-2c10-4add-8307-cb1712703887", "Name": "Exchange"}]). The TaxonomyPickerExtensions.cs extension class includes extension methods for converting TaxonomyFieldValue and TaxonomyFieldValueCollection objects into this JSON format:
Setting Taxonomy Picker Value from .NET
protected void Page_Load(object sender, EventArgs e){ //The following code shows how to set a taxonomy field server-side var spContext = SharePointContextProvider.Current.GetSharePointContext(Context); using (var clientContext = spContext.CreateUserClientContextForSPHost()) { var list = clientContext.Web.Lists.GetByTitle("TaxTest"); var listItem = list.GetItemById(1); clientContext.Load(listItem); clientContext.ExecuteQuery(); taxPickerOpenSingle.Value = ((TaxonomyFieldValue)listItem["OpenSingle"]).Serialize(); taxPickerClosedMulti.Value = ((TaxonomyFieldValueCollection)listItem["ClosedMulti"]).Serialize(); }} |
The taxonomy picker will store the selected terms in the hidden field using JSON string format. These values can be accessed by other client-side scripts or server-side following a post. The JSON will include the Term Name, Id, and PathOfTerm (ex: World;North America;United States). JSON.parse can be used client-side to convert the hidden input’s value to a typed object and any number of server-side libraries can be used (ex: JSON.net).
Conclusion
Building in the SharePoint app model does NOT mean you have to compromise on user experience. I hope this taxonomy picker helps illustrate that. You can get the taxonomy picker and many other code samples in the Office App Model Samples on Codeplex.
Code sample from blog: TaxonomyPickerSample.zip