How to Create Nicely Formatted Directions in Bing Maps Windows Store apps (.NET)
Not long after the Bing Maps Windows Store apps SDK was first released we published a blog post on how to calculate and display routes. We created a simple input form to allow the user to enter a start and end location and then displayed the route instructions using a ListBox. This works fine, however the directions in the Maps app in Windows 8 have a lot more options in the input form, and the route instructions have nice turn-by-turn icons. Wouldn’t it be nice if we could have nice looking directions in our app or better yet if we didn’t have to directly access the Bing Maps REST services to calculate our route? We could have our app launch the Maps app as described in this other blog post, but this takes the user away from our app. In this blog post we are going to take a look at how we can create a similar user experience for directions in our own app much easier than the original post we published.
With the release of the Bing Maps Windows Store Apps SDK for Windows 8.1 last July our development team added a DirectionsManager to the map to make it easy to calculate directions from code without having to use the REST services directly. Recently I came across a couple hidden gems in the DirectionsManager: The DirectionsInputView and RouteSummaryView properties. These two properties are UIElements that create the nice input form and route instructions that are in the Maps app. We can use these to greatly simplify the development of our application.
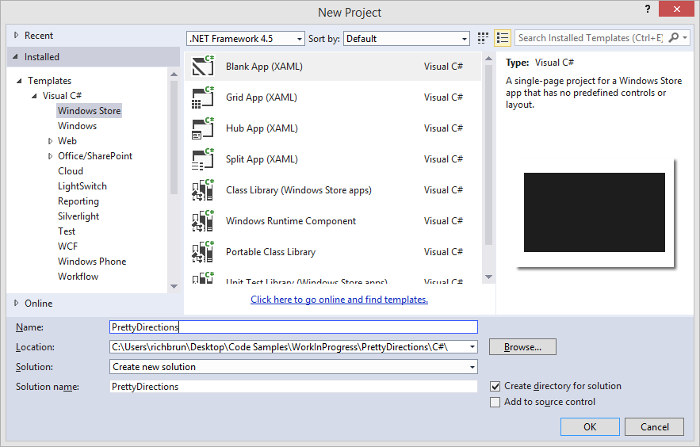
To get started, open Visual Studio and create a new project in C#. Select the Blank App template, call the application PrettyDirections, and then press OK.
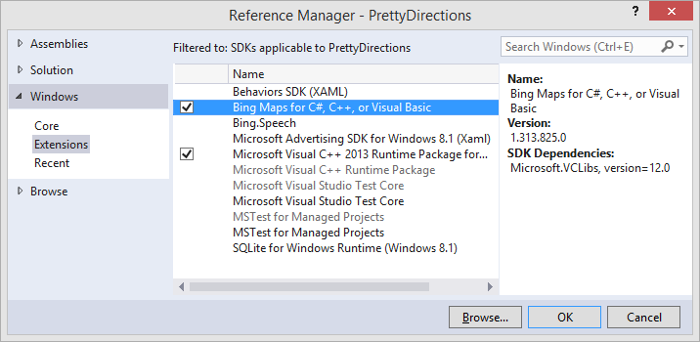
Next, add a reference to Bing Maps SDK. Right click on the References folder and press Add Reference. Select Windows → Extensions, and then select Bing Maps for C#, C++ and Visual Basic. If you do not see this option, be sure to verify that you have installed the Bing Maps SDK for Windows Store apps. While you are here, also add a reference to the Microsoft Visual C++ Runtime Package, as this is required by the Bing Maps SDK when developing using C# or Visual Basic. Press OK.
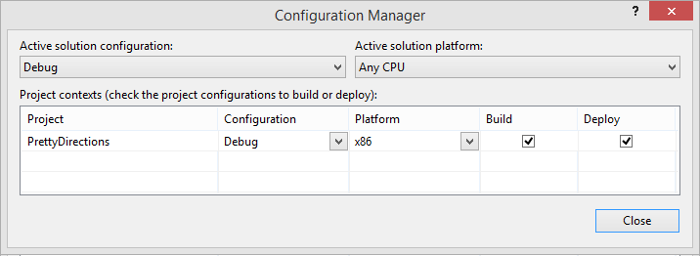
In Solution Explorer, set the Active solution platform in Visual Studio by right clicking on the Solution folder and selecting Properties. Select Configuration Properties → Configuration. Find your project and under the Platform column, set the target platform to x86, and press OK.
Now open the MainPage.xaml file and update the XAML to the following.
<Page
x:Class="PrettyDirections.MainPage"
xmlns="https://schemas.microsoft.com/winfx/2006/xaml/presentation"
xmlns:x="https://schemas.microsoft.com/winfx/2006/xaml"
xmlns:local="using:PrettyDirections"
xmlns:d="https://schemas.microsoft.com/expression/blend/2008"
xmlns:mc="https://schemas.openxmlformats.org/markup-compatibility/2006"
xmlns:m="using:Bing.Maps">
<Page.BottomAppBar>
<AppBar>
<StackPanel HorizontalAlignment="Right">
<AppBarButton Label="Directions" Tapped="ShowDirectionsPanel_Tapped">
<AppBarButton.Icon>
<FontIcon Glyph=""/>
</AppBarButton.Icon>
</AppBarButton>
</StackPanel>
</AppBar>
</Page.BottomAppBar>
<Grid Background="{ThemeResource ApplicationPageBackgroundThemeBrush}">
<m:Map Name="MyMap" Credentials="YOUR_BING_MAPS_KEY"/>
<Grid Name="DirectionsPanel" Background="White" Width="350" Margin="10,50,0,50" HorizontalAlignment="Left" Visibility="Collapsed">
<Grid.RowDefinitions>
<RowDefinition Height="75"/>
<RowDefinition Height="*"/>
</Grid.RowDefinitions>
<Grid Background="DimGray">
<TextBlock Name="ToLocation" FontSize="14" FontWeight="Bold" Margin="20"/>
<Button Content="X" Margin="5" HorizontalAlignment="Right" VerticalAlignment="Top" Tapped="CloseDirections_Tapped"/>
</Grid>
<ScrollViewer Name="Instructions" Grid.Row="1"/>
</Grid>
</Grid>
</Page>
This will add a button to the bottom app bar to open the directions input form, a map, and a panel for displaying the directions. When the app loads we create a SettingsFlyout control that contains the DirectionsInputView from the directions manager. We will also set the content of our Instructions ScrollViewer to the RouteSummaryView of the of the direction manager. To do this open the MainPage.xaml.cs file and update it with the following code.
C#
 using Bing.Maps.Directions;
using Windows.UI;
using Windows.UI.Xaml.Controls;
using Windows.UI.Xaml.Input;
using Windows.UI.Xaml.Media;

namespace PrettyDirections
{
    public sealed partial class MainPage : Page
    {
        private SettingsFlyout directionsInputFlyout;

        public MainPage()
        {
            this.InitializeComponent();

            var directionsManager = MyMap.DirectionsManager;

            //Get the directions input panel and set the width and horizontal position
            var directionsInput = directionsManager.DirectionsInputView;

            directionsInput.Width = 340;
            directionsInput.HorizontalAlignment = Windows.UI.Xaml.HorizontalAlignment.Center;

            //Create a flyout and add the directions input panel to it.
            directionsInputFlyout = new SettingsFlyout()
            {
                Background = new SolidColorBrush(Colors.DimGray),
                Content = directionsInput,
                Title = "Directions"
            };

            //Add the route summary to the instructions panel
            Instructions.Content = directionsManager.RouteSummaryView;

            //Attach an event to show the instructions panel when the route changes.
            directionsManager.ActiveRouteChanged += DirectionsManager_ActiveRouteChanged;
        }

        private void ShowDirectionsPanel_Tapped(object sender, TappedRoutedEventArgs e)
        {
            //Close bottom appbar
            this.BottomAppBar.IsOpen = false;

            //Show the directions input flyout
            directionsInputFlyout.ShowIndependent();
        }

        private void DirectionsManager_ActiveRouteChanged(object sender, DirectionsEventArgs e)
        {
            if (e.Route != null && e.Route.RouteLegs != null && e.Route.RouteLegs.Count > 0)
            {
                //Set the instructions header info
                ToLocation.Text = string.Format("{0} Directions\r\n{1}",
                    e.Route.RouteMode,
                    e.Route.RouteLegs[e.Route.RouteLegs.Count - 1].EndLocation.Name);

                //When the user presses the button to show the instructions panel.
                DirectionsPanel.Visibility = Windows.UI.Xaml.Visibility.Visible;
            }
            else
            {
                //Hide the instructions panel
                DirectionsPanel.Visibility = Windows.UI.Xaml.Visibility.Collapsed;
            }
        }

        private void CloseDirections_Tapped(object sender, TappedRoutedEventArgs e)
        {
            //Hide the instructions panel
            DirectionsPanel.Visibility = Windows.UI.Xaml.Visibility.Collapsed;
        }
    }
}
Visual Basic
 Imports Bing.Maps.Directions
Imports Windows.UI
Imports Windows.UI.Xaml.Controls
Imports Windows.UI.Xaml.Input
Imports Windows.UI.Xaml.Media

Partial Public NotInheritable Class MainPage
    Inherits Page
    Private directionsInputFlyout As SettingsFlyout

    Public Sub New()
        Me.InitializeComponent()

        Dim directionsManager = MyMap.DirectionsManager

        'Get the directions input panel and set the width and horizontal position
        Dim directionsInput = directionsManager.DirectionsInputView

        directionsInput.Width = 340
        directionsInput.HorizontalAlignment = Windows.UI.Xaml.HorizontalAlignment.Center

        'Create a flyout and add the directions input panel to it.
        directionsInputFlyout = New SettingsFlyout()
        directionsInputFlyout.Background = New SolidColorBrush(Colors.DimGray)
        directionsInputFlyout.Content = directionsInput
        directionsInputFlyout.Title = "Directions"

        'Add the route summary to the instructions panel
        Instructions.Content = directionsManager.RouteSummaryView

        'Attach an event to show the instructions panel when the route changes.
        AddHandler directionsManager.ActiveRouteChanged, AddressOf DirectionsManager_ActiveRouteChanged
    End Sub

    Private Sub ShowDirectionsPanel_Tapped(sender As Object, e As TappedRoutedEventArgs)
        'Close bottom appbar
        Me.BottomAppBar.IsOpen = False

        'Show the directions input flyout
        directionsInputFlyout.ShowIndependent()
    End Sub

    Private Sub DirectionsManager_ActiveRouteChanged(sender As Object, e As DirectionsEventArgs)
        If e.Route IsNot Nothing AndAlso e.Route.RouteLegs IsNot Nothing AndAlso e.Route.RouteLegs.Count > 0 Then
            'Set the instructions header info
            ToLocation.Text = String.Format("{0} Directions" & vbCr & vbLf & "{1}", e.Route.RouteMode, e.Route.RouteLegs(e.Route.RouteLegs.Count - 1).EndLocation.Name)

            'When the user presses the button to show the instructions panel.
            DirectionsPanel.Visibility = Windows.UI.Xaml.Visibility.Visible
        Else
            'Hide the instructions panel
            DirectionsPanel.Visibility = Windows.UI.Xaml.Visibility.Collapsed
        End If
    End Sub

    Private Sub CloseDirections_Tapped(sender As Object, e As TappedRoutedEventArgs)
        'Hide the instructions panel
        DirectionsPanel.Visibility = Windows.UI.Xaml.Visibility.Collapsed
    End Sub
End Class
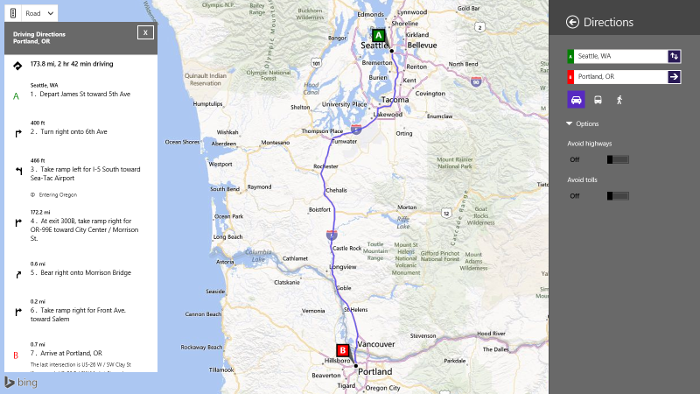
At this point the application is complete. Run it by pressing F5 or by pressing the Debug button. When you right click or swipe up from the bottom you will see the bottom app bar appear with a directions button on the far right side. When you press this button a directions input panel will fly out from the right side of the app. The following is a screenshot of the app with the generated instructions for the route from “Seattle, WA” to “Portland, OR”.
Full source code for this blog post can be downloaded from the MSDN Code Samples Gallery here.