Creating web pages using WebMatrix - Tutorial 6: Dynamic Content (Basics: Forms).
In this article, you’re going to be introduced to processing of data input by the user by using forms.
Download complete CSHTML Project
Step # 1: First of all, create a new empty site and name it: "BasicsForms". Once you’ve done this – you’ll automatically be presented with the contents of the newly created page. To continue, replace the existing markup with the following (we’ll be referring to it as you go):
Code Snippet #1: ASP.NET Razor Syntax
1234567891011121314151617181920212223242526272829303132333435363738394041424344454647484950515253545556575859606162636465666768 |
@{ // Declaring the necessary variables and initialising them with values captured from the form submission var Name = Request["Name"]; var Surname = Request["Surname"]; var ExamplePassword = Request["ExamplePassword"]; var Gender = Request["Gender"]; var FavouriteDaysOfWeek = Request["FavouriteDaysOfWeek"]; var HasAnySiblings = Request["HasAnySiblings"]; var Comments = Request["Comments"]; var IsVegetarian = Request["IsVegetarian"]; var LikedFruits = Request["LikedFruits"]; var FileToAttach = Request["FileToAttach"]; // Checking if the form has been submitted if(IsPost) { // Making sure that all the fields have been completed if(Name != "" && Surname != "" && ExamplePassword != "" && Gender != "" && FavouriteDaysOfWeek != "" && HasAnySiblings != "" && Comments != "" && IsVegetarian != "" && LikedFruits != "" && FileToAttach != "") { // Using the "<text>" element to mark the start & end of Text/HTML markup and separate it from the code <text> <!-- Displaying a summary of data received from the form --> <fieldset> <legend>Sample Result</legend> <p>Your name: @Name <p>Your surname: @Surname <p>Your example password: @ExamplePassword <p>Your gender: @Gender <p>Your favourite day(s) of the week: @FavouriteDaysOfWeek <!-- Making a decision based on the processed value --> <p>@{ if(@HasAnySiblings == "Yes") { @: You have siblings } else { @: You have no siblings } } <p>Your comments: @Comments <!-- Making a decision based on the processed value --> <p>@{ if(@IsVegetarian == "Yes") { @: You are a vegetarian } else { @: You are not a vegetarian } } <p>Fruits you like: @LikedFruits <p>Your file to attach: @FileToAttach </fieldset> </text> } else { // Otherwise displaying an error message @: Error: Make sure you complete all the fields of the form! } }} |
Code Snippet #2: HTML/CSS markup
123456789101112131415161718192021222324252627282930313233343536373839404142434445464748495051525354555657585960616263 |
<!DOCTYPE html><html> <head> <title>Basics: Forms</title> </head> <body> <!-- A sample form START --> <form action="" method="post"> <!-- We do not supply any values to the "action" parameter forcing the page to reload --> <fieldset> <legend>Sample Form <input type="button" value="Reload" onClick="parent.location='BasicsForms.cshtml'"></legend> <p>Name: <input type="text" name="Name"> <p>Surname: <input type="text" name="Surname"> <p>Example password: <input type="password" name="ExamplePassword"> <p> Gender: <p><input type="radio" name="Gender" value="Male"> Male <p><input type="radio" name="Gender" value="Female"> Female <p>Favourite day(s) of the week: <p><input type="checkbox" name="FavouriteDaysOfWeek" value="Monday"> Monday <p><input type="checkbox" name="FavouriteDaysOfWeek" value="Tuesday"> Tuesday <p><input type="checkbox" name="FavouriteDaysOfWeek" value="Wednesday"> Wednesday <p><input type="checkbox" name="FavouriteDaysOfWeek" value="Thursday"> Thursday <p><input type="checkbox" name="FavouriteDaysOfWeek" value="Friday"> Friday <p><input type="checkbox" name="FavouriteDaysOfWeek" value="Saturday"> Saturday <p><input type="checkbox" name="FavouriteDaysOfWeek" value="Sunday"> Sunday <p>Do you have any siblings: <select name="HasAnySiblings"> <option value="" selected disabled>Select</option> <option value="Yes">Yes</option> <option value="No">No</option> </select> <p>Enter your comments: <p><textarea name="Comments" rows="10" cols="50"></textarea> <p>Are you a vegetarian: <select name="IsVegetarian" size="2" multiple> <option value="" selected disabled>Select</option> <option value="Yes">Yes</option> <option value="No">No</option> </select> <p>Which fruits do you like (use CTRL to select multiple options): <select name="LikedFruits" size="7" multiple> <option value="" selected disabled>Select</option> <option value="Apples">Apples</option> <option value="Bananas">Bananas</option> <option value="Cherries">Cherries</option> <option value="Kiwis">Kiwis</option> <option value="Oranges">Oranges</option> <option value="Grapes">Grapes</option> </select> <p>Attach a file: <input name="FileToAttach" type="file"> <p><input type="submit" value="Proceed"> <input type="reset"> </fieldset> </form> <!-- A sample form END --> </body></html> |
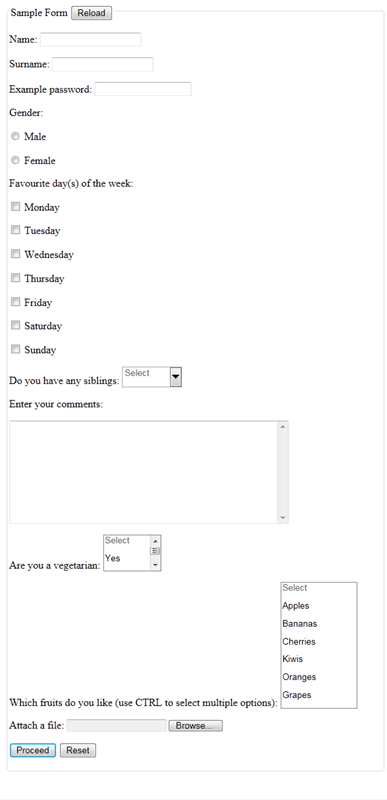
Step # 2: When you’re finished, it’s now time to see your web page in action! Click on the “Run” option from the standard toolbar to launch the page in a browser – what you’ll see should correspond to the image shown below.
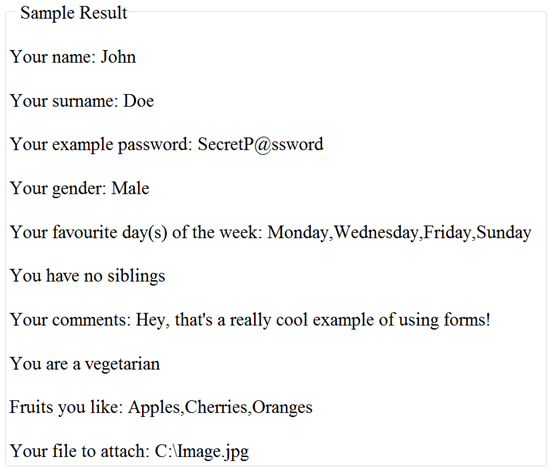
Step # 3: Now comes the interactive part! Go ahead and complete the form with some sample data. Once you’re finished click on the “Proceed” button, alternatively you can click on the “Reset” button to start again.
Look what happens – your data has just been processed and displayed as a summary for your review. What you’ll see should look similar to the image shown below.
Step # 4: Let’s now take a closer look on the underlying code (HTML/CSS markup and the ASP.NET Razor Syntax).
As you’ve probably seen above, your web page is now making some real decisions based on the data input by the user. In the source code, lines # 1-64 are responsible for the application logic and lines # 65-113 contain the HTML markup.
HTML Markup (lines # 1-64)
In order to capture data from the user we use HTML forms. In this case, we have a simple form with multiple controls of types including: Text, Password, Radio, Checkbox, Select, Textarea, File, and finally Submit & Reset.
Notice the two “<form>” tags embracing the whole structure. The first one (“<form action="" method="post">”) simply defines the action to be performed upon submission of the form as well as the method to be used (“post”). In this case, we don’t supply any values to the “action” parameter consequently forcing the page to reload. The “post” method prevents the browser from encoding the data received from the form into a URL, instead – it’s entirely stored within a message body (invisible to the user).
The protocol used for making requests to the server – HTTP (HyperText Transfer Protocol) supports only the two methods mentioned above: GET & POST. The GET method is primarily used for requesting data from the server (i.e. downloading a web page, but can also be used for passing ASCII parameters back) and the POST method for returning data back to the server (i.e. values from a form, files, binary data, or the like thanks to no restrictions on data type).
If we were to use the GET method instead of the POST, the resulting URL in the browser would look something like: https://localhost:51819/BasicsForms.cshtml?Name=John&Surname=Doe&ExamplePassword=SecretP@s sword&Gender=Male&FavouriteDaysOfWeek=Monday&FavouriteDaysOfWeek=Wednesday&FavouriteDaysOfWeek=Friday&FavouriteDaysOfWeek=Sunday&HasAnySiblings=No&Comments=Hey%2C+that%27s+a+really+cool+example+of+using+forms%21&IsVegetarian=Yes&LikedFruits=Apples&LikedFruits=Cherries&LikedFruits=Oranges&FileToAttach=C%3A%5CImage.jpg and would not work with this particular example anyway.
Let’s now move on to the “<fieldset>” and “<legend>” tags which allow for producing of a neat frame with a caption embracing the entire HTML form. This is a handy way of keeping the form well organised.
Later in the code – notice that each of the form controls is assigned its own unique name, for example: the “<input type="text" name="Name">” is assigned the value “Name” as its name. This is then used in the application logic for capturing its contents upon submission of the form. But does it work? Read on below…
Application Logic (lines # 65-113)
In this case, the application logic is quite straightforward – we begin by declaring the necessary variables and initialising them with values captured from the form submission. Then, we’re using a simple “If” statement to check if the form has been submitted – if so we’re later using another “If” statement to make sure that all the fields have been completed. Only when the first two tests have been passed can the program continue with displaying a summary of data received from the form, and later making decisions based on the processed values. Otherwise – an error message is displayed forcing the user to review the contents of the form. And that’s all there is to know about processing forms really! Feel free to modify the source code of the web page to see what comes back – you might agree that it’s best to learn the new concept by experimenting with it.
Step # 5: Congratulations! You have now completed all the activities related to this article.
What have we done?
In this tutorial, you have been introduced to processing of data input by the user by using forms. In the following ones – you’ll be introduced to using databases with your web pages, become familiar with many useful helpers and finally get ready to put your skills to practice by using each of the built in site templates. It’s all yet to come and there’s far more exciting stuff later on as well, so please stay tuned! :-)