Creating web pages using WebMatrix - Tutorial 5: Dynamic Content (Basics: Instructions)
In this article, you’re going to be introduced to making a practical use of variables that store predefined data as well as data input by the user (to follow in later articles) to make certain decisions. You’ll learn more about conditional logic and loops available to use in WebMatrix, namely – If/Switch statement, and While/Do-While/For/Foreach loop. Download complete CSHTML Project
Step # 1: First of all, create a new empty site and name it: "BasicsInstructions". Once you’ve done this – you’ll automatically be presented with the contents of the newly created page. To continue, replace the existing markup with the following (we’ll be referring to it as you go):
Code Snippet #1: ASP.NET Razor Syntax
123456789101112131415161718192021222324252627282930313233343536373839404142434445464748495051525354555657585960616263646566676869707172737475767778798081828384858687888990919293949596979899100101102103104105106 |
@{ // IF STATEMENT // example no.1 // // feel free to experiment with those 3 numbers and note that the program still works fine int NumberOne = 26; int NumberTwo = 15; int NumberThree = 0; var SmallestNumber = ""; // IF number one is the smallest if((NumberOne < NumberTwo) && (NumberOne < NumberThree)) { // assign the following value to the variable SmallestNumber = "one"; } // ELSE IF number two is the smallest else if((NumberTwo < NumberOne) && (NumberTwo < NumberThree)) { // assign the following value to the variable SmallestNumber = "two"; } else { // ELSE it must be number three that is the smallest SmallestNumber = "three"; } // example no.2 // // either "true" or e.g. "1==1" is fine if you want to force execution of a particular code var IsTrueTrue = ""; if((true) & (1==1)) { IsTrueTrue = "[IF STATEMENT - example no.2] It's officially proved: true is always true!"; } // example no.3 // because it's never the case it won't be executed... var IsFalseFalse = ""; if(false) { IsFalseFalse = "[IF STATEMENT - example no.3] It's officially proved: false is always false!"; } // SWITCH STATEMENT // // using the DateTime helper to assign the current day of the week to a variable upon successful conversion to the string data type var DayOfWeek = @DateTime.Now.DayOfWeek.ToString(); var WeekdayGreeting = ""; // the current day of the week is used for determining the appropriate greeting to be displayed switch(DayOfWeek) { // if the contents of the above variable are as follows case "Monday": // assign the following value to the variable WeekdayGreeting = "So it's the great Monday! Welcome back new week... :-)"; break; // if the contents of the above variable are as follows case "Tuesday": // assign the following value to the variable WeekdayGreeting = "Today's Tuesday - my favourite day! And what's your favourite? :-)"; break; // if the contents of the above variable are as follows case "Wednesday": // assign the following value to the variable WeekdayGreeting = "Looks like you've made it to Wednesday! Well done... :-)"; break; // if the contents of the above variable are as follows case "Thursday": // assign the following value to the variable WeekdayGreeting = "It's Thursday... so there's only one day left until the weekend! :-)"; break; // if the contents of the above variable are as follows case "Friday": // assign the following value to the variable WeekdayGreeting = "Hurray! It's Friday and the weekend is almost here... :-)"; break; // if the contents of the above variable are as follows case "Saturday": // assign the following value to the variable WeekdayGreeting = "I gotta feeling... that Saturday's night gonna be a good night! :-)"; break; // if the contents of the above variable are as follows case "Sunday": // assign the following value to the variable WeekdayGreeting = "Make the most of Sunday because tomorrow starts another brilliant week! :-)"; break; } } |
Code Snippet #2: HTML/CSS markup
1234567891011121314151617181920212223242526272829303132333435363738394041424344454647484950515253545556575859606162636465666768697071727374757677787980818283848586878889909192 |
<!DOCTYPE html><html> <head> <title>Basics: Instructions</title> </head> <body> <p>[IF STATEMENT - example no.1] Looks like number @SmallestNumber is the smallest! <p>@IsTrueTrue <p>@IsFalseFalse <p>[SWITCH STATEMENT] Message of the day: @WeekdayGreeting <p>[WHILE LOOP] Let's practice some maths by counting to ten! ;) Here we go...<br> <!-- WHILE LOOP --> @{ // initialising the "counter" variable with a starting value int CountToTen = 1; // the condition which must be met for the loop to run while(CountToTen <= 10) { // displaying the current contents of the variable @: @CountToTen; CountToTen++; // incrementation of the variable by one } // checking if the loop executed successfully if(CountToTen >= 10) { // displaying the appropriate message @: ...Done! } } <p>[DO-WHILE LOOP] Let's now try something harder and count to one hundred! ;) Here we go...<br> <!-- DO-WHILE LOOP --> @{ int CountToHundred = 1; // initialising the "counter" variable with a starting value do { // displaying the current contents of the variable @: @CountToHundred; CountToHundred++; // incrementation of the variable by one } while(CountToHundred <= 100); // the condition which must be met for the loop to run (once again) // checking if the loop executed successfully if(CountToHundred >= 100) { // displaying the appropriate message @: ...Done! } } <p>[FOR LOOP] Here's an example of a simple countdown timer (60secs):<br> <!-- FOR LOOP --> @{ int CountdownTimer; // declaring the "counter" variable // initialisation, condition, decrementation of the variable for(CountdownTimer = 60; CountdownTimer >= 0; CountdownTimer--) { // displaying the current contents of the variable @: @CountdownTimer } // checking if the loop executed successfully if(CountdownTimer <= 0) { // displaying the appropriate message @: ...Time is up! } } <p>[FOREACH LOOP] Here's an example of displaying the contents of a simple string array:<br> <!-- FOREACH LOOP --> @{ // initialising the string array with sample values string[] SimpleStringArray = {"One", "Two", "Three", "Four", "Five"}; // using a "helper" variable to read each element of the array in turn foreach(var element in SimpleStringArray) { // displaying the current contents of the variable @: @element } } </body></html> |
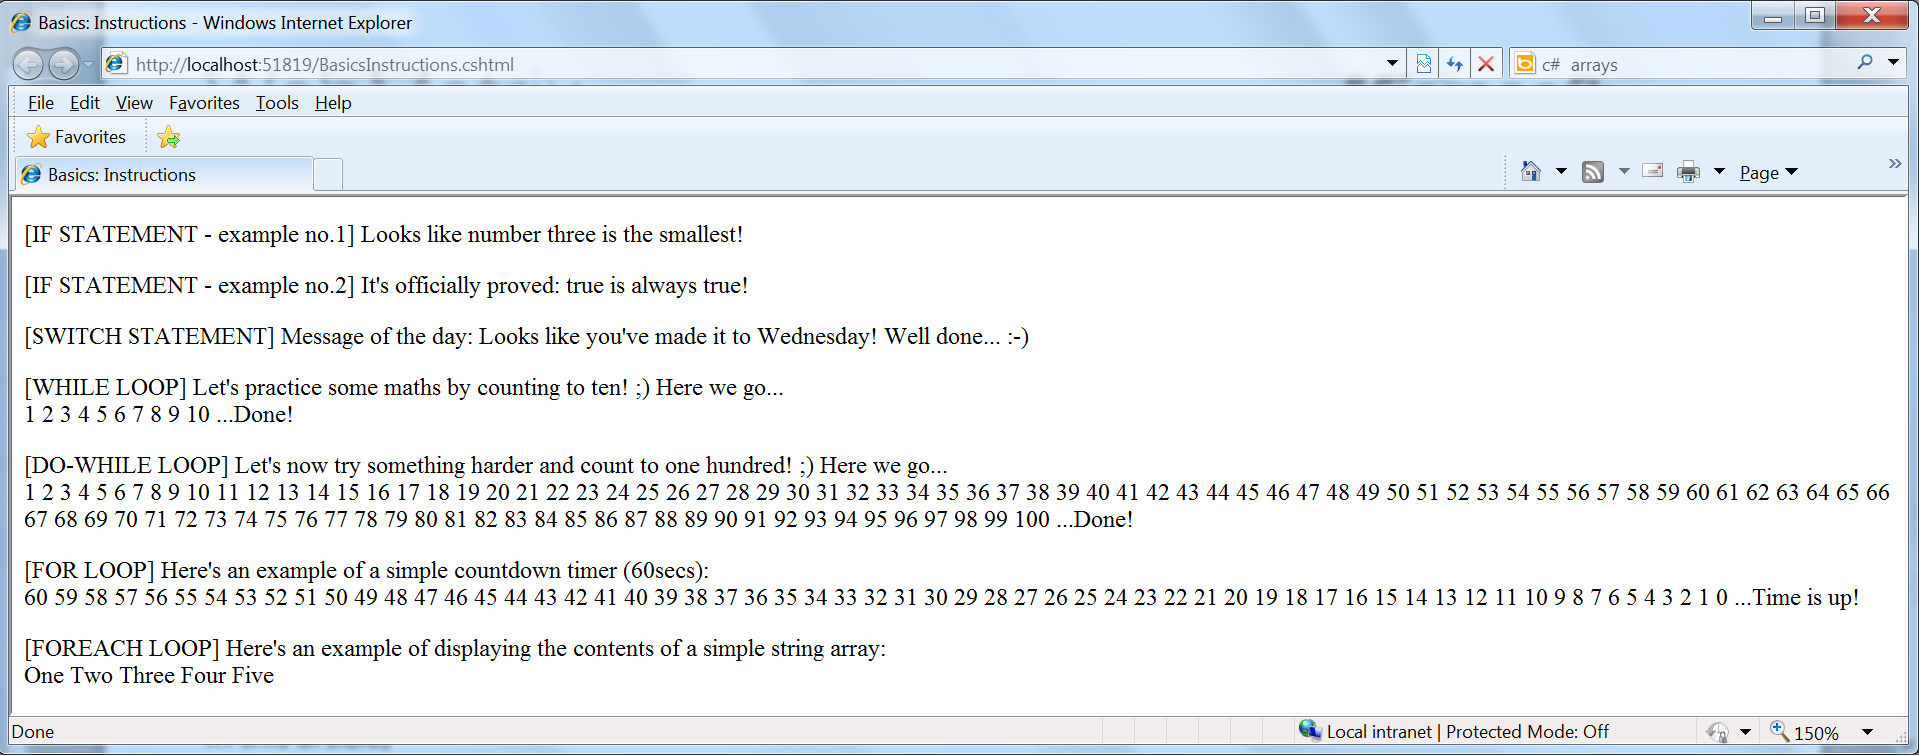
Step # 2: When you’re finished, it’s now time to see your web page in action! Click on the “Run” option from the standard toolbar to launch the page in a browser – what you’ll see should correspond to the image shown below.
Step # 3: Let’s now take a closer look on the underlying code (HTML/CSS markup and the ASP.NET Razor Syntax).
If Statement
Starting from line # 2 you’re presented with 3 examples concerning the “if” statement.
- The first example (lines # 3-22) is a compound “if” statement; this means that you can have many different conditions and instructions to be executed when they’re met – along with alternatives to be executed otherwise. For example: in this case after checking whether the first number is the smallest (the “if(condition)” statement), if this condition isn’t met the program progresses to the next alternative condition (the “else if(condition)” statement), which in turn not being met leads to the final alternative (the “else” statement) instruction terminating the compound “if” statement.
- The second example (lines # 24-30) shows how a simple conditional “if” statement can be used to force execution of a particular code. To do this, simply set the condition to be either “true” or use a Boolean expression that returns the “true” value e.g. “1==1”.
- The third example (lines # 32-38) proves that the “false” value used as the condition (which in this case is regarded as not being met) will never execute a particular code.
Switch Statement
In lines # 41-74 you’re presented with an example concerning the “switch” statement. The “switch” statement is just another way (designed for convenience) of representing the “if” statement. In fact, both their structures and functionality are virtually the same – please refer to the comparison shown below.
| If Statement Sample | Switch Statement Sample |
switch(variable){ |
|
| if(variable == condition1){ // Code to be executed follows…} | case condition1: // Code to be executed follows… break; |
| else if(variable == condition2){ // Code to be executed follows…} | case condition2: // Code to be executed follows… break; |
| else{ // Code to be executed follows…} | default: // Code to be executed follows… |
| } |
The above two samples have exactly the same functionality and could therefore be used interchangeably. Back to our example: we have used the “DateTime” helper to assign the current day of the week to a variable (upon successful conversion to the string data type), which then used by the “switch” statement allows for determining the appropriate greeting to be displayed. Note that there is no “default”/”else” alternative as the value supplied by the server will always remain in the specified range.
While Loop
In lines # 92-109 you’re presented with an example concerning the “while” loop. The “while” loop requires the condition specified to be met each time it’s to be run. In this case we’ve used a variable initialised with the value of “1” and the condition for the loop of “<= 10” which ensures that it will execute exactly 10 times.
Because this particular example is about counting from 1 to 10, later on we’re using an “if” statement to detect when we’re finished and display the appropriate message.
Do-While Loop
In lines # 113-129 you’re presented with an example concerning the “do-while” loop. The “do-while” loop unlike its predecessor checks the condition specified only after it’s been executed (which ensures that it’s executed at least once). You will see some practical uses of this functionality later on when we start dealing with forms and data input by the user. In this case we’ve used a variable initialised with the value of “1” and the condition for the loop of “<= 100” which ensures that it will execute exactly 100 times.
Because this particular example is about counting from 1 to 100, later on we’re using an “if” statement to detect when we’re finished and display the appropriate message.
For Loop
In lines # 133-148 you’re presented with an example concerning the “for” loop. The “for” loop is just another way (designed for convenience) of representing the “while” loop. The “for” loop requires three parameters to be specified in order be to run – namely: an initialiser, a loop-test, and a counting expression. In this case, we’ve set them accordingly to: “CountdownTimer = 60”, “CountdownTimer >= 0”, and “CountdownTimer--” which ensures that the loop will execute exactly 60 times.
Because this particular example is about counting down from 60, later on we’re using an “if” statement to detect when we’re finished and display the appropriate message.
Foreach Loop
In lines # 152-162 you’re presented with an example concerning the “foreach” loop. The “foreach” loop is just another way (designed for convenience in displaying the contents of arrays) of representing the “while” loop. In this case, we’ve used a “helper” variable to read each element of the array in turn and then displayed its contents at each loop run. You will see some practical uses of this functionality later on when we start dealing with databases and displaying the contents of records.
Step # 4: Congratulations! You have now completed all the activities related to this article.
What have we done?
In this tutorial, you have been introduced to making a practical use of variables that store predefined data as well as data input by the user to make certain decisions. In the following one – you’ll be introduced to processing of data input by the user by using forms. Then you’ll advance to working with databases and unleash the full power of WebMatrix lying at your fingertips! It’s all yet to come, please stay tuned! :-)