Construct 2 Trivia App Part 2 (Reading From File Cont.)
This is the second part in a 4 part tutorial on how to create a trivia app using Construct 2, a free drag and drop type tool for creating cross platform games. In this tutorial, we will continue where we left off in part 1 , focusing on and continuing with reading input from a file. If you haven’t read through part 1, you can find it here Part 1. For those of you who have already done part 1, let’s continue.
Now, from part 1 you might have noticed that while we are able to read from the text file, there are a couple of things missing. The first is how do we keep track of the correct answer? The second is that right now we are only reading one set of question and answers. However, for a real trivia app, we are definitely going to want multiple sets of questions and answers. So, how do we go about doing these two things?
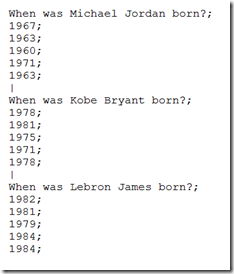
The first part about keeping track of the correct answer is pretty simple. For each set of questions, we will have not only a question and four answer choices, but we will also add the correct answer, which will look exactly like the corresponding answer choice.
Now, let’s figure out how we can add more questions. The first step is simple enough, just type in more questions in our questions.txt, but how we do separate each set of answer and questions? We used the “;” earlier to separate within a set of question and answers, so to separate different sets, we will use the “|”. So, I’m going to add two more sets of question and answers to the text file, including the correct answer and using the “|” as a separator. My text file now look like this.
Now, if I run my game again, I should still see the same thing that I saw at the end of Part 1. So what are we missing? Well, we need to figure out a way to store all of the different sets of questions after we read them from our text file. For this, we will use an array, which is an object used to store a list different things, including string data. So, the plan is to read from our text file once, and then store in the array a list of data strings, each of which contains a question, answer choices, and correct answer. Sound good?
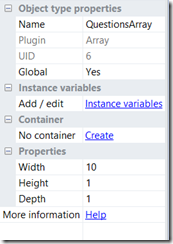
Alright, let’s go ahead and add the array object. Double click in your layout 1 to add an object, and then select array, and give it a name such as “QuestionsArray”. As usual, it will pop up on in the project pane under “Object types”. Also notice the properties for the array in the left hand pane, specifically the width. The width will more or less represent the number of sets of questions that we have in our text file. Right now, I will set my width to 3 since I am only using 3 sets of questions.
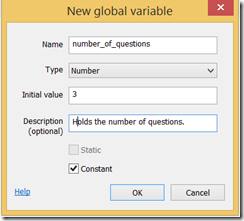
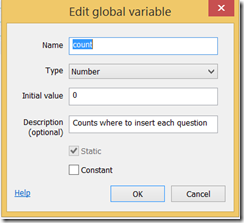
Now that we have created our array, we need to take the input from the text file, separate the different sets of questions, and add them to our array. For this we will use a simple “for” loop, which allows you to repeat a certain action a given number of times, like adding a question set to our array. Since we will be doing this once for each question, we will want our for loop to execute the same number of times as the number of questions that we have. To keep track of how many questions we have, I am going to create a global variable. To create a global variable, go back to our event sheet, right click anywhere in the empty space and click “create global variable”. You will need to give your variable a name, a type, an initial value, an optional description, and you can choose whether or not it is constant. Follow the screenshot below for that information.
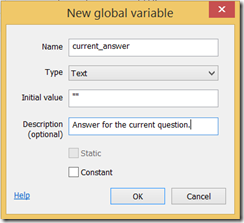
Your global variable will now show up at the top of your event sheet! Now that we know how to create a global variable, let’s go ahead and create a couple more, the first to hold the correct answer based on the current question. Let’s call it “current_answer”, with type string and initial value of “”. See below.
Now one more global variable. Let’s add one called “count” that we will tell us where to store the individual question sets going into our array.
As of now, our event sheet should look like this.
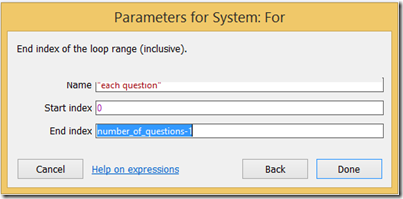
Now that we have those global variables, let’s add our for loop to add the questions to the array that we created. We will want to add the for loop inside of the “On Completed” AJAX event. To do this right click on the green right array of that event, then “add”, then “add sub-event”. Now we will need to choose which event we want to add, which should be a “for” loop. You can find it under System, then “for”. You will then see the below dialog box. The name is mainly used for legibility purposes, so I am just using “each question” here. Then I want to start at 0 and end at our number of questions –1. The reason we go from “0 to number_of_questions –1” instead of “1 to number_of_questions” is because arrays use 0-based indexing as explained previously.
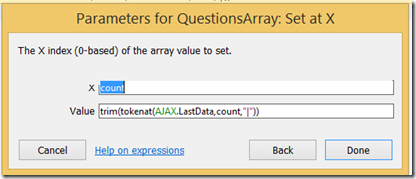
Now, we need to add the corresponding actions for this event, where will actually place the 3 sets of questions inside of our array using our count variable. We will need to use the “set at x” action from our array object here. We will use our global variable, count, as the X, and then the value will be an individual question set data string. To get the question set, use the tokenat and trim methods like we did in part 1, but we will use our count variable instead of just a constant number and the separator will be “|” instead of “;”. It should look like this.
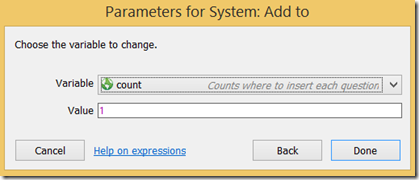
We now need to add 1 to our count variable, so that it updates with every iteration through our for loop. For example, the first time through, count equals 0, which means we will get the first question set and put it in the first slot in the array. Then, add 1, and the second time we will get the second question set and so on. We can do this by using the action System->Add to, then select the count variable and tell it to add 1 like below.
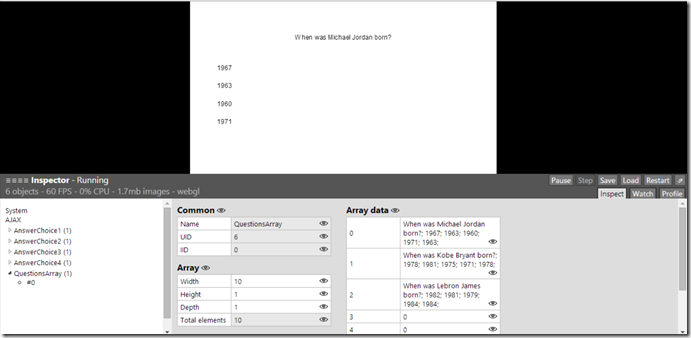
Now, we should have all of our question stored properly in our array. One cool way to test this is to run your game in debug mode by clicking the bug like icon just right of the play button at the top of the construct window. Once you do that, you can actually check what data is stored in the array by clicking on the array object like below.
Notice that under the section on the right called “Array Data” the data is what I expected and was hoping for! In the next part of this tutorial, we will create a couple of functions, for example to get a random question, and add some additional logic to our game!
Lastly, here is a link to the project file for this template in case you missed a step or got lost. You can find it here
