Build a setup project for your XNA game
Now you have created your XNA game but how do you package it so the world can download and install it? You will see how to build a windows setup (.msi) for your XNA game. You will use Visual Studio 2005 Pro (or above) to create a setup project that will use the Visual Studio bootstrapper to prereq the XNA framework. In this post I will discuss how to setup Visual Studio to prereq the XNA Framework. In future posts I will dig into how to add more features to your setup project.
You will need Visual Studio 2005 Pro (or above) to create a Setup project. This gets a little more complicated because you cannot add a setup project directly to your GSE solution. So you will need to do a few manual steps. Using a setup project you can specify the prerequisites that your application requires, for example the .Net Framework 2.0 and in this case the XNA Framework. Out of the box the XNA Framework is not on the Visual Studio prerequisites list, which is understandable since Visual Studio shipped a year ago. Luckily this is extensiable. Let's look at how we can add XNA to the list.
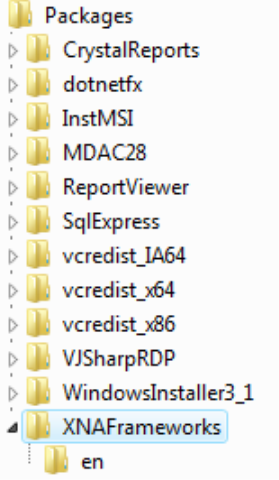
Items in the prerequites list require two files; product.xml and package.xml. These are placed in the C:Program FilesMicrosoft Visual Studio 8SDKv2.0BootStrapperPackages directory. Note that setting all of this up is fairly complicated and poorly documented so I won't dicsuss every possible option, just enough to get up and running. Start by creating a directory under the Packages folder called XNAFrameworks. This is the folder that will contain the product.xml file. Create a language specific folder called 'en' for english. The 'en' folder will contain the package.xml. It will look something like this. Adding the product.xml and the package.xml only needs to be done once for your development machine.
Now create a file called product.xml under the XNAFrameworks folder. These files conform to the product and package schemas.
<?xml version="1.0" encoding="utf-8"?>
<!-- Specifies a unique ID for the package.-->
<Product xmlns="https://schemas.microsoft.com/developer/2004/01/bootstrapper"
ProductCode="Microsoft.XNARuntime.1.0">
<RelatedProducts>
<DependsOnProduct Code="Microsoft.Net.Framework.2.0" />
</RelatedProducts>
<!-- Provides a list of all the files in the redistributable.-->
<PackageFiles CopyAllPackageFiles="false">
<PackageFile Name="xnafx_redist.msi" HomeSite="xnafx_redistmsi"
PublicKey="3082010a0282010100cd819638ae5ca2f2c1dfded0ab958dd63c9d1f8bc35d862e5df0b172f5abac886ab5dab1227b0bc8c8a54b915e2213e9f9f5239db5f46e76aeefeea43cc7c4c0595c3fabb3733326a662816179a162f46e8895d06eddc79fd2a451117661ba708a65a1961689a75d81d04466e5db569e40cafcdc76242e443000e5d67d7b9511d5581da3e84f0bc988dca2d653996cca63ca996a9a925e4c4d11e82fd35b5b5e5f52a3732da5bb84450d8c191576cb08da9aa67015e84dec69fd5db26b8fed295137388bc6464915945098b0f468a4d7de097167749e778c1d856b97eae75f45cce0e6710dd16300937b31988e0bb413bdb3d0eef1df21eea96061ee37433dc30203010001"
/>
</PackageFiles>
<!-- Contains all of the detection logic that the Bootstrapper
should run prior to downloading and installing the component.-->
<InstallChecks>
<MsiProductCheck Property="XNARuntimeInstalled"
Product="{E7A2604C-0131-4415-9D0A-717E1BB1EDD2}"/>
<MsiProductCheck Property="XNAGSEInstalled"
Product="{26DBF096-6283-43E2-B7A3-4C36785C635C}"/>
</InstallChecks>
<!-- Actions the Bootstrapper should perform while installing the component.-->
<Commands Reboot="Defer">
<!-- Specific action to take during the installation process.-->
<Command PackageFile="xnafx_redist.msi"
Arguments=""
EstimatedInstalledBytes="10000000"
EstimatedTempBytes="10000000"
EstimatedInstallSeconds="60">
<!-- Conditions under which the Bootstrapper should install, bypass, or fail the component installation.-->
<InstallConditions>
<BypassIf Property="XNARuntimeInstalled" Compare="ValueGreaterThanOrEqualTo" Value="3" />
<BypassIf Property="XNAGSEInstalled" Compare="ValueGreaterThanOrEqualTo" Value="3" />
</InstallConditions>
<!-- How to interpret the various codes that dotnetfx.exe might return after executing.-->
<ExitCodes>
<ExitCode Value="0" Result="Success" />
<DefaultExitCode Result="Fail" FormatMessageFromSystem="true" String="GeneralFailure" />
</ExitCodes>
</Command>
</Commands>
</Product>
The root node is the <Product> node. The <RelatedProducts> node contains a list of prereqs for this prereq. In this sample I only listed the .Net Framework 2.0. The <PackageFiles> node contains the files that can be included with the bootstrapper, for example a EULA or other files that are needed to do any custom checks. For the XNA framework I only need to include the XNA Framework Redist.msi. But it is not embedded in the bootstrapper but downloaded on the fly during installation. The HomeSite property is the location of the file. In this case it is the name of a string property located in the package.xml file, which defines the URL to the msi. Since you are using the HomeSite property you need to include the PublicKey for the msi. This is verified when the file is downloaded. If the keys don't match the file will not be installed. The <InstallChecks> node defines how the bootstrapper knows if the required software is installed. Here you check to see if the XNA Frameworks or the XNA Game Studio Express is installed by looking up the Product ID in the Windows Installer database. I check for both because if either one is installed my game will work. But you only need to install the XNA Frameworks to get the game to run. The <Commands> node contains the commands to run, xnafx_redist.msi. <InstallConditions> node takes the values from the InstallChecks nodes and determines if it should run the command (install the XNA Frameworks) or skip it.
The package.xml file is a localized file that contains more information about the prereq. Add the package.xml file under the 'en' folder.
<?xml version="1.0" encoding="utf-8"?>
<Package
xmlns="https://schemas.microsoft.com/developer/2004/01/bootstrapper"
Name="DisplayName"
Culture="Culture">
<!-- Defines a localizable string table for error messages.-->
<Strings>
<String Name="DisplayName">Microsoft XNA Framework</String>
<String Name="Culture">en</String>
<!-- Exception messages.-->
<String Name="GeneralFailure">
A failure occurred attempting to install the XNA Framework Redist.
</String>
<String Name="xnafx_redistmsi">https://download.microsoft.com/download/e/9/e/e9ef6d37-ae65-48fd-aa0e-e9a8129c9868/xnafx_redist.msi</String>
</Strings>
</Package>
You can use the package file to store your localized strings. The <Strings> node contains the strings which map to properties in the product and package files. The xnafx_redistmsi string is the URL to the XNA Frameworks Redist.
Ok, now you are ready to create the setup project.
- Create a Setup Project. Open Visual Studio 2005 and choose File-New Project. Choose Setup Project template under the Other Project Types- Setup and Deployment in the New Project dialog.
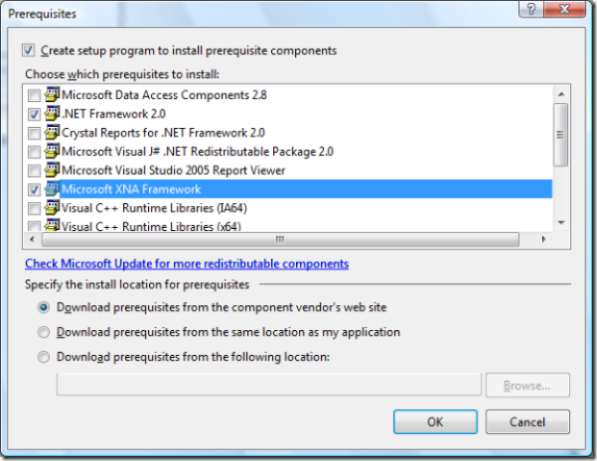
- Add the prerequisites. Select Project-Properties from the main menu and click on the Prerequsites button to open the Prerequsites dialog. Select the .Net Framework 2.0 and the Microsoft XNA Framework (which is the one you just created).
- Continue to create the setup project as you normally would. (I will go over this step in more detail in the next post)
- Build the setup project.
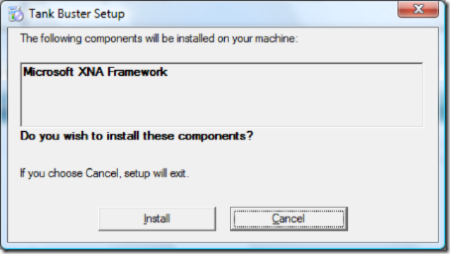
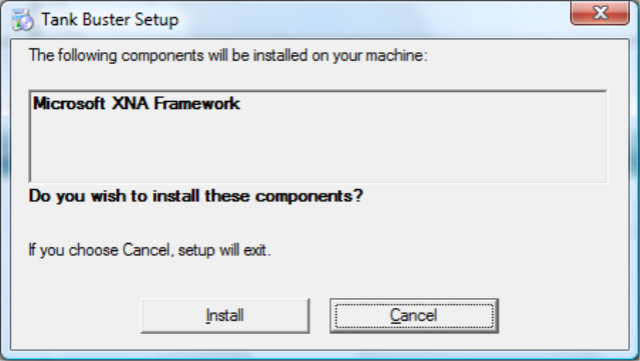
- Run the Setup.exe. This will detect if you have the XNA GSE or the XNA FX installed. If not it will download and install it before begining your games installation. You will see the following dialog.
I hope you find this post useful it took some time to track down some of this information and pull it together to get it working. I know this is only scratches the surface of the power of the bootstrapper but it should at least get you started.