Scalable Issues & Risks Report
Introduction
Out of the box the Issues & Risks components of Project Server 2007’s collaboration functionality have an architectural problem which surfaces when 100’s of Project Server Workspace sites are created. This problem is forced by the need to allow flexibility in PWS placement within the farm and the ability to assign issues and risks to any user within the farm, not just specific project team members.
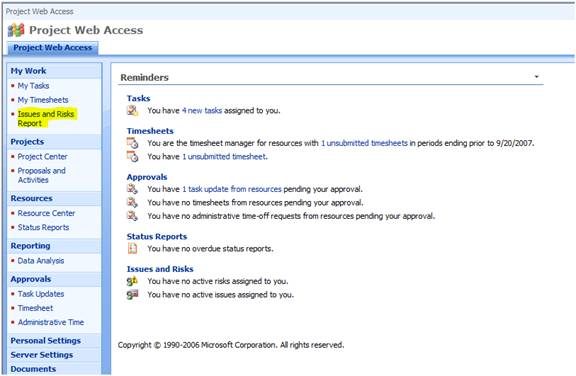
This results in a non-scalable multi-site query whenever a team member hits the home page of the Issues and Risks page in Project Web Access. The home page issue is mitigated by removal of the functionality; however the team member still needs a place to see all issues and risks across the Project Server site. These instructions detail how to implement such a place in a scalable manner using the data held in the Project Server Reporting Database in combination with SQL Server Reporting Services.
Caveat: this solution is provided as a workaround; it is not intended to become part of the Project Server 2007 solution and as such will not be localized or migrated/upgraded in future releases. The source of this solution is provided to the customer as-is and should be tested within the customer’s pre-production environment prior to production deployment. Microsoft Product Support Services will not be able to offer full support for this software.
Architectural Notes
This solution uses the flexibility of the Microsoft Office Project Server 2007 architecture to leverage the following technologies:
- Project Server Reporting Database
This database contains Issue, Risk, Project & Resource data used by this solution. Note that this data is updated on project publish (or explicit WSS site synchronization) so after new Issues & Risks are created the project should be published or the site synchronized in order to make this data available in the reporting database.
Team members should subscribe to the Issues & Risks lists for their projects in order to get earlier notification of new data.
- SQL Server Reporting Services 2005 SP2
The reports used to provide this solution were built using the Report Designer (available in the “Business Intelligence Workbench”) that ships with SQL Server 2005. The SP2 version of the software was used. Note that the installation section refers to the non-integrated Report Viewer web parts, used to demonstrate the integration. It is recommended that the integrated mode be used for a cleaner interface.
The solution uses the Report Viewer web part that must be installed into the farm as described in the installation section.
The solution is built as a master report that hosts two sub-reports, one for issues and one for risks – this makes individual reformatting and editing a little bit easier.
- SharePoint Web Part Pages
The report developed to display the list of issues & risks is hosted within the Reporting Services report viewer web part within a web part page that is added to the Project Web Access site. The report assumes that flat lists are being used for Issues and Risks, if folders within the list are to be used then further testing is recommended.
Security Notes
The report should be run using a data connection with credentials that have read-only access to the Reporting database, specifically the following tables:
- MSP_EpmProject: Used to obtain project name and URL details
- MSP_EpmResource: Used to filter data based on the caller (see more below)
- MSP_WssRisk: Data on Risks, updated when the project is published or the site is explicitly refreshed, not when an issue or risk is added to the list.
- MSP_WssIssue: Data on Issues, updated when the project is published or the site is explicitly refreshed, not when an issue or risk is added to the list.
A design aim for the report is to avoid having to register every team member in the reporting database. This is met via SQL Server Reporting Services parameterized filtering on the caller’s userid (this is passed into the query so that only data directly assigned to the caller is returned) – This report was not tested in a farm configuration, it is recommended that it be fully tested in a multi-server configuration before live deployment to ensure that data is filtered.
This report does not respect SharePoint list-item security (which is not enabled by default) – if an issue or risk is assigned to a team member and then secured individually in a manner that denies the team member access they will continue to see the data pertaining to the item in this report, however the link will not display the item form.
Scalability and Performance Notes
This solution will be considerably more performant than the cross-site query that it replaces. However it is recommended that an additional index be created in the reporting database to facilitate the filtering, specifically:
MSP_EpmResource:
 CREATE NONCLUSTERED INDEX [IX_FastAccountLookup] ON [dbo].[MSP_EpmResource]
(
[ResourceName] ASC
)
INCLUDE ( [ResourceNTAccount])
Go
Installation Notes
Assumptions:
SQL Server 2005 Reporting Services 2005 is already installed in the farm, in non-integrated mode as specific website (in the example below: https://pconlan08:81/ReportServer) – it is recommended that integrated mode be used.
The SQL Server 2005 Reporting Services web parts are installed on every SharePoint server in the farm, installation instructions:
https://msdn2.microsoft.com/en-au/library/ms159772.aspx (note that the CAB file is located in a different location on an X64 server, search for RSWebParts.cab on the Reporting Services server(s))
Installation Steps:
1. Customize and Deploy the Reports
Load the attached Reporting Services solution into Business Intelligence Workbench. Edit the Shared Data Source to point to the correct SQL Server and Reporting Database; then set the appropriate credentials (Reporting Services implements a secure credential store)
Review the form design and make any customer-requested changes (see Report Configuration Notes below)
In Business Intelligence Workbench edit the Project Properties to point to the correct Reporting Services server and Deploy the solution. Use the https://xxxxx:nn/Reports url to validate that the report works as intended before proceeding to the next step.
Once tested, use the SQL Server Management Studio to connect to the Report Server and grant appropriate access to the reports to all team members. Test this with a subset of team members to ensure they can access the report.
2. Create a web part page to host the web part for the report
- Navigate to the PWA site as a SharePoint administrator, and use the Site Options drop down to select Site Settings/Modify All Site Settings which will bring up the Site Settings page.
- Select Site Libraries and Lists which will bring up the Site Libraries and Lists page.
- Select Create New Content which will bring up the Create page.
- From the menu select: Web Part Page
- Fill in the dialog as below:

Note that you may want to place this page in a new document library rather than the Documents library as depicted as you will be granting read access to team members to this library.
Note that once created the page can be “hidden” in the library to prevent accidental erasure (to do this edit its properties in the library view).
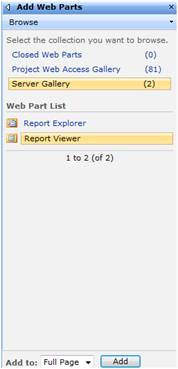
This creates the page, click the “Add a Web Part” orange bar to add the web part. Use the “Advanced Web Part gallery and options” link, select the “Server Gallery” and then the “Report Viewer” web part.
This will add the web part to the page. Now configure it as below:
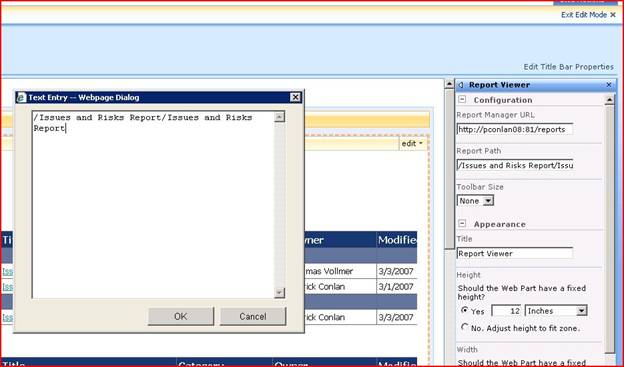
Note that the Toolbar and chrome are turned off and a fixed height of 12” is used. No width need be set. The Report Path can contain spaces (no need to %20 escape the string)
Save the changes and the web page, navigate to the URL to ensure that the report web part displays as expected and that it contains the report as expected. (Note that if you edit and redeploy the report you will need to restart your IE session to avoid caching the report format)
3. Connect the page to the Project Web Access menu
In PWA Server Settings choose Quick Launch from the Look and Feel set of options.
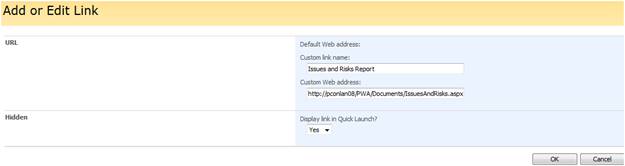
Add a new Entry to the Work Item Group: “Issues and Risks Report”, connect it to the page you created above, as depicted below:
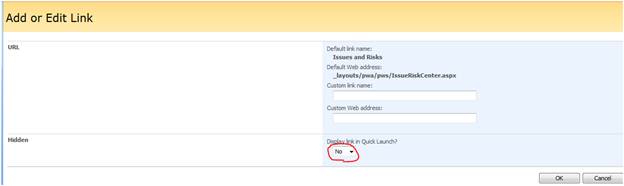
The final step in this task is to hide the un-scalable Issues & Risk option. In the Quick Launch dialog click the Issues & Risks link and set its hidden property.
The final result should look like:

You have now deployed the report, and added it to the PWA menu for team members to use.
Report Implementation Notes
Several SQL Server 2005 Reporting Services features have been used to deliver the reports, these are briefly discussed below.
Team members will click on the new Issues and Risks Report link, this will take them to the page below:
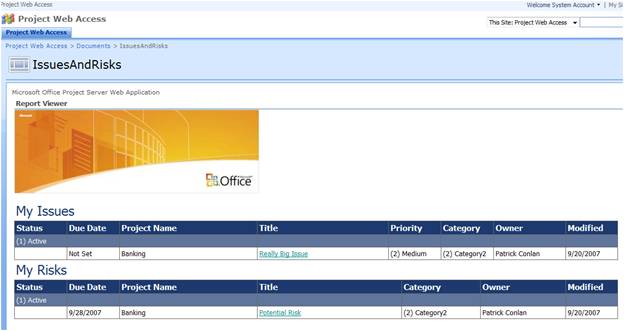
1. Issues and risks are grouped by status (to put Active at the top of each) – a filter could be added to remove items that have been postponed and/or closed if required, this is a trivial change to the reports. Note that if the types of status have been customized this may look slightly different.
2. Within the grouping data is sorted by Due Date and Project Name. If Due data is not set then “Now” is assumed (ie the current date will be used)
3. The Title is set up to be clickable to take the team member to the detailed item form, where the item can then be viewed and/or edited.
4. Dates have had their time element stripped to save space on each row.
5. The report displayed above is actually three reports – the master (that contains the Microsoft Office logo and sub-report objects) and two sub reports.
6. Data is filtered on items assigned to the caller using Reporting Services filtering capabilities – the report has a hidden parameter (a standard Reporting Services feature) that is populated with the callers Windows account, care should be taken to test this in your environment.
7. Further customization could add graphs/additional data to the view.
Patrick Conlan