Creating a PSI Extension
Overview
The Project Server Interface (PSI) is a set of over 20 web services that provide a programming interface for Project Server 2007. The PSI is used by Project Professional, Project Web Access (PWA) and third party applications to communicate with Project Server. For an overview of the PSI, read: PSI Reference Overview.
Even though the PSI is a rich set of web services that provide access to the majority of Project Server data, there are still scenarios where custom extensions to the PSI are required. The PSI provides the ability to extend the PSI with custom web services. This provides the ability to create a web service that tightly integrate with Project Server.
Here are a few scenarios that might make use of a PSI extension:
- A PSI extension that pulls data from the reporting database. This allows for a simple deployment story for third party applications that are deployed outside a firewall from Project Server. They will not have to do direct query to the SQL database. If you create a PSI extension that opens up the reporting database, please make sure you do the appropriate security checks.
- PSI extension and impersonation works easily because the PSI extension will be running in the correct security context.
- Seamless third party integration. If you write an application that extends the functionality of project server with additional functionality, a PSI extension may provide a seamless integration story.
In this article, we will begin by creating a simple "Hello World" web service that is an extension of the PSI and have a client application access the "Hello World" web service. Then we will extend the web service to show how to get the user context information and how to call into existing PSIs from the new web service.
Creating a Simple "Hello World" Web Service in Visual Studio
To begin, we are going to create the "Hello World" web service. This example is written in C# using Visual Studio 2005; Visual Basic .NET provides equivalent functionality and could also be used.
This web service has only one exposed web method, HelloWorld(). All the method does, is return the string "Hello World".
Open Visual Studio 2005
Click File à New Web Site
From the Templates, Select "ASP.NET Web Service" and enter a location:
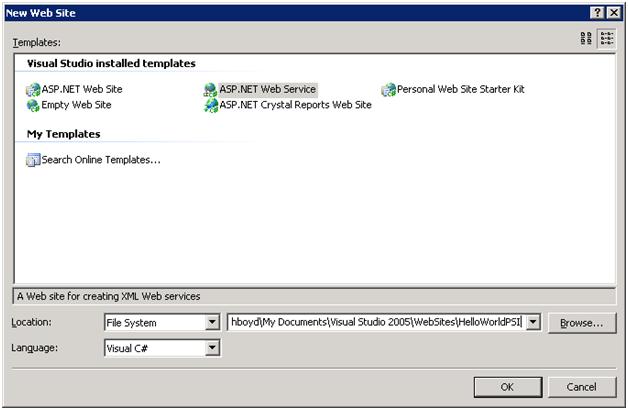
In this example, the location is set to HelloWorldPSI.
Click OK
Next, you are going to want to create a new project within the HelloWorldPSI solution. This class library project is going to be used to contain the Web service logic:
To create the project, right click on the solution name from the Solution Explorer, click Add àNew Project:
From the Templates, Select "Class Library" and give the Class a name:
In this example, the class name is HelloWorldPSI.In the Class Library Project, add the references to System.Web.Services and Microsoft.Office.Project.Server.Library by Right Clicking References à Add Reference in the Solution Explorer:
- System.Web.Services should be found in the list of .Net Assemblies
- Microsoft.Office.Project.Server.Library can be found by browsing to the bin directory in the install directory of Project Server. (C:\Program Files\Microsoft Office Servers\12.0\Bin)
Replace the default Class1.cs file in the project with the Service.cs file that Visual Studio provides in the App_Code folder of the Web Service. To replace the Class1.cs file with the Service.cs file:
- In Solution Explorer, drag Service.cs to the top node in the class library project.
- Delete the Class1.cs file, and also delete the Service.cs file that remains in the App_Code folder.
The Solution Explorer should look like this when you are done:
Open the Services.cs file and Replace:
[WebService(Namespace = "https://tempuri.org/")]
With:
[WebService(Namespace = "https://schemas.microsoft.com/office/project/server/webservices/Service/", Name = "HelloWorldPSI", Description = "Contains the Service web service for Microsoft Project Server.")]
Create a strong name for the class library. In Solution Explorer:
- Right Click the Class Library Project à Properties dialog box
- Click Signing,
- Select Sign the assembly, and select <New> in the box for choosing a strong name key file.
- Provide a file name for the key
- Deselect Protect my key file with a password
- Click OK.
Build only the Class Library Project, Right Click the project in Solution Explorer, and click Build.
Add the assembly to the Global Assembly Cache (GAC), you can either:
- Drag and drop the assembly into the %windows%\assembly directory using 2 instances of Windows Explorer
- Use the command line utility gacutil.exe that is installed with the .NET Framework SDK 2.0.To use gacutil.exe to copy the class library DLL into the GAC:
To open the Visual Studio command prompt, Click Start à All Programsà Microsoft Visual Studio 2005 à Visual Studio Tools à Visual Studio 2005 Command Prompt.
Enter the following command and press ENTER:
gacutile.exe -iF "<Full file system path to DLL>".
Open %windows%\assembly in Windows Explorer
Open the Properties of the assembly by Right Clicking on the assembly and Selecting Properties:
In Visual Studio, open Service by Right Clicking the file in the Solution Explorer and Clicking Open
Remove the CodeBehind attribute from the page directive in Service.asmx, and modify the contents of the Class attribute so that the directive matches the following format:
<%@ WebService Language="C#" Class="Service, HelloWorldPSI, Version=1.0.0.0, Culture=neutral, PublicKeyToken=3f8ef1d5444ca3c9" %>
Rename the Service.asmx to something meaningful. In this example, it will be renamed to HelloWorldPSI.asmx.
Generating and Modifying Static Discovery and WSDL Files
To provide discovery and description for your custom Web service, you must create a .disco and a .wsdl file. Since Windows SharePoint Services virtualizes URLs, you cannot use the auto generated .disco and .wsdl files generated by ASP.NET. Instead, you must create a .disco page and a .wsdl that provides the necessary redirection and maintains virtualization.
You can use ASP.NET to generate the .disco and .wsdl files by hosting your Web service in a virtual directory, such as /SharedServices1/PSI, and then using the .NET Framework Web Service Discovery tool (Disco.exe) to obtain the generated files.
The below steps assume that you have installed project server in the default directory. To generate .disco and .wsdl follow these steps:
In Windows Explorer, copy the .asmx file to C:\Program Files\Microsoft Office Servers\12.0\WebServices\Shared\PSI.
Open the web.config found in: C:\Program Files\Microsoft Office Servers\12.0\WebServices\Shared\PSI.
Add the following below the line <add assembly="Microsoft.Office.Project.Server.WebService, Version=12.0.0.0, Culture=neutral, PublicKeyToken=71e9bce111e9429c" />:
<add assembly="HelloWorldPSI, Version=1.0.0.0, Culture=neutral, PublicKeyToken=3f8ef1d5444ca3c9" />
You will need to change the public key token to match the public key token for your assembly. Your public key token was determined in step 9 in the section "Creating a Web Service in Visual Studio".
Restart IIS by opening a command prompt and entering: iisreset
Run disco.exe in the command prompt:
disco /o:"C:\Program Files\Common Files\Microsoft Shared\Web Server Extensions\12\isapi\PSI" https://localhost:56737/SharedServices1/PSI/HelloWorldPSI.asmx
In Windows Explorer navigate to: C:\Program Files\Common Files\Microsoft Shared\web server extensions\12\ISAPI\PSI
Rename HelloWorldPSI.disco to HelloWorldPSIdisco.aspx
Rename HelloWorldPSI.wsdl to HelloWorldPSIwsdl.aspx
To register namespaces of the Windows SharePoint Services object model, open both HelloWorldPSIdisco.aspx and HelloWorldPSIwsdl.aspx files and replace the opening XML processing instruction <?xml version="1.0" encoding="utf-8"?> with instructions such as the following:
<%@ Page Language="C#" Inherits="System.Web.UI.Page" %> <%@ Assembly Name="Microsoft.SharePoint, Version=12.0.0.0, Culture=neutral, PublicKeyToken=71e9bce111e9429c" %> <%@ Import Namespace="Microsoft.SharePoint.Utilities" %> <%@ Import Namespace="Microsoft.SharePoint" %><% Response.ContentType = "text/xml"; %>
In the HelloWorldPSI.disco file, modify the contract reference and SOAP address tags to be like the following example, which replaces literal paths with code generated paths through use of the Microsoft.SharePoint.Utilities.SPEncode class, and which replaces the method name that is specified in the binding attribute:
<discovery xmlns:xsi="https://www.w3.org/2001/XMLSchema-instance" xmlns:xsd="https://www.w3.org/2001/XMLSchema" xmlns="https://schemas.xmlsoap.org/disco/">
<contractRef ref=<% SPHttpUtility.AddQuote(SPHttpUtility.HtmlEncode(SPWeb.OriginalBaseUrl(Request) + "?wsdl"),Response.Output); %> docRef=<% SPHttpUtility.AddQuote(SPHttpUtility.HtmlEncode(SPWeb.OriginalBaseUrl(Request)),Response.Output); %> xmlns="https://schemas.xmlsoap.org/disco/scl/" />
<soap address=<% SPHttpUtility.AddQuote(SPHttpUtility.HtmlEncode(SPWeb.OriginalBaseUrl(Request)),Response.Output); %> xmlns:q1="https://schemas.microsoft.com/projectserver/soap/Service/" binding="q1:ServiceSoap" xmlns="https://schemas.xmlsoap.org/disco/soap/" />
<soap address=<% SPHttpUtility.AddQuote(SPHttpUtility.HtmlEncode(SPWeb.OriginalBaseUrl(Request)),Response.Output); %> xmlns:q2="https://schemas.microsoft.com/projectserver/soap/Service/" binding="q2:ServiceSoap12" xmlns="https://schemas.xmlsoap.org/disco/soap/" />
</discovery>In the HelloWorldPSI.wsdl file, make the following, similar substitution for the SOAP address:
Replace:
<soap:address location="https://localhost:56737/SharedServices1/PSI/HelloWorldPSI.asmx" />
With:
<soap:address location=<% SPHttpUtility.AddQuote(SPHttpUtility.HtmlEncode(SPWeb.OriginalBaseUrl(Request)),Response.Output); %> />
And Replace:
<soap12:address location="https://localhost:56737/SharedServices1/PSI/HelloWorldPSI.asmx" />
With:
<soap12:address location=<% SPHttpUtility.AddQuote(SPHttpUtility.HtmlEncode(SPWeb.OriginalBaseUrl(Request)),Response.Output); %> />
Restart IIS by opening a command prompt and entering: iisreset
Creating a Client Application
At this point, we have a basic web service that extends the PSI. Now we are going to write a small client application that calls the web service. Open Visual Studio and create a new project:
- File à New Project
- From the Templates, Select "Windows Application"
- Give the Windows Application a name. In this example, we will use "HelloWorldPSIClient"
- Add Web Reference to: https://localhost/pwa/_vti_bin/PSI/HelloWorldPSI.asmx?WSDL and call it WSHelloWorldPSI
- Rename Form.cs to HelloWorld.cs
- Open HelloWorld.cs in Deisgn Mode
- Add a Button Called "Connect to Hello World PSI"
- Copy the following Code:
using System;
using System.Collections.Generic;
using System.ComponentModel;
using System.Data;
using System.Drawing;
using System.Text;
using System.Windows.Forms;
using System.Net;
namespace HelloWorldPSIClient
{
public partial class HelloWorld : Form
{
public HelloWorld()
{
InitializeComponent();
}
private void cmdHelloWorld_Click(object sender, EventArgs e)
{
WSHelloWorldPSI.HelloWorldPSI helloWorldWS
= new HelloWorldPSIClient.WSHelloWorldPSI.HelloWorldPSI();
helloWorldWS.Url = https://localhost/pwa/_vti_bin/psi/HelloWorldPSI.asmx;
helloWorldWS.Credentials = CredentialCache.DefaultCredentials;
string hello = helloWorldWS.HelloWorld();
MessageBox.Show(hello);
}
}
}
If you run the client application and click the button, it should connect to Project Server, get the string "Hello World" and show it in a message box:
Now we have successfully created a web service that extends the PSI and a client application that calls into the web service. The attached file, Sample Code.zip contains PSIExtensionSample1.zip, which has the source code to the web service, the client application, HelloWorldPSI.disco and HelloWorldPSI.wsdl.
Doing More with the Simple Web Service
In the last example we created a simple web service that returned "Hello World". In this example, we are going to extend the "Hello World" web service. Within the HelloWorld() web method, we are going to get the user context and get the user's e-mail address from the Resource PSI.
Starting from the HelloWorldPSI solution:
Add a Reference to System.Web
Add a Web Reference to the Resource PSI: https://localhost/_vti_bin/PSI/Resourcewsdl.aspx and call it WSResource
Open the Service.cs to edit the code
Add using System.Net;to the top of the class file
In the method HelloWorld() Replace:
return "Hello World";
With:
// Get the user context of the calling user
HttpContext context = HttpContext.Current;
string pjAuthHeader = context.Request.Headers["PjAuth"];
PSContextInfo contextInfo = PSContextInfo.DeserializeFromString(pjAuthHeader);
String message = "Hello World\r\n\r\n";
message += "Following user called the Custom Project Server Web Service\r\n";
message += String.Format(System.Globalization.CultureInfo.InvariantCulture,
"UserName = {0}, SiteGuid = {1}, Lcid = {2}\r\n",
contextInfo.UserName, contextInfo.SiteGuid, contextInfo.Lcid);
// Call into the Resource PSI for the user's e-mail address
HelloWorldPSI.WSResource.Resource resWS = new HelloWorldPSI.WSResource.Resource();
resWS.Url = https://localhost/pwa/_vti_bin/psi/Resource.asmx;
resWS.Credentials = CredentialCache.DefaultCredentials;
HelloWorldPSI.WSResource.ResourceDataSet resDS = resWS.ReadResource(contextInfo.UserGuid);
message += "E-Mail Address: " +
resDS.Tables[resDS.Resources.TableName].Rows[0][resDS.Resources.WRES_EMAILColumn.ColumnName].ToString();
return message;
Now we need to deploy the changes:
Build only the Class Library Project, Right Click the project in Solution Explorer, and click Build.
Add the assembly to the Global Assembly Cache (GAC), you can either:
- Drag and drop the assembly into the %windows%\assembly directory using 2 instances of Windows Explorer
- Use the command line utility gacutil.exe that is installed with the .NET Framework SDK 2.0.To use gacutil.exe to copy the class library DLL into the GAC:
To open the Visual Studio command prompt, Click Start à All Programsà Microsoft Visual Studio 2005 à Visual Studio Tools à Visual Studio 2005 Command Prompt.
Enter the following command and press ENTER:
gacutile.exe -iF "<Full file system path to DLL>".
Restart IIS by opening a command prompt and entering: iisreset
Run the Client Application and click the button:
As you can see from the message box, we have successfully got the user context of the calling user and have been able to call into an existing PSI. The attached file, Sample Code.zip contains PSIExtensionSample2.zip, which has the source code to the web service that displays the user context and the resources e-mail address, the client application, HelloWorldPSI.disco and HelloWorldPSI.wsdl.
Best Practices for Project Server Extensions
There are best practices to follow when developing a Microsoft Office Project Server 2007 extension for the PSI:
- Do not modify any Project Server database objects (tables, views, stored procedures, and so on)
- You can read and manipulate Project Server Data by calling into existing PSIs
- You can read Project Server data from the Reporting Database
- Incorporate security into your PSI extensions. Do not return data back to users who should not have access to the data.
- PSIs can throw runtime exceptions in many situations. Make sure all your code is protected with try/catch blocks so that a sensible reply message can be returned to the client.